Mill Motors

Australia & New Zealand Homebrewing Forum

Help Support Australia & New Zealand Homebrewing Forum:

This site may earn a commission from merchant affiliate links, including eBay, Amazon, and others.
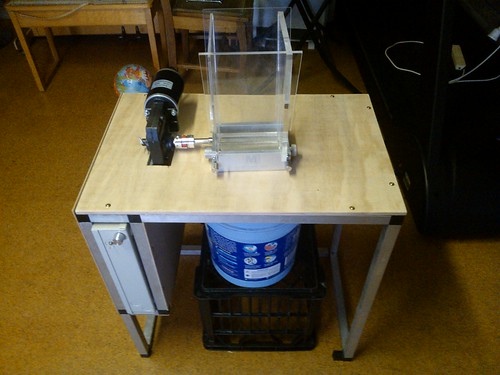
Here is a video of my rig in action..
Sorry about the link, it points to my google+ thingo. I wasn't sure how to move it over to youtube.

The hopper is a modified 9L enamel coated galvo bin from K-mart with a cone cemented into the base (so it's kinda like a grain silo). The bin is removable, but fits snuggly in place on top of the top with the aid of 4x N52 rare earth 2cm diameter x 5mm thick coin-sized magnets. The bin can fit 8kg of grain in it. The power supply for the motor, and PWM controller are in the grey jiffy box mounted underneath. I put a vent on the back to let it breathe as the massive heatsink on the PWM controller made me a little concerned about heat dissipation in a closed box. I made up a faceplate from a 19" Rack face, and mounted a 240VAC IEC socket, two switches (one for mains, one for the PWM/motor), and the pot. I did a dodgy dremel job with the engraving, but you get the idea. :)
It's all very neat, just the way I intended.

The bench is a modified Ikea Bekvam kitchen trolley - but I cut two legs short, and put four braked castors on it.. so it glides around the brewhouse now. I left out the second shelf, and I can put my grain bucket on the bottom one, to catch grain.

Mashmaster minimill - the gears and gap width is still easily adjustable.. and (as you can see in the vid) it uses a lovejoy coupling.

oh... i got the Bekvam second hand because at the time all Ikea's in the country were out of them.. so mine came with a spice rack. Which I left in place.


That's a pretty good build Kieran. Thanks for sharing your design.
I almost have everything now. Just waiting for a sparky to return my power supply that he is modifying.

The only thing that I find a bit of a PITA with the speed controller is, the switch and the speed adjuster knob are located on the actual board. This makes it virtually impossible to neatly mount the board successfully in a cabinet due to the heat sink being a lot higher than the controls and impossible to access when the board is mounted inside a cabinet. However, I am overcoming this problem by removing both from the board and running cable from the board to where they will be fixed to the cabinet so I can adjust speed and use the switch when the cabinet is closed.

Maybe this is something for MD to think about with regards to design?

Nevertheless, I am happy so far even though I am yet to test it.
 
Nice work there Kieran, very neat, and the spice rack will come in handy ;)
 
That's pretty awesome Kieran!

I have to admit, I really enjoy seeing the builds people come up with. Its incredible how creative people are! Seriously... a bin! hahaha! Backyard engineering at its best!

You can encase the entire controller in solid epoxy if you choose to! the big heat-sink is a massive overkill, and you'll find it wont even get hot.

I'm not sure which model you have, because there's been a few, but there's been a lot of changes to both the worm drive motor itself and the controller since I first started selling them. The only thing that's stayed the same since the beginning is the gearbox, the rest has all been overhauled and revamped.

The old version of the worm drive had a 180w motor that was decent and had power, but was not super efficient. The new one has a 200w motor with a much higher efficiency (83% vs 70%) and its a much better motor too, its a full bearing unit which runs quieter and smoother.


"The only thing that I find a bit of a PITA with the speed controller is, the switch and the speed adjuster knob are located on the actual board"

You must have an early one, the new ones have edge connectors on the pot connection so you can make up a lead and just simply screw the wires into the pcb terminal block. After reading this though, I think I'll make all the homebrewer units with connectors for both the switch AND the pot!

With the next version of the controller I'll probably add the option for an adjustable current limit (optional because it will add to the overall cost!), but, if you hit that elusive rock, the unit will simply shut down until you reset it, instead of destroying the gearbox, mill or your house as the motor goes on a rampage mashing all it see's. And as a bonus, you wouldn't need any expensive clutched couplings either!


You live and learn, not being a brewer myself, it's not always easy to understand all the different ways that people can use these but without these constructive comments things would never improve!
I hope in the near future I can find some more cost savings and drop the price even further!

But if you want just the motor for $99, all you have to do is use the AHB code in the coupon code at the checkout
 
Hey guys,

Recently having bought a MD worm drive motor and controller for my minimill i have to say i love it.
Should have done it sooner. Slides straight onto the shaft, just put a roll pin into secure.

Highly recommended!
 
"The only thing that I find a bit of a PITA with the speed controller is, the switch and the speed adjuster knob are located on the actual board"

You must have an early one, the new ones have edge connectors on the pot connection so you can make up a lead and just simply screw the wires into the pcb terminal block. After reading this though, I think I'll make all the homebrewer units with connectors for both the switch AND the pot!

With the next version of the controller I'll probably add the option for an adjustable current limit (optional because it will add to the overall cost!), but, if you hit that elusive rock, the unit will simply shut down until you reset it, instead of destroying the gearbox, mill or your house as the motor goes on a rampage mashing all it see's. And as a bonus, you wouldn't need any expensive clutched couplings either!


You live and learn, not being a brewer myself, it's not always easy to understand all the different ways that people can use these but without these constructive comments things would never improve!
I hope in the near future I can find some more cost savings and drop the price even further!

But if you want just the motor for $99, all you have to do is use the AHB code in the coupon code at the checkout

It couldn't be that old surely???.... if it is then I'm really not that impressed receiving old stock when I only purchased this a matter of 2-3 weeks ago.....

I wish I knew about the AHB code I think I paid $149 for both motor and controller yet I now see it on the site for $139 :unsure:
 
Hey guys,

Recently having bought a MD worm drive motor and controller for my minimill i have to say i love it.
Should have done it sooner. Slides straight onto the shaft, just put a roll pin into secure.

Highly recommended!

I dont know how you "just slide it straight onto the shaft". The mill shaft is 1/2" and the mill takes 12mm. 1/2" is 12.7mm. I would have though you'd need a coupler.
 
With the next version of the controller I'll probably add the option for an adjustable current limit (optional because it will add to the overall cost!), but, if you hit that elusive rock, the unit will simply shut down until you reset it, instead of destroying the gearbox, mill or your house as the motor goes on a rampage mashing all it see's. And as a bonus, you wouldn't need any expensive clutched couplings either!

Please let us know when you have this option up and running, will probably hang on with my purchase until then.
 
Hey MotionDynamics
- you might have a few sales of a scaled-down version of your PWM controller if you could push it out for ~$25 for people to make 'stir plates' with..

I'm looking at making one now on breadboard and the parts will cost me about $10 using a 555 timer. It only needs to handle <0.5A @ 12V.
 
new hopper for my MD motor driving minimill

hopper.jpg


photo.JPG
 
:eek: :eek: :eek: Awesome hopper Matt.

You wouldn't happen to have the plans / dimensions handy so I can get someone to fabricate that for my MiniMill.


I can get some measurements during the week mate, i cant take all the credit i have a very handy neighbour who loves beer and tinkering with steel. We gave it a run last nite but the battery died and we couldnt get all the grain milled. Bought a 20a power supply today and it works a treat. Ill get some more pics of the mill and motor mounted up for ya also.

Best thing is it just slips into the bench i can remove hopper once grain is milled.

Sweet.
Cheers
 
Kieren Stir plates? Also, I wouldn't sell it for $25 if it was that simple. Maybe $11-13

The controller can be cut down obviously, but doesn't it feel good to have quality ?
If i remove a lot of the features I can put together a basic pwm, though I don't think I'd be inclined to use a 555. I've heard they can speeds vary depending on the temp.

I was actually thinking (when its finished) of offering this controller as an added option with the AHB setup for those lazy people or those that like bling! How cool would this be to show off? PIMP MY MILL!


Amber Fluid
I change the design all the time. If I can do something better I will. The original AHB units had a different controller which was nowhere near as good as the newer ones and they were more expensive too.
If someone can think of a better way to do things though, I'll always try and implement them. On top of that, I'm always trying to find ways to do things cheaper and pass along any savings I can scrounge.

How many companies will do that? Last time I checked, prices were going up everywhere :(

If I can build something to benefit you guys, I will. If you want anything, you only have to ask and I will get my engineers to find whatever it is you need. I'm good to my word, if I say I'll do something, I will.
Sometimes it just takes me a while, that's all!

Some great builds in here!
 
Last edited by a moderator:
Almost finished my Mill setup last weekend. Just need to give it a lick of paint now then all set to rumble!... although I will eventually make a bigger hopper.

8018280335_781fe63a1f.jpg


Here is a link to it in operation albeit, was taken on my mobile and the first run of grain will go through her next weekend after I paint it.

Stupid me, cut the holes in the top before mounting the top. Therefore, when I lined it all up it was out about 2-3mm as you can see on the left side. lol nothing a bit of filler won't fix though.
 
So after winning a MillMaster MiniMill back in February I have finally got around to getting it going (don't ask) with the help of a mate with the welding skills with a worm drive.
For those interested you can see more photos and a video in my blog entry, otherwise here's a quick pic.

Thanks to everyone here inc MD as it wouldn't have turned out this way otherwise.

20121008_wiseman_270.jpg
 
Hi Matt,

I have just been playing around with my Marga to see if I can motorise it. We have burnt out 2 drills grinding grain, and I can't be bothered sitting there during the grinding process, so I thought I'd tinker.

I have a wiper motor and window winder motor, both of which have a lot of torque and were picked up on the cheap from a wreckers. Additionally, they are 12V so I can play around with the wiring myself. I also got one of these off ebay for the connection between the two shafts. So far, I've put it together and graound a few handfulls of grain, but there's a few obstacles that I need to overcome...

  • I need a 12V power supply that can deliver somewhere around 5-7A, as I understand that wiper motors can draw that much under load
  • I need a way to anchor the wiper motor to the mill bench (they are ugly and unwieldy
  • I need to somehow attach the spider coupling to the motor - it doesn't really have a shaft, just a protruding 8mm thread

So long story short, yes you can motorise these but, as you've pointed out, it's not practical to spend more than the mill itself, which is why I looked into using a wiper motor. I also have an electric meat grinder that has a lot of torque - might also look into adapting that somehow if the wiper motor doesn't work out.
G'day. How has the wiper motor turned out? I've been trying to get a bread machine motor to run my marga with no success yet, the the belt & pulley from the bread machine just slips and the motor might be a bit quick to run it without down-gearing of some kind. I'll might still persevere but just interested to find out if your idea worked and if so how you did it...
 
yeah I'd be keen to know as well 'cause I have an XD wiper motor sitting here with a 30A 12V power supply. if you've got it to work then I may go that route.
 

Latest posts

Back
Top