Show us your brewrig

Australia & New Zealand Homebrewing Forum

Help Support Australia & New Zealand Homebrewing Forum:

This site may earn a commission from merchant affiliate links, including eBay, Amazon, and others.
From this:
nochill.jpg
Thats a pretty sexy looking mash tun there in the before pic bud. Is that latex or PVC?, I'm getting doughy.

The foil version in your second build is a bit too 2001 and is just not doin it for me.
 
Decided to add some insulation to the mash tun and HLT. 2 windshield screens with a yoga mat in the middle for each kept on with a strap from bunnings. Can be removed for cleaning. Hope that keeps a decent temp. Probably do the same thing on the kettle once i convert it to electric with 2 x 2200w elements.

Slotted frame built from the stuff available at bunnings. Less than $100 all up, including the castors, which make it easy to slot away next to the mower. Got the rambo underslung to the kettle... gets to boil before i've finished draining the MT.

Double batches are a breeze with the 80L kettle, could push out triples with a bit of care. Each keggel has a $12 tempered glass lid bought from target. At the moment i have the electric 2200w HLT on top of the fridge and the MT with SS perf false bottom on a milk crate for a gravity system. Will be getting one of those brown pumps from ebay just for hot water and wort transfer, but keep gravity draining to cube. Although, i like the simplicity of gravity, so not sure if i'll enjoy having the pump or not. All fittings are SS, transfer tuebs are silicon... no copper or brass anywhere... which i'm quite happy about. Might get some camlocks when i get the pump.

Also had to include the BigW 19L as it's a great multi purpose vessel in the brewhouse... no lid as i smashed it

SDC16820_2.jpg
 
Although no-one ever feels like their rig is finished, I guess it might be time for me to post some piccies. ;)

As a little bit of background, my aim has been to produce a rig that provides as much functionality as possible but spending as little as possible. At the moment I estimate that I have spent around $300.

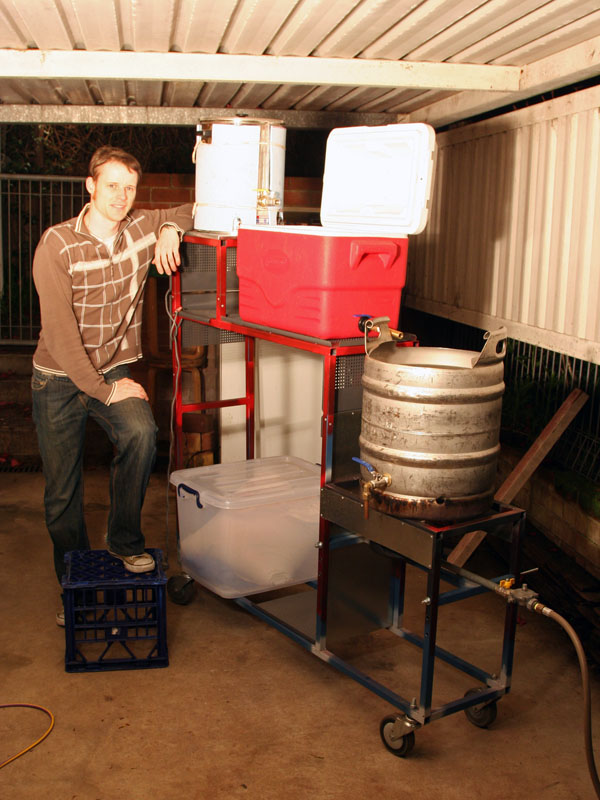
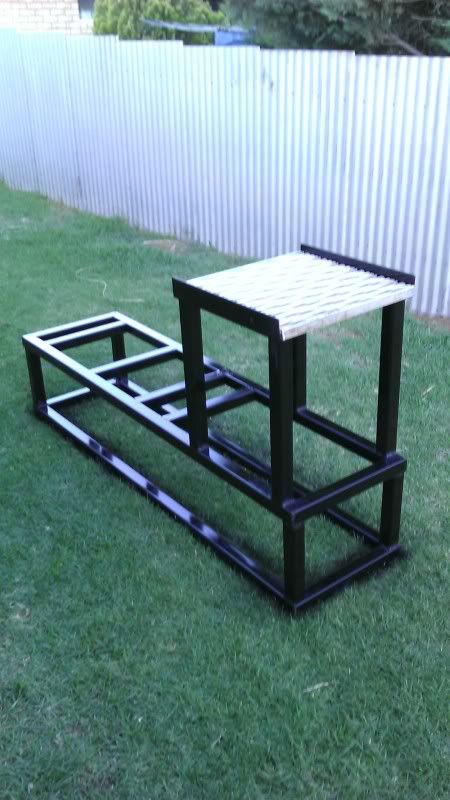
Here's my gravity feed 3-tier, in this case set up for hot-cubing (which these days I tend not to do). It breaks into three pieces and, believe it or not, you can fit the entire rig into a Honda Civic.
img_2740_sml.jpg


Working from one end to the other...

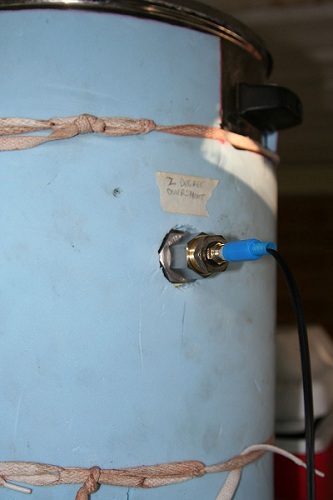
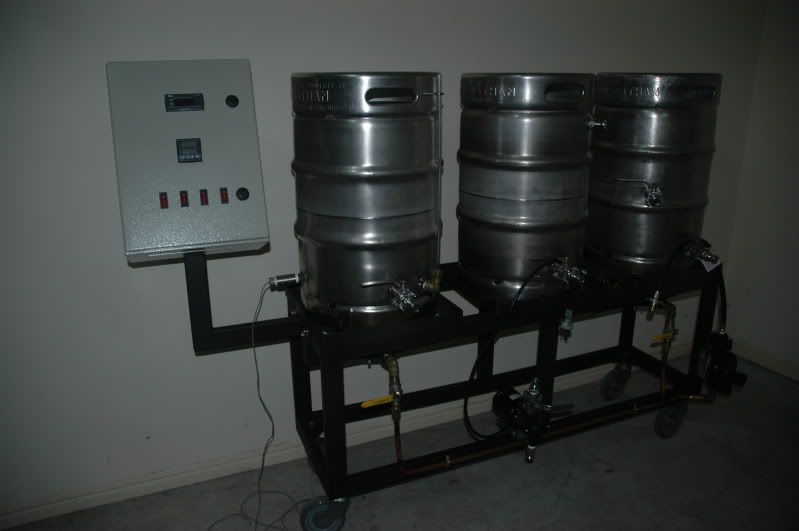
My HLT is a standard conference-room boiler (20L). I got mine for free - it came from a hospital and I was told that boilers that don't have clamping lids now don't meet OH&S standards and they are valueless. Well, for them perhaps! My HLT has a thermowell, and is temp controlled by an STC-1000. It also has the crappy low-flow tap removed and replaced with a ball valve (this ~$12 upgrade I highly recommend).

img_2929vsml.jpg


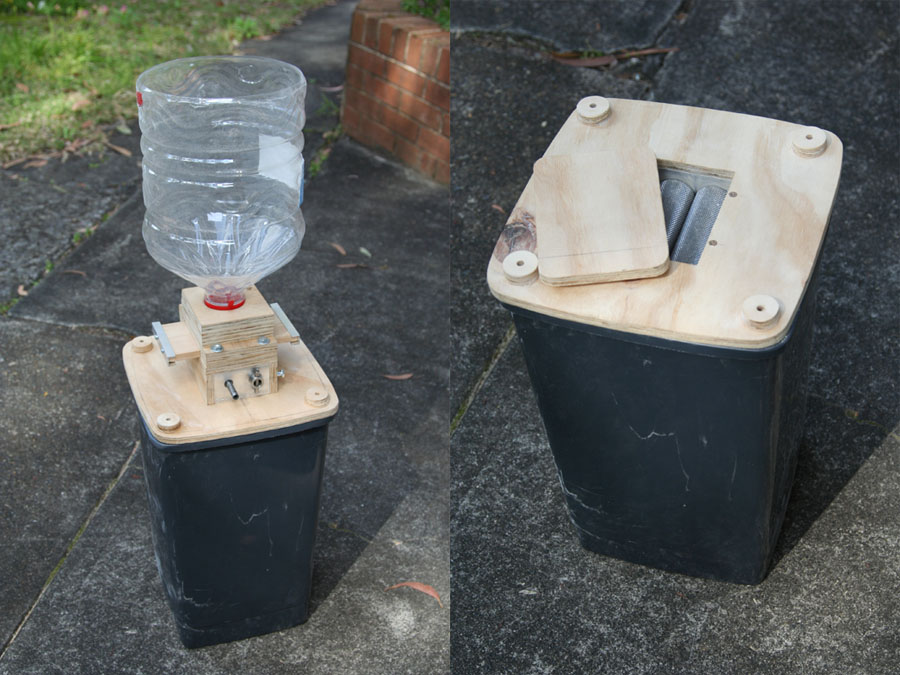
Next is the mill. Its a Crankandstein 2D. I built the hopper out of laminations of ply and a watercooler bottle free from officeworks. The ply laminations are designed to all use the same width, so you simply rip a plank on the circular saw and then build up the height with appropriately trimmed pieces. It also has a flow-control slider. The whole thing inverts and lives inside the base bin.

montage.jpg


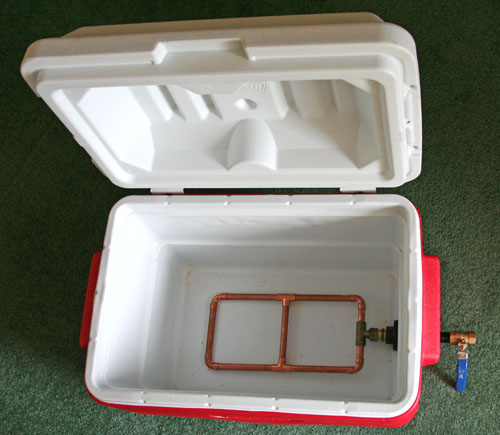
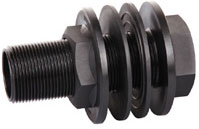
Next is the mash tun. It's a secondhand esky with a standard copper manifold. Mine didn't come with a drain hole so I needed to drill through the wall. After talking with the boys in Gainforts, I used a device called a 'tank bulkhead' ($8). It's made from glass reinforced nylon and is perfect for the job. (Although I did grind one side flat so it would sit closer to the bottom)

img_2650_sml.jpg

tank-inlet-threaded-bulkhead.jpg


My keggle is a pretty bog-standard affair. I either use a spout that is lower than the pickup tube to create a siphon flow for hot cubing, or I connect the CFC with braided hose. The keggle is heated with a 23-jet NG mongolian.

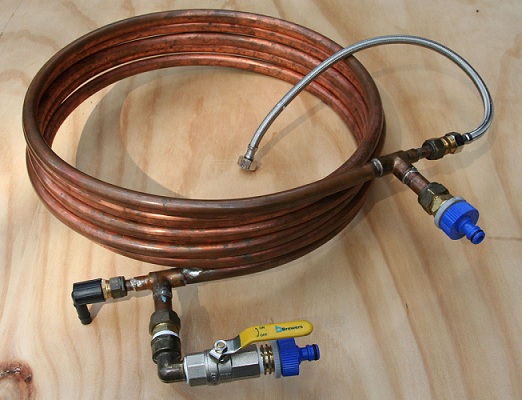
The CFC is next. It has a ball valve on the water side to allow me to regulate the temperature hitting the fermenter.

img_2924_vsml.jpg


And lastly the fridge is nothing special - another STC-1000 controlling the fridge and a heater pad thrown in the bottom of it.

All of this - especially the wheelable brew frame and temp controller on the HLT - has taken the fatigue and heart-ache out of brewing. I encourage everyone that is still brewing on a stack of milkcrates and collection of rickety tables or chairs to take the next step!
 
Although no-one ever feels like their rig is finished, I guess it might be time for me to post some piccies. ;)

img_2740_sml.jpg

Well done voodoobrew. Nice nick by the way.
Whats the piece of timber between the fram and the wall (cyclone fence or something?)
Or is it not touching the frame, but really on the ground, creating the illusion its keeping the rig awat from the wall?
 
Whats the piece of timber between the fram and the wall (cyclone fence or something?)
Or is it not touching the frame, but really on the ground, creating the illusion its keeping the rig awat from the wall?
That plank of wood is actually just leaning against the fence. I lay it down on the ground as a chock to stop the frame rolling away (the ground slopes a little), as I don't have fancy lockable castors! ;)
 
Public Holiday here in WA today, and I'm on call, so no booze for me. So I knocked this up at work today while there was no one there to disturb me.

Castors and burner going on soon, Just waiting on my march pump, and plate chiller to rock up so I can mount them too :)

IMAG0086.jpg


Mitch :D
 
Some nice rigs. Here is one for people that have no welding skills like me. Its not finished (prob never will be) but hoping to put down 42lts in it this weekend. I am going to put tiles ontop and need to do some more plumbing for the gas so I can run 2 burners at the same time, also need to do some electrical work but can use it without it done. I am going to get a frame welded up tomorrow for the 3 ring burner.

IMG_12401.JPG
 
Well, it's been a long time getting here but this is my rig so far.

3 x 50lt keggles, beerbelly liquor return dish, 2 x 23 jet mongolian burners. I am recirculating through a 1.5" stainless Rims tube that houses a 2400 watt element.

DSC_0207.jpg
 
Well, it's been a long time getting here but this is my rig so far.

3 x 50lt keggles, beerbelly liquor return dish, 2 x 23 jet mongolian burners. I am recirculating through a 1.5" stainless Rims tube that houses a 2400 watt element.

DSC_0207.jpg


FINALLY the image downloaded!! :p

Crusty, its a pin head pic.. you got bigger?


What I can see looks great btw...
 
Nothing Fancy but she gets the job done.
Looking to build a compact brew stand, as well as get the kettle + Tun insulated and get a thermo and ball valve for the kettle.

IMAG0105.jpg
 
Hey there brewers, im back in the game...

havent brewed since early 2010, so i built a new brewery and im back into it!

heres the old rig...
med_gallery_10325_462_142078.jpg


img0017ft.jpg


heres the new setup...
img0031zg.jpg


img0173sq.jpg


img0183vq.jpg


img0184rc.jpg


img0185ja.jpg


And for all the berd nerds...


Its a 4v with a HLT, Mash Tun, HeatX and Kettle

Run by a BCS462

2 March Pumps

6 Motorised Ball valves

Solonoid controlled 23 Jet Mongolian Burners LPG

Whirlpool immersion chiller

the valve under the blue control box is for tap water


Its not quite what i had in mind when i started, but i ran out of cash....but as a proof of concept im pretty happy, now that i have some money again, i will start again and finish what i started.

thanks for looking
 
after some time (years, i think?) i have installed valves in my brewery...no more siphoning really hot stuff

syphons got real old real quick, especially after i added the HX - from kettle to pump to HX, find a milk crate, get a clamp, fk thats hot...etc

the strips of styrene are to reduce the amount of water so it heats up faster or something

Image0580__1_.jpg Image0578__1_.jpg

even made a hidey-hole for the pump, and removed the pot lid handle and replaced with a luverly timber shelf for the box of death

Image0584__1_.jpg Image0585__1_.jpg

then i used it! 80L of BIAB coopers mid, 10 minutes into the boil. topped up to 90L and just failed to fill 4 cubes...grrr fkn uncalibrated cubes
Image0583__1_.jpg

does there exist a hall of shame? i think my rig belongs there
 
Here's my rig,

Been brewing on this baby now for 3 years and its never let me down...

Thinking of a hermes project next, we'll see if i can give this up?

2011_10_31_19.33.13.jpg

2011_10_31_19.32.21.jpg

2011_10_31_19.33.50.jpg

Thinking I might put on a brew this weekend...
 
Hey all .. I thought it was about time I showed you all my rig ... and then my upgrade to a better version of 3 V ... although definitely a work in progress .. still much to do to it but am hoping to crack out ANZAC days beer int he upgraded version .. I am really looking forward to smashing out some big volume beers in the new set up and using the old system for trial batches ..

System 1 is a 20l Crown urn (HLT) , 55lt Coleman esky (Mashing Tun) and a 40l S/S stock pot with 2200w Keg king hotsticks.

System 2 will be a 70l (I think) HLT 1 x 2200w hotstick, 100l Tun Kegking False bottom with recirculating wort via March pump and copper coil in 10l stockpot) and a 100l Keggle with 2 x 2200w hotsticks, hopsock and a hybrid chiller housed in a 6 inch PVC pipe flowing straight into 1 of 3 60l fermenters.

Now I am not gloating but I am fortunate enough to have a cellar where I live which obviously is now empty after living in the house for 12 months :icon_drunk: (although I must say it is a sweet addition to the house - I don't know how I have lived without one before ;-) ) anyway so I am planning on using it to hold my full kegs which don't fit into my fridges ( 2 beer fridges and a fermenting fridge) ..

It is all electric as the area / brewery is a bit confined and I was concerned about the build up / possible build up of fumes .. I do have an exhaust system planned and have a second hand but new range hood extractor to install. The brewery will be plumbed with hot and cold water taps to reduce the need to walk back and forth to the laundry to get Hot or Cold water ..

I am pretty happy with the set up but will continue to add to it ... It certainly is the most addictive hobby I have ever had..

Cheers


Matt

IMG_0448.jpg


IMG_0449.JPG
 
Back
Top