


DJ_L3ThAL
Such rapp, very bass
- Joined
- 11/5/10
- Messages
- 3,213
- Reaction score
- 1,461
**Update 26th May 2023 - Have added some items into the setup and changed price accordingly.
Hi All,
Following on from my mash tun going up for sale (https://aussiehomebrewer.com/threads/melb-65l-ss-insulated-mash-tun.104495/), my whole system upgrade has gotten wheels faster than I planned, so I will now offer up all the 3V pots for sale. It is just the pots and frame, I will be removing the control panel and associated wiring/sensors.
What's included (summary):
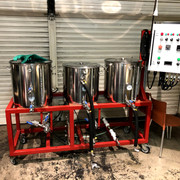
1x 90L SS HLT w/ 3-piece ball valve and pickup tube (near zero dead space). Thermowell and large temperature gauge. Already has a hole to take 1x electric element (or see below to keep element as added option).
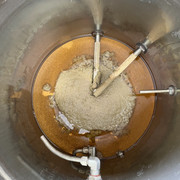
1x 65L SS Insulated Mash Tun w/ 3-piece ball valves with integrated sight glasses, grainstopper false bottom, custom 3/4" pickup tube (plus spare 1/2" version) and silicone tube for a recirc ring/sparge setup etc.
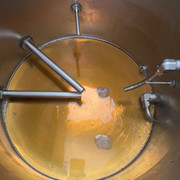
1x 90L SS Kettle w/ 3-piece sight glass ball valve on drain w/pickup tube (near zero dead space) and 3-piece ball valve on adjustable whirlpool setup. Thermowell and large temperature gauge. Already has 2x holes for 2x electric elements (or see below to keep elements as added option).
Steel frame (painted red) - 50x50x2mm SHS steel all fully welded, with upright for RIMS/HERMS mount, custom pump mounting plates so you can easily flip the pumps for free-draining after a brew day (NEVER have to disassemble a pump head again as you can clean in place!), silicone anti-slip on the top for the pots to sit on, upright for control panel mounting (TV bracket and control panel not included) and 4x braked heavy duty wheels.
Approx dimensions 1800x600mm (Width x Depth)
Fittings etc - Included are the camlock fittings for silicone tubing (I will be re-purposing my tubing as it is cut to length for my brew frame). So you just need to cut some 1/2" silicone tubing to your desired length. Fittings are a female camlock to 90 degree elbow to a BSP thread to hose barb. There is enough to make 7x hoses up inc. a single hose for cube transfer.
I can probably sweeten the deal with some pumps if someone takes it soon (plastic head though, the SS ones pictured as I am re-purposing those).
Price $1450
Optional A (Heating elements) +$350 - HLT has 1x3600W (15A) heating element with a 2" Triclamp element/wiring guard. Kettle has 1x3600W (15A) & 1x2400W (10A) heating element with 2" Triclamp element/wiring guard. ELements are 5-star Distilling brand (high quality).
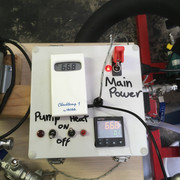
Optional B (Mash/Element Controller and pump switch) $100 - I have a PID controller (photo below) that can control a single 10A electric element on a PID and also a pump switch using conventional IEC plugs (ie. like your computer and PC monitor power cables).
The detail:
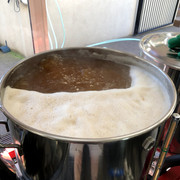
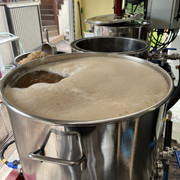
I have pushed out many many triple batches (ie. 6x 11L cubes) on this system. It makes very clear wort. It's possible to even make singles on this but I tend to either do doubles or triples as I have a 20L brau for singles.
90L SS HLT
It is a custom made double pot, so one Stainless Steel (SS) pot inside another SS pot, the space between the walls is filled with insulating foam and the top rim sealed with engineering grade sealant. The lid is two lids sealed together as well with foam/adhesive, you'd never know other than it feeling like a thick insulated lid, it sits snug on top like a charm. It's a very sturdy unit, you can single person lift when empty, I typically scooped out grain after the mash, then took it to my big sink, tipped on its side and hose out by myself. This always got a PBW soak/recirc after every brew day.
False bottom is a Cheeky Peak Grainstopper which has been cut to size (fits nice and snug, was recently replaced under warranty due to the handle corroding (see thread here aussiecraftbrewing.com.au/thread/346/ss-false-bottom-corrosion). New one is perfect and being my second go was a much neater cut, I used to use a silicone seal around the older one, but this newer one is cut so nice you wouldn't even fit a seal in between the false bottom and pot wall!!
Pickup is a custom 3/4" tube on a camlock for easy removal/cleaning with 30mm BSP elbows on the end, this greatly improves pump suction and reduces velocity at the bottom, preventing stuck mashes. I have never had any recirc or sparging issues since changing to the Grainstopper type false bottom with this pickup. I also have an older 1/2" SS tube pickup that I originally used but found it reduced pump performance, but it still did not stick any recircs/sparges. I will include it anyway because it was custom made for this so they belong together and is an option. Otherwise if you have 1/2" BSP inside a kettle or HLT you could use this as a whirlpool arm...
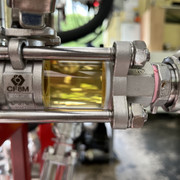
Valves are high grade Prochem 3-piece SS ball valves, both with integrated Cheeky Peak sight glasses, so you can monitor what is coming out of your mash at the bottom and stop/recitfy any issues with chunks of grain, air pockets etc. But also monitor the nice clear wort returning to the top at standing height. Probably overkill but hey, it's installed like this and ready to go. Both have 1/2" SS male camlocks for easy connection to most peoples brew systems.
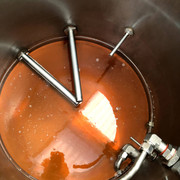
Has an integrated Mashmaster temperature dial (large one that is easy to read) for measuring the middle of the mash bed. Because of this you could use this as a single infusion tun if you do not have RIMS or HERMS. Or purchase this as an upgrade to an esky mash tun with a plan to later add RIMS or HERMS, or use as is for infusion")
Finally the mash recirculation return is a 1/2" SS male camlock, I had this to some silicone tubing connected to the SS Brewtech sparge/recirculation ring/manifold, however this worked so well I am keeping it for my new SS Brewtech Infussion tun and can highly recommend purchasing one for this. I can however include the female camlock and length of silicone tubing for this so you can either use just the tubing or add the manifold or a custom made manifold etc. But the SS Brewtech manifold is NOT included, only shown in the photos for reference.
Total volume (brim capacity): 65 Litres
Dimensions: 570H (inc. lid) x 510W (Excl. handles/valves) or 640 (Incl. valves)
Some photos of the unit along with some brew day action shots to show the nice clear wort it can produce. This will serve you well
90L SS Boil Kettle
Valves are all Prochem high quality ball valves, most fittings are from Prochem too so high quality BSP fittings. The tube compression fittings are Swagelok (ie. the best quality compression fitting money can buy).
System is leak-free. I am happy to fill these to the brim for inspection if you would like to see them holding full volume or have a demo etc. Obviously before I remove the elements so please get in fast if you want to take me up on that as when my new kettle and HLT arrive I will need to remove the elements.
Some pictures of various brew days and wort quality below...
Please ask any questions!
Hi All,
Following on from my mash tun going up for sale (https://aussiehomebrewer.com/threads/melb-65l-ss-insulated-mash-tun.104495/), my whole system upgrade has gotten wheels faster than I planned, so I will now offer up all the 3V pots for sale. It is just the pots and frame, I will be removing the control panel and associated wiring/sensors.
What's included (summary):
1x 90L SS HLT w/ 3-piece ball valve and pickup tube (near zero dead space). Thermowell and large temperature gauge. Already has a hole to take 1x electric element (or see below to keep element as added option).
1x 65L SS Insulated Mash Tun w/ 3-piece ball valves with integrated sight glasses, grainstopper false bottom, custom 3/4" pickup tube (plus spare 1/2" version) and silicone tube for a recirc ring/sparge setup etc.
1x 90L SS Kettle w/ 3-piece sight glass ball valve on drain w/pickup tube (near zero dead space) and 3-piece ball valve on adjustable whirlpool setup. Thermowell and large temperature gauge. Already has 2x holes for 2x electric elements (or see below to keep elements as added option).
Steel frame (painted red) - 50x50x2mm SHS steel all fully welded, with upright for RIMS/HERMS mount, custom pump mounting plates so you can easily flip the pumps for free-draining after a brew day (NEVER have to disassemble a pump head again as you can clean in place!), silicone anti-slip on the top for the pots to sit on, upright for control panel mounting (TV bracket and control panel not included) and 4x braked heavy duty wheels.
Approx dimensions 1800x600mm (Width x Depth)
Fittings etc - Included are the camlock fittings for silicone tubing (I will be re-purposing my tubing as it is cut to length for my brew frame). So you just need to cut some 1/2" silicone tubing to your desired length. Fittings are a female camlock to 90 degree elbow to a BSP thread to hose barb. There is enough to make 7x hoses up inc. a single hose for cube transfer.
I can probably sweeten the deal with some pumps if someone takes it soon (plastic head though, the SS ones pictured as I am re-purposing those).
Price $1450
Optional A (Heating elements) +$350 - HLT has 1x3600W (15A) heating element with a 2" Triclamp element/wiring guard. Kettle has 1x3600W (15A) & 1x2400W (10A) heating element with 2" Triclamp element/wiring guard. ELements are 5-star Distilling brand (high quality).
Optional B (Mash/Element Controller and pump switch) $100 - I have a PID controller (photo below) that can control a single 10A electric element on a PID and also a pump switch using conventional IEC plugs (ie. like your computer and PC monitor power cables).
The detail:
I have pushed out many many triple batches (ie. 6x 11L cubes) on this system. It makes very clear wort. It's possible to even make singles on this but I tend to either do doubles or triples as I have a 20L brau for singles.
90L SS HLT
- Same pot essentially as the Kettle.
- Single element hole.
- Thermowell.
- Temperature gauge.
- Sight glass (marked at 5L increments).
- Top hole cut for 1/2" BSP which is plugged as it initially had a "water fill" port there which I remove to simplify (I fill from the drain ball valve at the bottom).
- Lid.
It is a custom made double pot, so one Stainless Steel (SS) pot inside another SS pot, the space between the walls is filled with insulating foam and the top rim sealed with engineering grade sealant. The lid is two lids sealed together as well with foam/adhesive, you'd never know other than it feeling like a thick insulated lid, it sits snug on top like a charm. It's a very sturdy unit, you can single person lift when empty, I typically scooped out grain after the mash, then took it to my big sink, tipped on its side and hose out by myself. This always got a PBW soak/recirc after every brew day.
False bottom is a Cheeky Peak Grainstopper which has been cut to size (fits nice and snug, was recently replaced under warranty due to the handle corroding (see thread here aussiecraftbrewing.com.au/thread/346/ss-false-bottom-corrosion). New one is perfect and being my second go was a much neater cut, I used to use a silicone seal around the older one, but this newer one is cut so nice you wouldn't even fit a seal in between the false bottom and pot wall!!
Pickup is a custom 3/4" tube on a camlock for easy removal/cleaning with 30mm BSP elbows on the end, this greatly improves pump suction and reduces velocity at the bottom, preventing stuck mashes. I have never had any recirc or sparging issues since changing to the Grainstopper type false bottom with this pickup. I also have an older 1/2" SS tube pickup that I originally used but found it reduced pump performance, but it still did not stick any recircs/sparges. I will include it anyway because it was custom made for this so they belong together and is an option. Otherwise if you have 1/2" BSP inside a kettle or HLT you could use this as a whirlpool arm...
Valves are high grade Prochem 3-piece SS ball valves, both with integrated Cheeky Peak sight glasses, so you can monitor what is coming out of your mash at the bottom and stop/recitfy any issues with chunks of grain, air pockets etc. But also monitor the nice clear wort returning to the top at standing height. Probably overkill but hey, it's installed like this and ready to go. Both have 1/2" SS male camlocks for easy connection to most peoples brew systems.
Has an integrated Mashmaster temperature dial (large one that is easy to read) for measuring the middle of the mash bed. Because of this you could use this as a single infusion tun if you do not have RIMS or HERMS. Or purchase this as an upgrade to an esky mash tun with a plan to later add RIMS or HERMS, or use as is for infusion
Finally the mash recirculation return is a 1/2" SS male camlock, I had this to some silicone tubing connected to the SS Brewtech sparge/recirculation ring/manifold, however this worked so well I am keeping it for my new SS Brewtech Infussion tun and can highly recommend purchasing one for this. I can however include the female camlock and length of silicone tubing for this so you can either use just the tubing or add the manifold or a custom made manifold etc. But the SS Brewtech manifold is NOT included, only shown in the photos for reference.
Total volume (brim capacity): 65 Litres
Dimensions: 570H (inc. lid) x 510W (Excl. handles/valves) or 640 (Incl. valves)
Some photos of the unit along with some brew day action shots to show the nice clear wort it can produce. This will serve you well
90L SS Boil Kettle
- Same pot essentially as the HLT.
- Double element holes.
- Bottom drain valve is sight glass 3-piece ball valve, which makes for great monitoring of mash draining into kettle and also cube filling or sending to a chiller (can see the clarity of what is coming out, flow rate etc whilst leaving the lid on.
- Whirlpool port has a 3-piece SS ball valve and the internal tube is adjustable, when you turn it it's pressing on a silicone o-ring which will hold the tube at any position. I typically adjusted this to the desired height based on my expected pre-boil volume (can position itself for singles, doubles or triples).
- Thermowell.
- Temperature gauge.
- Sight glass (marked at 10L increments).
- Top hole cut for 1/2" BSP which is plugged as it initially had a "water fill" port there which I remove to simplify (I fill from the drain ball valve at the bottom).
- Lid.
Valves are all Prochem high quality ball valves, most fittings are from Prochem too so high quality BSP fittings. The tube compression fittings are Swagelok (ie. the best quality compression fitting money can buy).
System is leak-free. I am happy to fill these to the brim for inspection if you would like to see them holding full volume or have a demo etc. Obviously before I remove the elements so please get in fast if you want to take me up on that as when my new kettle and HLT arrive I will need to remove the elements.
Some pictures of various brew days and wort quality below...
Please ask any questions!
Last edited:
