Dedicated Herms Guide, Problems And Solution Thread

Australia & New Zealand Homebrewing Forum

Help Support Australia & New Zealand Homebrewing Forum:

This site may earn a commission from merchant affiliate links, including eBay, Amazon, and others.
Ha.. yeah cheers, today was a piece of piss.. the 6 months of research, building and tweaking was a curve though :)
 
All my Ebay bits have arrived so it's time to start the tedious process of putting together the control box for the new brewery-setup.

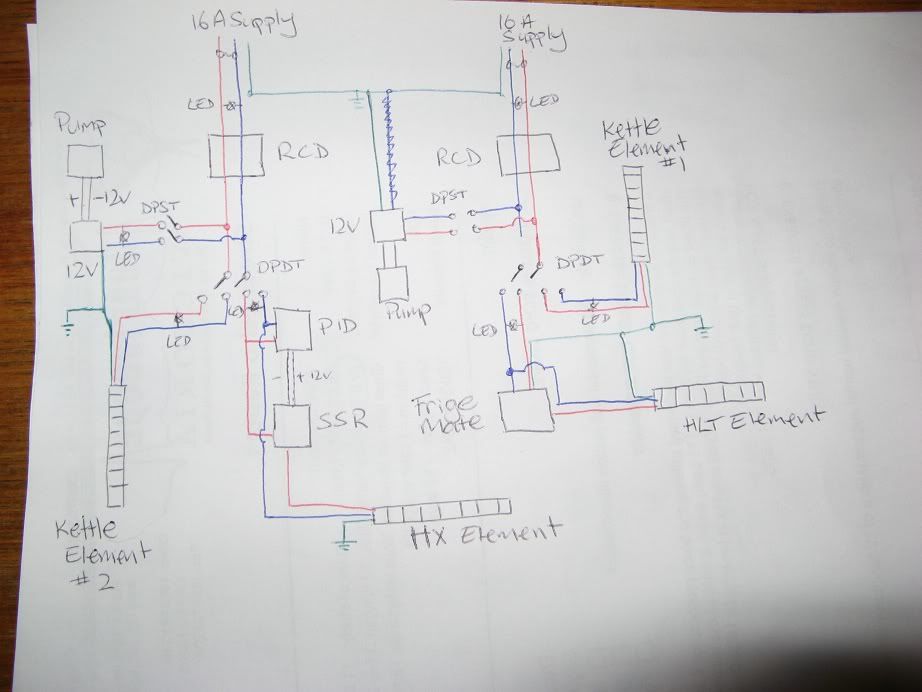
Circuit diagram currently looks like this:
electrical_3a.jpg


Unless there is something major wrong with the diagram above, the only remaining question is how to plug the temperature probe into the PID?
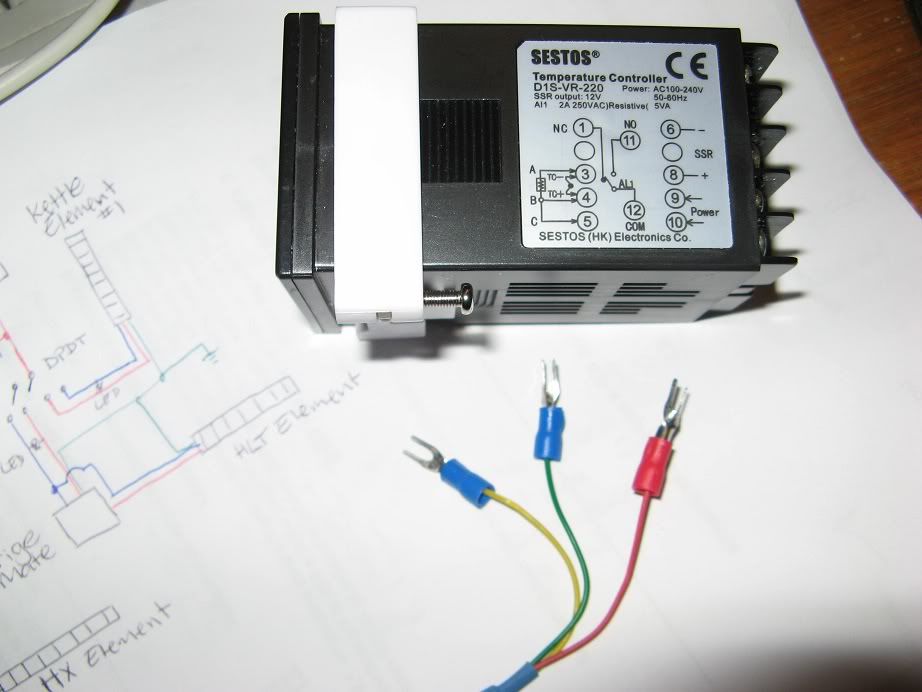
PID is a Sestos D1S-VR-220 and the probe is a 0-150C PT100 with three wires (yellow, green, red):
electrical_4.jpg

I assume that the probe is connected to terminals 3-4-5, but don't know which order.
 
at a guess, red lug on terminal 3, other two on 4 and 5, if you have a multi-meter check the resistance, between the two blue lugs should be close to zero ohms and a resistance between either of those and the red lug which varies with the temperature of the probe 100 ohms at 0c or around 107 ohms at 20c
 
Thanks zxhoon. :)
It's 108 ohms between the red and blue and 1.1 ohms between the two blue terminals - so I guess your guess is spot-on.
 
sweet as, basically the two blue lugs enable the controller to calculate the resistance in the wiring to the sensor, to compensate for it, and then get the precise resistance of the RTD
 
It 's a simple tee piece with a terminator end. I epoxied it in there using high temp expoxy.

Was there a specific epoxy you used that is food safe?

In the process of putting my herms together :)

I'm using the Kettle / Griffon Coil "im a cheap *******" method.... for now anyway :D

I think I paid more for stainless quick disconnects then for the pump and kettle.... :eek:
 
Following some recent dramas I had with my pump not priming properly

See this thread
Solution for pump priming problems

I completely re plumbed my system making sure all my lines were as short as possible and my pump was much lower than anything else.

Heres the pic of the new setup with the HLT moved so its level with the mash tun and kettle and well above the pump.

3v_new_setup.jpg

And heres the pump complete with built in illuminated switch. Water comes in at the top direct from the HLT or MLT through the HEX and back up into the top of the MLT.
Havent tested it yet but confident it will work.

pumpswitch.jpg
 
Looks a lot tidier mate... Go on.. Give it a wet run

lol..Ive still got to swap over the temp probe and the male barb on the hex outlet as the hose kinks too much when it comes out the side from under the shelf above.

Will give it a go tomorrow night.
 
Looks Great Truman. I wish that I had the room for a nice tidy setup like that - as it is, At the moment I have to drag everything out of storage when I want to brew.

It makes it neat by mounting the pump switch in the frame, although if you haven't already, you should probably earth the frame of your stand, or at least run your pump off a Safety Switch.
If any water gets on the back of that switch, it could light the whole frame like a christmas tree!

Thanks mate...The pumps only 12 volt and I do have it plugged into a powerboard with a cutout and the GPO is wired through an RCD.
 
It occured to me the other week that I could be making better use of my HERMS rig.. The HER-MUT.. (under testing) I know it's against the grain currently with all these small HERMIT type contraptions... but hay, it's multi purpose, makes brewday easier and my losses to my HER-MUT are probably about 50ml (unmeasured) if that.

1.JPG

The old, inlet to the HER-MUT at the top so that the lines gravity empty to the MT when the inlet is disconnected

2.JPG

First thing I wanted to do was get the element off the bottom of the pot. Easily acheived with a few minutes with the Ozzito rotary tool. The Hook now props against the lid and suspends the element nicely.

4.JPG

Next was to add a tap to the pot.

5.JPG

and a return Barb

6.JPG

So now I can, after mash out, stop the pump and drain the lines to the Keggle, change the inlet line over from the MT to the tap on the HER-MUT and change the return from the MT to the return on the HER-MUT

7.JPG

add PBW or Sodium PERC to the HER-MUT and simply recirc it through all the lines for 20 mins, drain to Keggle (after boil naturally) and add rinse water and recirc... essentially turning the greater part of the brewery into a CIP unit.

These mods were made post brew the other day so didnt get to string it all together but it will certainly work :beerbang:

Next thing to do is insulate it so I can improve the thermal properties of the unit. with a cork base and probably camping mate type wall insulation.

Yob
 
Looks good Yob, always good to see your latest inventions. your an inspiration to us gadget lovers. :D

I dont get how your hook holds the element though? Wont the lid be in the way??
 
I dont get how your hook holds the element though? Wont the lid be in the way??

It's the lid that holds it off the bottom.. The Hook on the element jams against the lid keeping the base of the element held 25mm or so from the base of the pot.

The sad thing is Im probably going to have to wait 2 weeks or so to use the bloody thing propperly.... unless I buy another cube that is.. ;)

:icon_cheers:
 
A bit of further tinkering to insulate the HER-MUT has seen it evolve into this

Capture.JPG

$3 pink camping mat from the Salvo's and 20 minutes tinkering and half a roll of gaffa tape, going to use it today and see if there is an improvement in temp stability.. not that I was displeased with it before, just trying to make things a little more refined

:icon_drunk:
 
Nice one! But... it looks like you've taped the lid on? Isn't that going to be problematic? Am I right in thinking this unit is your combined HLT/HEX?
 
Nice one! But... it looks like you've taped the lid on? Isn't that going to be problematic? Am I right in thinking this unit is your combined HLT/HEX?

Na, the tape on the lid is only temporary and will be cut, its just to get a better seal.

The unit is a dedicated HEX unit but doubles as a CIP unit for the pump and lines, the water/cleaning solution is then dumped into the keggle at the end of the boil.
I should be using much less water at the end of the day
 
Has anyone had success with auto-tuning the Sestos D1S-VR-220 PID?

My understanding of the instructions:
3/ First operate the Auto adjustment, press AT key 2 second, SV display blink AT, finally into PID control mode. Press the AT key 2 second to abandon Auto adjustment.
4/ If successful the first Auto adjustment, can not use AT key for Auto adjustment again. It need change function setting Ctrl to 2 to operated again.
5/ Auto adjustment needs from few second to few hour.
... is that I simply press the AT key (for 2 seconds) and then something visible should happen.
But pressing the AT key seems to do nothing that I can see, but assistance translating the instructions to someone who has used it successfully would be appreciated. ;)
 
Has anyone had success with auto-tuning the Sestos D1S-VR-220 PID?

My understanding of the instructions:

... is that I simply press the AT key (for 2 seconds) and then something visible should happen.
But pressing the AT key seems to do nothing that I can see, but assistance translating the instructions to someone who has used it successfully would be appreciated. ;)

I've just received 2 of these that I'm yet to power on, so can't help, I'm afraid, but would be very interested in any advice about these devices. There should be a way to set the "control output" function to "auto adjustment" (the other 2 choices being "ON/OFF" and "PID"). So maybe you'll have to manually kick off the process that way.

A few folks have reported that these units are so similar internally to the Auber ones that the manual is more or less interchangeable (although the contact layout is completely different).
Yep the Auber instructions were invaluable for changing the probe-type-setting, no way I'd have accomplished that with the Sestos stuff, so I might have to read them again. :)
 
Back
Top