Show us your brew-plumbing

Australia & New Zealand Homebrewing Forum

Help Support Australia & New Zealand Homebrewing Forum:

This site may earn a commission from merchant affiliate links, including eBay, Amazon, and others.

droid

somewhere on the slippery slope with a beer in han
Joined
13/8/14
Messages
2,091
Reaction score
1,425
Location
Eagle Point, VIC
I have just lost a heap of text for this thread from my pc crashing and the wind has been taken out of my sails a little.

Fascinated by plumbing and valving of different brew systems I thought it would be nice to start a dedicated conversation about the plumbing aspect. Please merge if there is a thread, I couldn't find it and I think it deserves to stand alone from the show us your brew-rig thread or at least not muddy those waters...

This is a pic of my 4 vessel brew-house as it stands. I'll explain what's plumbed where and why and would love to hear about what I could do better. I'd also love to see what other people are doing and why they are doing it.

Here's cheers to brew-plumbing :beer:


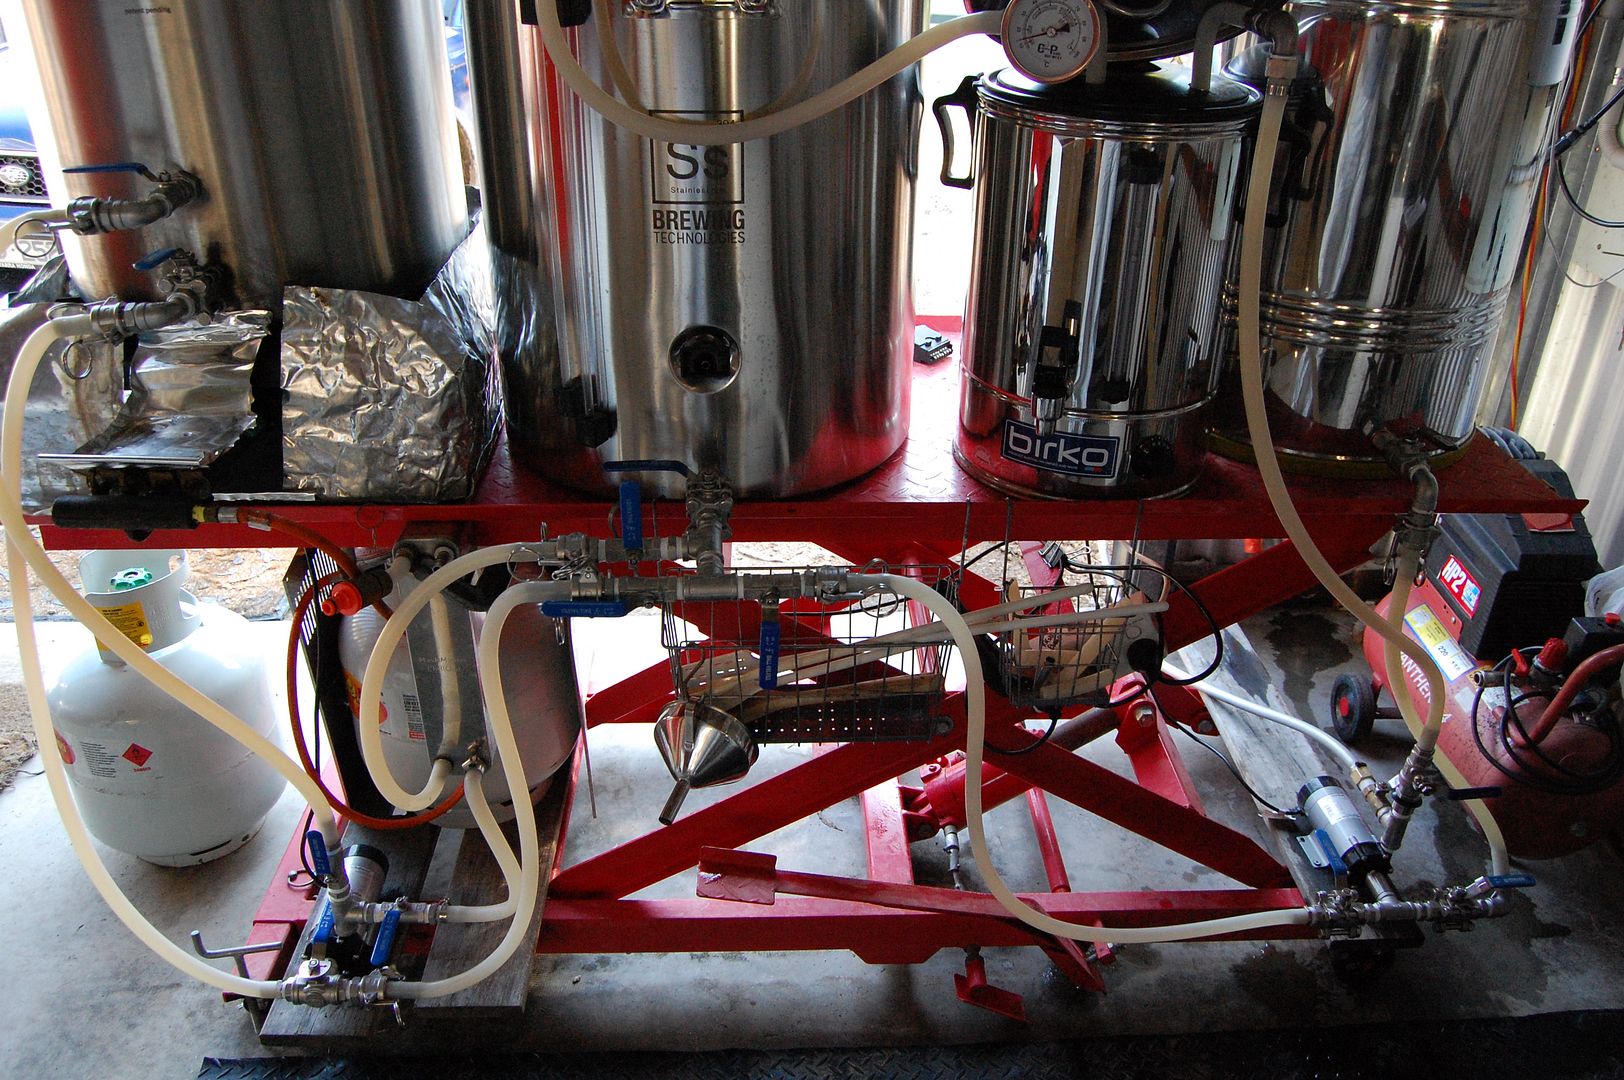
This system works right to left so it's a bit different in that regard. Sorry, also everything is written as-you-look at it...Right is the HLT, next is the heat exchange and recirculation, next is the mash-tun and on the left is the kettle

This is the plumbing under the HLT. The hose running into the pump (from the right) is the only hose on the HLT (it will have recirc and probably house the HERMS eventually)
Hot Water coming in, that hot water can go straight through the pump and into the recirculation for the heat exchange or HERMS which is the tube coming out the top of the pump and going straight up.
The other valve located behind the pump out is to drain the system and can be used to fill with food grade hose if required
The valve on the left is there to accept the runnings from the mash and send it through the pump back into the HERMS. It also allows liquid from the kettle and chiller side to pass through.

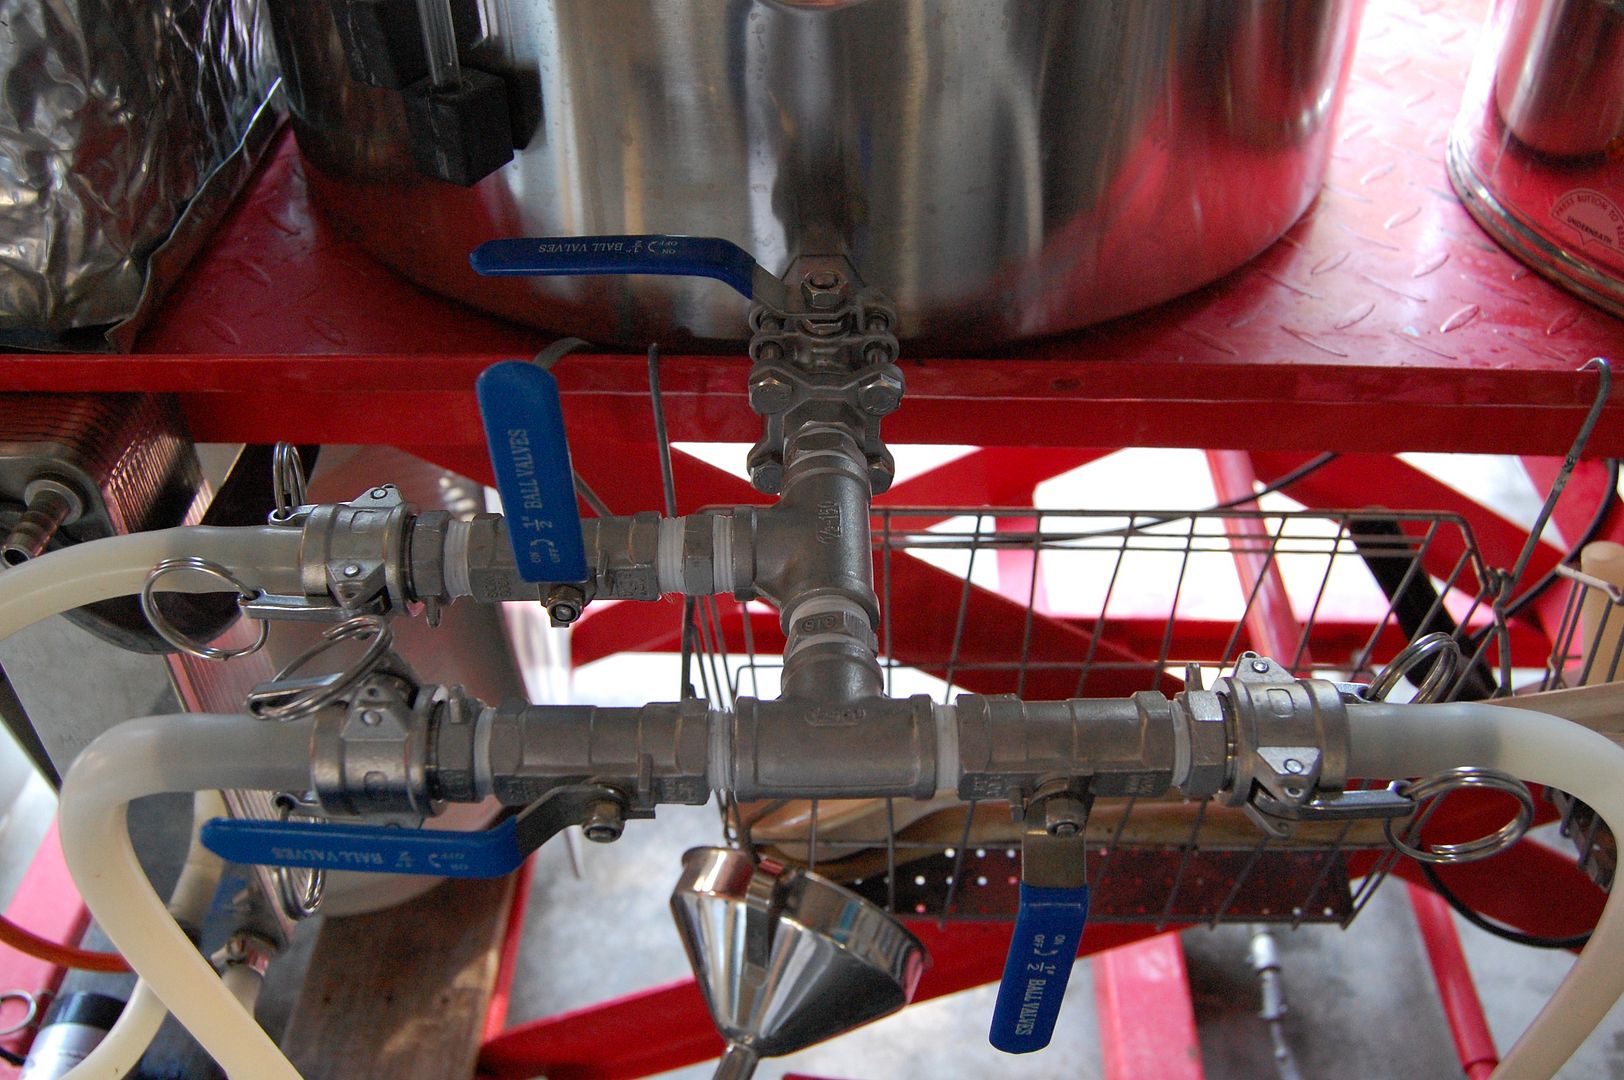
This is the plumbing on the mash-tun.
Main valve to and from mash-tun
The valve in the middle on the left is from the plate chiller and it's only use is to bring the water out from the plate chiller. It can be diverted to the mash-tun if I've cleaned it in time and can also go to the HLT via the valve on the right which travels down to the pump under the HLT.
The left front valve allows the clear wort from the mash to go to the kettle but also allows hot water or cleaning solution from the HLT. So basically the two front valves, left and right allow transfer from left to right or vice versa.
It has release clamps so that the mash-tun can be removed to get the grain out. I will maybe build a swing for the mash-tun for easy tipping, maybe not.

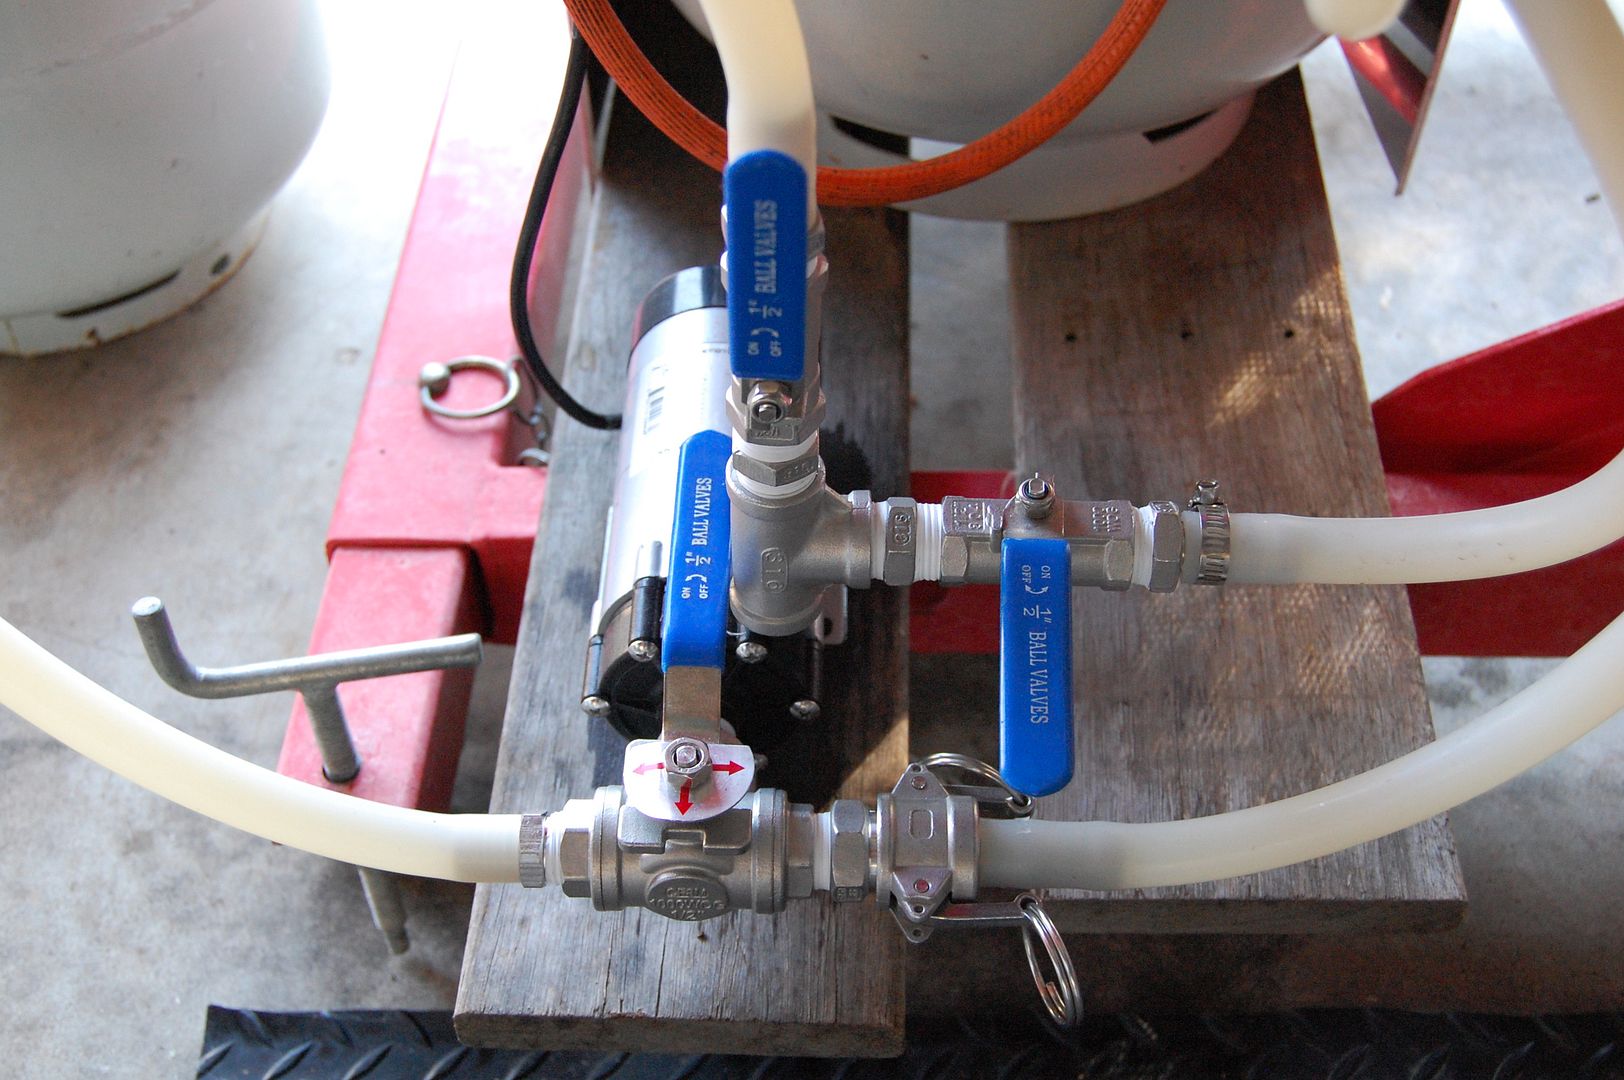
Here is the valving under the kettle.
The hose on the right is to allow liquid in from the mash or from the HLT and obviously it can release liquid back to the right, depending, this pump has a 3 way valve controlling liquid in to the pump but the great thing about it is you can swing it around and open up the left and right hoses bypassing the pump if needed
The hose on the left is liquid out from kettle but as mentioned it also diverts flow back into the pump from the kettle, mash-tun or HLT
The valve on top of the pump (pump out) is fed into the kettle (two valves on the kettle) and is used for filling but also for recirculating and creating a whirlpool
The valve off to the right is for feeding into the chiller
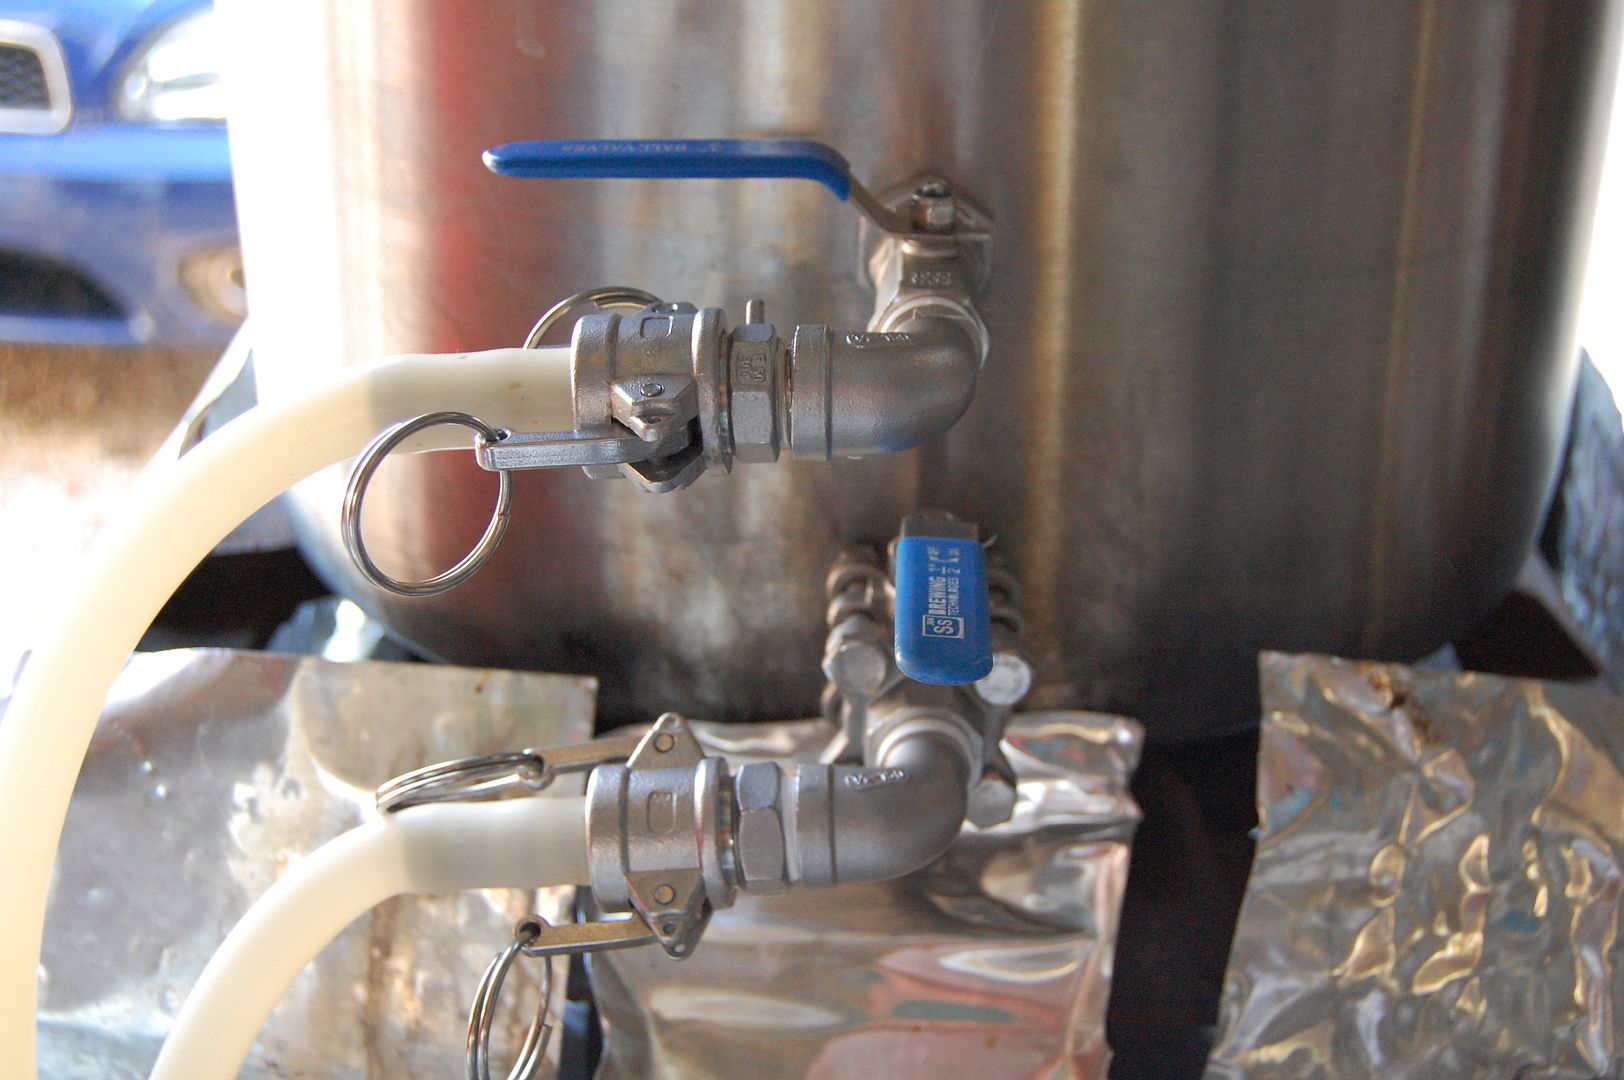
The kettle valves.
Top is liquid in so I can fill the kettle with wort, recirculate but also for cleaning.
Bottom is liquid out but can be used for liquid in from HLT.

Once I connect the hose to the chiller (water in) I can feed the whole system and with the hose out on the HLT side I can water the garden and drain the sytem without going anywhere. The missing hose out from the chiller is a slip on tee piece for filling two FV's at once if required. The reason for the tee is that I don't like to stop the chilling to swap over to another FV if I do a bigger brew.

Whaddya think?

I'd like to increase my whirlpool speed and was wondering if I can do that through altering hose length? or valve size? Those smaller valves are 1/2"bsp but the internal size looks like 8-10mm.

What have you got...and why?
 
I've got a 55L coleman and a rusty old beer keg for a kettle. Should probably plumb it in at some point.

If I told you that you have a beautiful brew rig, could you hold it against me?

Well done!

Garfield
 
Nice!
Droid do you run this as hard plumbed and CIP or do you strip down after each brew?
Are your pumps the standard KK variety and if so what sort of flow rate are you getting at the HEX output?
I think you've done well with the two pump are you or have you considered a third, or are you find advantages to the two pump system you have in place?

Cheers
Mike

Oh yeah, we gotts to get a brew day happenin soonish!

ED: RE whirlpool, check my post in the dedicated herms thread
 
malt junkie said:
Nice!
Droid do you run this as hard plumbed and CIP or do you strip down after each brew?
Are your pumps the standard KK variety and if so what sort of flow rate are you getting at the HEX output?
I think you've done well with the two pump are you or have you considered a third, or are you find advantages to the two pump system you have in place?

Cheers
Mike

Oh yeah, we gotts to get a brew day happenin soonish!

ED: RE whirlpool, check my post in the dedicated herms thread
Thanks guys :)

Yes we do Mike. At the moment I am thinking of leaving it plumbed mostly and CIP but will have to strip it down every so often. They are both KK pumps and have been doing the job for a year or more. The HEX output is strong but of course doesn't need to be and is run reasonably slow. I get .75deC increase recirculating from 14degC up to mash temp in winter.I hadn't thought of a third pump but will now...The two pump system for me has been good. Being magnetic pumps I fiddle with the valving to get the speed right when they are both on for sparging, so it's not running too fast and I'm keeping a nice level of liquid in the mash-tun.

I am looking for a better / stronger kettle recirc tho and am not sure why it doesn't seem as strong as the HEX out. Maybe it's due to the HEX running through the coil that makes it stronger flow?
 
I love the first picture, looks like the silicone lines are plumbed into your gas bottle.

I'm building my new system currently with 3 vessels and 2 pumps, and have also gone right to left as it suits where my water supply is and where I want to put my fermentation chamber (the plan being to chill and transfer directly into a fermenter in a chest freezer when finished so I don't have to lift/move anything until it's fermented). It's a simple little change, but it's amazing how many brew rigs are built left to right. I may add a HERMS coil later.

I've gone for disconnects for my hoses, pumps and valves, and will manually switch these around as I go. Will post some pics when I finish building on the weekend.

I see some 3 piece valves, but how do your other ball valves go for cleanliness? Are they 2 piece valves?
 
^good stuff!

yeah I got them little ones for free off a mate and that's when I decided to go nutso on trying to get it all plumbed. I'm assuming a caustic run every now and then will do the trick but it would be better to have 3pce, not that I've ever taken apart any of the valves... :ph34r:
 
I have a hard piped 1V that gets a CIP after each brew. 2% caustic @ 65 degrees followed by 1.5% acid @ 55 degrees. Just pulled some sections apart this morn to inspect and theyre all nice and clean. My 3V is hardpiped also but uses a flow plate and takes a bit longer to clean. The 1V basically cleans itself and the march pump seems to generate enough flow to clean some of the instrumentation dead legs.

20160908_143348.jpg
 
^beautiful

@husky - so I could entertain the idea of hard plumbing or would it just be $$$ I looked at tri-clover fittings for my system and it was about $1300! not including welding the fittings on to the vessels
 
droid said:
^beautiful

@husky - so I could entertain the idea of hard plumbing or would it just be $$$ I looked at tri-clover fittings for my system and it was about $1300! not including welding the fittings on to the vessels
You could entertain it but its a lot of $$ to brew beer that won't taste any better. I'd say that hard piping will clean better as you eliminate all the threads. Mind you with a long enough caustic at temp I rekon yours would clean fine without stripping it all down. Just a PITA to open up all the separate flow paths. Tri clamps are exy and I actually prefer the BSM unions for ease of tightening and locating., I have a random assortment of tri clamps left over from my project you're welcome to if you go the hard piped option.
 
^whoa ! watch for all the seagulls to come flying in - awesome offer, you're a champ, I'll check out those BSM unions you speak of

I see on Geordi stainless they have them - do they tighten up on the pipe? or do they just fit over a join and you weld?
 
husky said:
You could entertain it but its a lot of $$ to brew beer that won't taste any better. I'd say that hard piping will clean better as you eliminate all the threads. Mind you with a long enough caustic at temp I rekon yours would clean fine without stripping it all down. Just a PITA to open up all the separate flow paths. Tri clamps are exy and I actually prefer the BSM unions for ease of tightening and locating., I have a random assortment of tri clamps left over from my project you're welcome to if you go the hard piped option.
Husky what size is the pipe? I take it you have access to a mandrel, I can't get a tube bend to look that good.
why the differing valves in different locations (butterfly versus ball valve)?
I've drooled over both your build threads since you started them.
I'll see if I can post some pics of my 1v plumbing definitely not as flash but effective none the less.
 
droid said:
^whoa ! watch for all the seagulls to come flying in - awesome offer, you're a champ, I'll check out those BSM unions you speak of

I see on Geordi stainless they have them - do they tighten up on the pipe? or do they just fit over a join and you weld?
They work the same as a tri clamp in that there are two parts however one is a male thread and the other is a liner that when the nut is tightened seals up on the male part. The seal ensures there is no crevice so the line is flush on the inside like a tri clamp. I just find them easier than a tri clamp because if the two faces are not completely square it can still be done up easily where as a tri clamp can be a PITA if not completely square.

malt junkie said:
Husky what size is the pipe? I take it you have access to a mandrel, I can't get a tube bend to look that good.
why the differing valves in different locations (butterfly versus ball valve)?
I've drooled over both your build threads since you started them.
I'll see if I can post some pics of my 1v plumbing definitely not as flash but effective none the less.
Mine are 1" tube. No bender required as you buy the bends already polished and just weld them together.
http://www.geordi.com.au/Products13d.htm
I used hygienic butterfly valves for wort contact and ball valves for water, no nasty cavity in a butterfly valve for old wort to hide in like there is with a ball valve. The water is used to fill the tank as well as for pre cooling water to the jacket. The extra valves allow the water to divert through a chiller to get temps down to pitching more quickly, still working on getting that to work adequately though.
 
droid said:
^good stuff!

yeah I got them little ones for free off a mate and that's when I decided to go nutso on trying to get it all plumbed. I'm assuming a caustic run every now and then will do the trick but it would be better to have 3pce, not that I've ever taken apart any of the valves... :ph34r:
Don't want to get into a flame war with anyone, but when I pulled apart a 3 piece after using it on a SINGLE brew, there was plenty of wort back past the seals. Now how much effect this would actually have on your beer, especially if it's on the hotside, is debatable.

And I can't talk because my taps on my keezer are probably full of worse.
 
Husky's rig a beautiful thing.

I have always run hard-plumbed (vertical, horizontal, 90° bends) purely to help get air out of the system as sloping/looping silicone generally has air pockets at some stage and you don't want that on a pump suction. Then again we're not talking serious service and it's not $10mil if you lunch a pump, so :kooi: :chug:

I did all this in copper a couple of years ago, but I have been thinking in the last couple of months that the copper may be the reason the malt in my beers isn't as pronounced and 'wow' - vs an SS keg system 15 years ago and my 50L SS system in Brisbane. So I've just invested ~$700 in SS tube and fittings and it's in progress... so I will post when I finish that. The 14hr days and young child are making that hard, but I'll get there.

I am doing it in 'headers' with different sources coming into the suction header and then it splits to either the kettle or mash run. Makes my 2V extremely flexible (can be RIMSing and heating sparge water at the same time, drain off sparge water, transfer first wort and do batch sparge right on top, then pull out grain and start cleaning mash tun while kettle comes to the boil). Anyway, very functional and hopefully producing good tasting beers again soon. :)
 
Pictures as promised. HLT on the right, MLT, then kettle on the left. Just out of shot are a pair of ball valves mounted above the HLT which are plumbed into my mains hot and cold.

HLT and MLT are bottom draining using triclover fittings on the kegs, which are upside down and had the bottom chopped off. I drilled the end plates and used weldless fittings as I couldn't find a 2 inch end plate that went directly to a 1/2 inch thread. Just something I wanted to try instead of a pick up tube. In hindsight I probably could have fitted the weldless fittings to the bottom of the keg and achieved the same result, but this way I can flip my kegs after brewing, take off the triclover assembly and let everything air dry.

MLT has a blichmann sparge arm for a bit of fun.

The plan will be to put my ferment freezer against the wall on the left and drain directly into a fermenter sitting inside the freezer so I don't have to move it until it's finished.

All valves are 3 piece stainless ball valves. All fittings are quick disconnects. All hoses are silicone. 2 keg king pumps. Currently draining into buckets, but I have a floor drain in the area for rinsing water, and I will plumb in a drain into the kitchen drain for the house for everything else.

brew rig.jpg


sparge.jpg
 
Ok so some 1v plumbing.
1474419614961.jpg
Foreground is a 3 way valve selecting recirc or output

1474419633300.jpg
Pump is attached directly to skin fitting and I used barel unions to make it easy to remove the whole lot. And flow control valve.( yes the sparkys out there are having a fit but I did tripple insulate it)
1474419658070.jpg
Whirlpool set up, next one I build I'll have a second 3way valve directly to Whirlpool save playing with hoses.
 
Don't want to bum you out, but see highlighted parts of your pumps setup below, these are accidents and broken pump heads waiting to happen. Lots of posts about how brittle these pump heads are when simply over tightened, having extended leverage on them like show, lets say you knock it with a full bucket of grain or something falls against that riser, snap.

Easily solved by adding some structure around pump and them attaching valves etc to that structure.

DSC_0434.jpg
 
I thought the same with mine. Wait till it breaks (hopefully not in the middle of brew day, though I do have a spare plastic head) perfect excuse to buy the $40 SS head!
 
malt junkie said:
I thought the same with mine. Wait till it breaks (hopefully not in the middle of brew day, though I do have a spare plastic head) perfect excuse to buy the $40 SS head!
I use a SS head on one of mine and they are brilliant, 5 minute change over. Worth every cent.
 

Latest posts

Back
Top