Dedicated Herms Guide, Problems And Solution Thread

Australia & New Zealand Homebrewing Forum

Help Support Australia & New Zealand Homebrewing Forum:

This site may earn a commission from merchant affiliate links, including eBay, Amazon, and others.
Andrew I am in the Process of making a Herms and the bottom is where I would like to put the element but that was exactly my concern, should it leak!
Why is it the most logical and practical solution always has a downside!
Interested to hear what people have done to reassure themsleves against this.


Woody

I made sure mine sealed good and tight Woodmac, then I applied sikaflex just to be sure.

Andrew
 
QUOTE (altstart @ Jan 20 2010, 04:02 AM)
My herms uses a 1500 watt element and experience has shown that it is underpowered. It is proving impossible to find a 2400 watt non screw in type element but I already have a handheld 2400 watt water heater that is no longer used in the brewery. my thoughts are to adapt this heater and use it in addition to the 1500 watt element. I am useing a 19 litre pot with a 6 metre S/S coil this should improve my ramp times considerably. I am aware of the additional power requirements in order to do this safely but before I start down this road is anyone else useing this amont of heating capacity.
Cheers Altstart

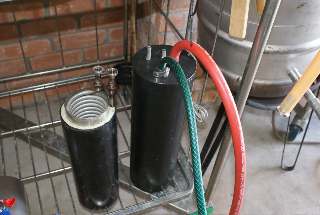
Alstart this is exactly what I have done. I did not want to mess with electricity and also wanted to be able to use my hand held for other situations. I dangle my hand held in the middle of the SS coil. The unit itself holds 2.5 Liters of water and is insulated which helps increase temp very quickly. Also in the picture is my chiller which is the same unit but without the top cut off.

3910117733_26ee29d0c8_o.jpg


Cheers,


JJ
 
Pete, could be the diameter of the pot, lots of guys are using small volume pots now and I think I would have difficulty sealing my jug element through the side wall of the new one that I bought for HARMS MK II. Will be mounting it through the bottom this time, easier too, can locate it in the centre of the copper coil and fit more coils in the pot.

Cheers,

Screwy


As KHB never mentioned it I took it for granted that he went through the bottom (Flat surface) as I did with my 7.5 litre pot. :(
I pretty certain that I did use silicone as well for a safety measure.
Selleys Silicone 401(-60 deg c to +205 deg c) from bunnings.

TP
 
I made sure mine sealed good and tight Woodmac, then I applied sikaflex just to be sure.

Andrew
Sikaflex I have some of that and you are right that is awesome stuff and very flexible so it should last pretty well!
Newguy will have a look at the eavestrough!

Woody
 
As KHB never mentioned it I took it for granted that he went through the bottom (Flat surface) as I did with my 7.5 litre pot. :(
I pretty certain that I did use silicone as well for a safety measure.
Selleys Silicone 401(-60 deg c to +205 deg c) from bunnings.

TP


Pete, how have you (and others) supported the HE after base mounting the element ? The shelf in my brewstand is covered with checkplate. Wouldn't be a problem if it sat on an open truss type shelf.

Screwy
 
Pete, how have you (and others) supported the HE after base mounting the element ? The shelf in my brewstand is covered with checkplate. Wouldn't be a problem if it sat on an open truss type shelf.

Screwy

Both top & bottom levels of my brewframe has stained & estapoled plywood floors (For want of a better expression) & it was only a matter of gluing on three equally spaced wooden blocks deeper than the electrics box under the pot.
If you're not keen on using wood you could bolt three pieces of ss RHS (You could even blank of the ends with those plastic end blanks you get from Clark Rubber) to your ally base plate & Bob's your Uncle.
To ensure the HE doesn't slip off these raised bits each block has a short piece of ally angle iron screwed on (In your case bolted on with the same bolts used to hold the RHS down).

TP
 
As KHB never mentioned it I took it for granted that he went through the bottom (Flat surface) as I did with my 7.5 litre pot. :(
I pretty certain that I did use silicone as well for a safety measure.
Selleys Silicone 401(-60 deg c to +205 deg c) from bunnings.

TP


I actually use a cut down keggle with a 2.4KW stokes element welded in but have tried to make a smaller one as i want quicker ramp times, i tried going through both the side and bottom and could not get a seal either way!

KHB
 
Browndog

one more question...

That junction box has a hole in it to go on the end of the external part of the element, yes?

If so are you screwing (clamping) the j box in between the element and the threaded socket? If so do you put a extra rubber washer in there? So there would be an washer either side the the plastic to create a good seal.

And does the plastic get affected by the heat coming thru the element...?

Cheers Jimmy

Correct, the S/S fitting goes though the junction box, I'll assemble it with copious amounts of silicon and the rubber washer on the element will but to the fitting. I'm hoping the base of the element will not get hot enought to damage the junction box. Time will tell, if i does I'll have to make one fron S/S.

cheers

Browndog
 
Pete, how have you (and others) supported the HE after base mounting the element ? The shelf in my brewstand is covered with checkplate. Wouldn't be a problem if it sat on an open truss type shelf.

Screwy

Gday Screwy

This is how i mounted my HE mate, just welded up a bit of scrap RHS i had lying around .

IMG_7033.jpg
 
What sort of temperatures does the mash return get up wo when your ramping the mash temp in one of these small vessel HERMS?

I have always been a bit concerned that returning the wort at too higher temp will give me lower attenuation and risk killing the enzymes?

I read a little while back for pics of HERMS returns. Here is mine.

The return slides up and down through the lid so i can adjust it to sit on the top of the mash

cheers

mash_return.jpg
 
What sort of temperatures does the mash return get up wo when your ramping the mash temp in one of these small vessel HERMS?
I have always been a bit concerned that returning the wort at too higher temp will give me lower attenuation and risk killing the enzymes?
I read a little while back for pics of HERMS returns. Here is mine.
The return slides up and down through the lid so i can adjust it to sit on the top of the mash

Tony you can monitor the temperature back into the Tun by a simple addition of a MM temp gauge S/s a T piece and a reducer as the thread on the short probe version of the MM is smaller. All up a shade over fifty bucks.

View attachment 35182

:icon_cheers:
 
where is a good place to get an SSR?, how do you know whats a good one and what s a chit one?
 
where is a good place to get an SSR?, how do you know whats a good one and what s a chit one?

Read my post on "dead ssr" ..Global Village on ebay 40 amp SSR' for AU$17.00 + post .........twist their arm and you will get them cheaper and the good thing is they work well. Been using them for three months now and no problems


cheers
BN
 
To all who are interested I sealed the element in the bottom of my HERMS using Loctite 567 this is a dedicated water and gas sealant. The pot in my system is a thin walled 20 litre job and the element is a 2 bsp fitting and nut, this element and nut when placed through the bottom of the HERMS sandwiches a die- cast electrical box that houses the wiring. I then drilled a 1/8 hole in the lid of the die-cast box so I could detect future leaks, as water would drip on the floor if a leak ever eventuated.
Brew_Gear_020.jpg
Brew_Gear_031.jpg
 
To all who are interested I sealed the element in the bottom of my HERMS using Loctite 567 this is a dedicated water and gas sealant. The pot in my system is a thin walled 20 litre job and the element is a 2" bsp fitting and nut, this element and nut when placed through the bottom of the HERMS sandwiches a die- cast electrical box that houses the wiring. I then drilled a 1/8 hole in the lid of the die-cast box so I could detect future leaks, as water would drip on the floor if a leak ever eventuated.
View attachment 35186
View attachment 35188


Very neat mate , looks good!
What size element is that and how big is the Pot??
Are you still building or is it finished ?


Woody
 
Very neat mate , looks good!
What size element is that and how big is the Pot??
Are you still building or is it finished ?


Woody


The element is a 2400 watt and the pot is a 20 litre job with an 11 metre stainless coil. Ive only ever brewed double batches and with some sorting out with flow rates ECT, thanks to AndrewQld now holds mash temp between HERMS and Mash Tun perfectly and ramps at 1.6 degrees per min. Hope this helps. Cheers.
 
The thing about sealing and adhesion in general is the surface preparation of the mating parts. They MUST be clean and free of contaminants, by that I mean dust, grease and even the oils from your skin. Give your parts to be bonded a scrub with hot soapy water using a scotchbrite pad and dry them thoughoughly. Then just prior to applying your sealant, give them a wipe over with a clean rag soaked in metho.

Cheers

Browndog
 
For sealing the kettle element into my 20L Big-W pot I used a bit of silicone from a baking tray. Cut up a $3 23cm torte tray. Basically put a square of it on the outside and cut a hole through the middle matching the hole in the pot.

The silicone baking tray washer sits on the outside of the pot. The washer from the kettle has (on mine at least) a thick side and a thin side. Mounted it with the thick side in the pot, and sitting over the top of the other silicone washer on the outside.

Tightened up the screws that came with it and it holds water just fine. The baking tray is food safe and rated from -40 to +220*C, so should be fine for our purposes.

I cut up a little jiffy box to cover the whole lot on the outside. It basically sits around the back part of the element, not touching either it or the pot. Cut an IEC shaped hole in the front and mounted the halogen light on the top. Looks pretty neat, and you get to see the light flash when the PID is using the element.

HTH,
Rob.
 
The thing about sealing and adhesion in general is the surface preparation of the mating parts. They MUST be clean and free of contaminants, by that I mean dust, grease and even the oils from your skin. Give your parts to be bonded a scrub with hot soapy water using a scotchbrite pad and dry them thoughoughly. Then just prior to applying your sealant, give them a wipe over with a clean rag soaked in metho.

Cheers

Browndog

All very good points Browndog but you forgot to mention that a light rub with fine emery cloth before cleaning as per your post gets rid of the "Greasy" surface normally associated with stainless steel. :icon_cheers:

TP
 
All very good points Browndog but you forgot to mention that a light rub with fine emery cloth before cleaning as per your post gets rid of the "Greasy" surface normally associated with stainless steel. :icon_cheers:

TP

Ah but Pete in my experience i have found you should clean before the emery to remove contaminates ( as contaminates can be scored into surface during abrasion) and clean after emery to remove residue.

Brad
 
Back
Top