Dedicated Herms Guide, Problems And Solution Thread

Australia & New Zealand Homebrewing Forum

Help Support Australia & New Zealand Homebrewing Forum:

This site may earn a commission from merchant affiliate links, including eBay, Amazon, and others.
Yeah mate seriously contemplting it. Will take me a couple of months to stash the $ away and build but this thread is a great insite and very timely. Yes i have been able to make reasonable beer on my cheap system but it is very labour intensive. This thread has been great info but if someone could take the time to explain the whole HERMs procedure step by step in detail (hint) it could prompt a few.

Brad
 
Great idea Chap Chap! Good to see you geting into the brewing stuff!

I built my HERMS about 5 years ago. Back then there was bugger all things like this thread. God i could only wish! I got my ideas from the net..... mostly from german and yank websites.

I had grand planes for stepping up mashes and wired it all up to have it switch between heat and bypass on the HERMS, But alas....... it was never needed. I now just switch it to manual control and use the HERMS coil to maintain mash temp and step my temps with infusions.

I fint its advantages lie in the constant flow of the mash liquor through the grain bed, clearing the liquor and basicly stiring the mash for me, without having to stir it.

I Monitor the temp at the outlet from the mash, the return to the mash after the HERMS and Mid grain bed. What i do is work on averages. If i want to mash at 65, i mash in for 65 deg and when i start recirculating i find i get a 1 or 2 deg drop at the outlet from the mash tun. I then bump up my HLT temp till i get a 1 or 2 deg increase over the core mash temp to maintain an average temp of 65.

Thats 66 at the top, 65 at the middle and 64 out the bottom. This works really well for me and i can get great reliability with mouth feel and attenuation using this method.

Thats how i use my HERMS. They are like anything..... there are so many ways you can use them. Thats what i love about brewing. If i ever upgrade my brewery, i will build a dedicated HERMS vessel as aposed to using the HLT. I have learnt to use it well but a dedicated vessel would be great.

Cheers

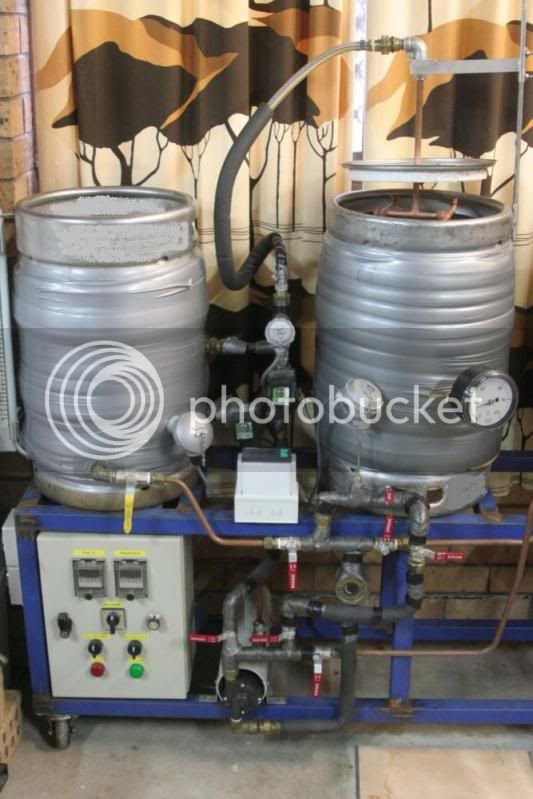
Here is the HERMS part of my brew rig

HERMSsystem.jpg


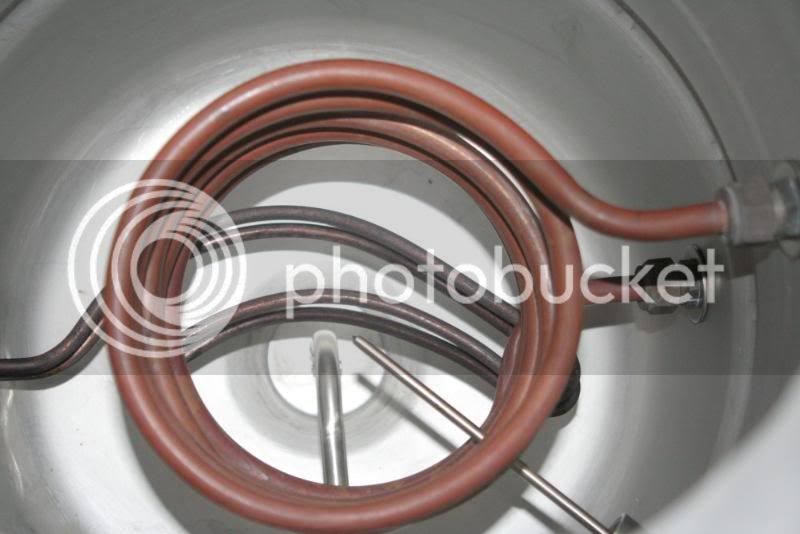
This is the coil in the HLT. I use a 3600W element and simple on/off control with a temp controller. No need for PID......it hardly moves.

HERMScoil.jpg


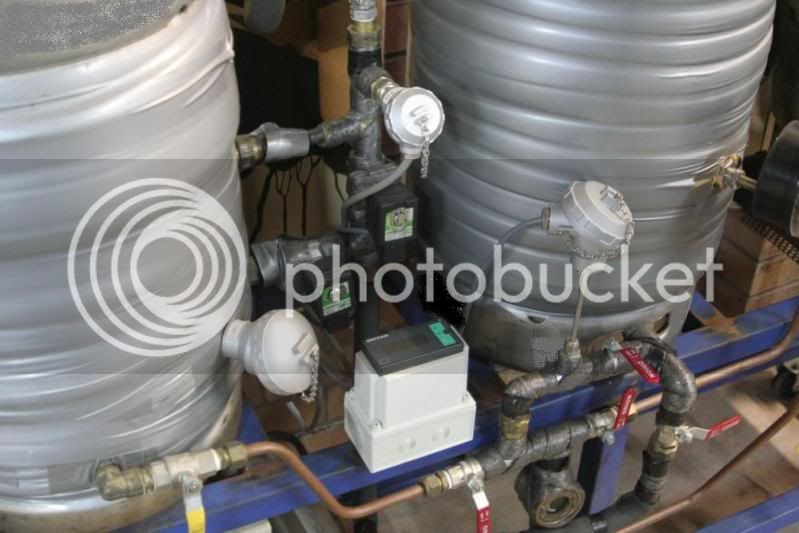
HEre you can see the 3 temp probes... one on the mash tun outlet, one on the return and the old dial one on the far right (not quite visable) thish reads the mash bed temp. The other one is the HLT temp controller.

HERMSTemp.jpg


cheers
 
I have 5.5 mtrs of copper in 10lt of water but can only manage 2-3.c a minute per degree someone suggested to me to throttle back the flow a bit, is this the norm??

Cheers
KHB
 
These breweries look great. Completely noob question but how much of it needs to be broken apart and cleaned and how easy/difficult is that?
 
These breweries look great. Completely noob question but how much of it needs to be broken apart and cleaned and how easy/difficult is that?

Man I hope its a flush out, boiling water and starsan in the lines till next brewday then boiling water flush before brew and a pull down and clean every Xbrews?

Brad
 
Love your system Yardy! Been good seeing you inch that together over Christmas.

I have to agree with Gregs you are 9/10th there you have the big bit! The bloody pump.

Ok shopping list and rough pricing.

Pot 11lt BigW $15
Cheapo Jug for element $12
Junction box including some electrical odds and ends $20
TempMate or PID say $75
Bit more plumbing but I bet my cotton socks you already have the bits after your build just laying around.
A waterproof housing control box about $20 for jaycar
Old/new extension lead that is still sound. (Awww honey I cut the extension cord by accident. I'll have to get a new one but not to worry I can use it again in the brewery so it's not a complete waste)
So say less than $150

Have I left anything out guys?

Ball valve and some hoses.

Chap Chap


Thanks Chap, i thought it would be a little more exxy than that, i'm still dialing the new system in but if i can get consistency from it then i may not bother going herms.

that poses a question,

what is it that you expect from a HERMS system when you build it, just consistency ?

sorry if thats a little OT

Cheers

Dave
 
I just head up about 20 liters of water to 70 deg and pump it through all the lines. This gets it very clean. No chemicals needed.

Once every 6 months it gets a hit of PBW which i heat to 70 deg and recirc through the pipes. This makes everything shiny clean, beer stone and all.

Iakes ne about an hour to drag the rig out the back, clean it out and put it back together. Very minimal "pulling apart" is needed.

cheers
 
what is it that you expect from a HERMS system when you build it, just consistency ?

Consistency yes. You have the power to control whats happening with the mash. You can increase or decrease the flow and regulate temps. It takes a bit to get to know your system, but when you work it out you can control your brewing with fantastic consistancy. I can use US-05, and with the control i have over the mash, can easily get spot on attenuation of 1.006 or 1.010 or 1.012, depending on what i want from the beer. It aids in getting the ballancing act of ballance in the beer right because i can set my bitterness to suit my grain bill and expected attenuation.

The clarification of the mash liquor, slow and steady movement of the mash liquor through the grain to aid conversion...... these are all added bonuses.

cheers
 
Thanks for the reply nifty. I know from experience how awkward & space consuming it is to put your inlet\outlet through the side of the HE. If I ever do another upgrade I'll follow your example & go through the lid. :icon_cheers:
Don't suppose you have a pic of your inlet\outlet on hand? Just trying to work out how you seal off the holes in the HE lid.

TP

It's a bit rough and I'm a bit embarrassed about my setup after seeing the others in this thread but it does the job well. I just cut holes in the lid for the piping to pass through. One day I'll get around to making it pretty.

top_view.JPG

inside.JPG

This is an old photo, I've since made a single tier stand and shortened the hoses joining all the bits and pieces, but the basic configuration is the same.

complete.JPG
 
I just head up about 20 liters of water to 70 deg and pump it through all the lines. This gets it very clean. No chemicals needed.

Once every 6 months it gets a hit of PBW which i heat to 70 deg and recirc through the pipes. This makes everything shiny clean, beer stone and all.

Iakes ne about an hour to drag the rig out the back, clean it out and put it back together. Very minimal "pulling apart" is needed.

cheers

Good to know.

Cheers
 
Slightly :icon_offtopic: but took off all the silicon hoses last weekend & gave them a good soak with hot water & Napisan. Was amazed at the gunk that came out after only 10\15 minutes soaking as I run PBW through the lines every 5th brewday & thought all was ok. :(

Can anyone give me a good reason why Napisan can't be run through the system (Followed by a couple of good flushes with clean, hot water)?
Just wondering as I've never heard of this being done.

TP
 
It's a bit rough and I'm a bit embarrassed about my setup after seeing the others in this thread but it does the job well. I just cut holes in the lid for the piping to pass through. One day I'll get around to making it pretty.

View attachment 34615

View attachment 34616

This is an old photo, I've since made a single tier stand and shortened the hoses joining all the bits and pieces, but the basic configuration is the same.

View attachment 34617

Thanks nifty. :icon_cheers:
No need to be embarrassed about your rig mate. It does the job for you & you've given me food for thought re the HE. :super:
I've seen a few flash brewrigs that look pretty but leave a lot to be desired efficiency-wise.

TP
 
It's a bit rough and I'm a bit embarrassed about my setup


Um.....rigs like that show anyone who thinks they might want to go down that route that it isn't all just unobtainable/unmakeable bling and swank.

Embarassment????? Inspiration is the word. Good stuff.
 
Thank you Screwy, that answers the question in part, but in my system Im not gravity fed from HLT I have one pump to do all the transferring so when the HERMS has ramped mash temp to mashout temp the grain bed at this point has not moved from 66c, so can I at that point start to transfer to kettle via the HERMS unit pre batch sparge?

Sorry for the 20 questions. Cheers.


Not sure why you can't transfer from MLT to the kettle via gravity and sparge via the pump and HE as others do. In any case, once at MO leave to recirc at MO temp for the rest time (10 min) then start to run to the kettle. While sparging the temp of my grainbed comes up to MO temp but takes 30 plus minutes. Don't sweat it gregs.

Cheers,

Screwy
 
Slightly :icon_offtopic: but took off all the silicon hoses last weekend & gave them a good soak with hot water & Napisan. Was amazed at the gunk that came out after only 10\15 minutes soaking as I run PBW through the lines every 5th brewday & thought all was ok. :(

Can anyone give me a good reason why Napisan can't be run through the system (Followed by a couple of good flushes with clean, hot water)?
Just wondering as I've never heard of this being done.

TP

I used to use napisan and found i needed to scrub the crap in the kegs to get it off.

THe inside of my hoses started to go brown. I ran PBW through it for 20 min at 70 deg and the water had a layer of brown slime on it. THis was the beer stone from inside the pipes (almost 3 years without chemical cleaning) simply disolving off. I find PBW to be far more effective than Napisan. Made 20 years of grime on a SS baking tray that the most horid oven cleaner wouldnt remove, just melt off like slime. Came up like new.

I now soak all my bake ware in the kettle when i PBW the rig. My mum wants to bring hers over the next time i do it.

I think PBW is the best way to keep the inside of the HERMS coil clean....... from my findings anyway.

cheers
 
Thanks Tony. :icon_cheers:
Perhaps I'm not using the PBW correctly? When I did the baking tray thing it only softened the gunk enough for me to scrape off. :(
Use as per the instructions --- 1 teaspoon\2.5 litres water. Maybe it's a bad batch? :unsure:

TP
 
Now that I am feeling a little better.................. :lol:

I monitor the wort out of the HE only!!!!! After entering a new temp into the controller I start the timer, so if at mash temp say 66 I enter 77 (for MO step) into the HE controller and set the timer for 15 min as this us usually how long (using my equipment) that it takes for the temp of the wort exiting the HE to rise from 66 to 77. When the timer goes off I check to see it the temp has reached MO. Sometimes this may take a min or two longer. As soon as the temp reaches MO I give the mash a turn or very light stir and set the timer for 10 min for the MO rest. Once at MO temp, I begin running wort from the MLT to the kettle (gravity) and pump 80C sparge water from the HLT to the MLT via the HE with the controller set at 80 to maintain temp until the sparge has finished. The flow in is set to match flow out of the MLT to the kettle.

Cheers,

Screwy

So Screwy you do stir the mash at some point, which brings me back to my original comments that the wort isn't flowing through the grain bed when your recirculating which is why your temps between the herms return and the grain bed are differing, if the grain bed is draining evenly then it should have an even temp throughout the bed, but you aren't seeing this, so to my mind the wort from your return is not getting pulled down through the grain bed evenly.

Andrew
 
Tony what temp sensors do you use? i wanted to add one more to my herms but the cheapest accurate thing i can find would be a PID controller with a RTD.
 
So Screwy you do stir the mash at some point, which brings me back to my original comments that the wort isn't flowing through the grain bed when your recirculating which is why your temps between the herms return and the grain bed are differing, if the grain bed is draining evenly then it should have an even temp throughout the bed, but you aren't seeing this, so to my mind the wort from your return is not getting pulled down through the grain bed evenly.

Andrew


Maybe Andrew, but mash efficiency indicates good even flow. Introduced the stir ages ago due to this problem trying to even up temp between top and bottom of the mash. Am sure it's the thermometer indicating the wrong temp at this stage until I test by replacing the thermometer with a probe. Could also be due to the slow rate of flow that I use, my mash is very open and the grist floats around but after 60 min it has set a little on the bottom due to flow so I still give a turn with the mash paddle after ramping to MO. Only a 10 min MO rest, so the grist is nice and open ready for sparge. Are you using a MM thermometer in your tun? and at what depth is it in the tun, mine is about 120mm from the bottom of the tun.

Cheers,

Screwy
 
Back
Top