Move To All Grain For Thirty Bucks

Australia & New Zealand Homebrewing Forum

Help Support Australia & New Zealand Homebrewing Forum:

This site may earn a commission from merchant affiliate links, including eBay, Amazon, and others.
IMO, the best way to get to supurb beers is to follow the styles. It's really tempting to make up your own "fusion" beers, like a wheatbeer stout with apple cores and eye of newt - but that stuff will work way better for you once you know the road a little better. Thing is, there's so many styles and variations on them, that you'll never exahust the proven recipes. Recipes proven over hundreds of years by people who've done all the cauldron bubbling for us.

totally agree with this... i've probably wandered from style guidelines less than a handful of times and of those probably only half have been any good. I'm yet to understand or nail any particular style, so i like to brew to style as closely as i can.
 
+3 - BribieG put it best a while ago when he said that every new brewer starts out wanting to make an American Pale Hefe Saison Robust Lambic Extra Special Porter Alt Bock Pilsner Weiss and then changes even that specific recipe to something else.

I've learned (the hard way) - find a style, have a plan of attack and go for it. If you must combine 2 styles as something interesting, have in mind exactly why you want (like I want to do a RottRoggenweizen - but I know what I want to achieve very specifically with my additions, what the IBU should be, what I must do to get there).

Usually I do APA/AAA with the same sort of additions hop and malt wise and nail it with my eyes closed.

This is why many have a "house beer" - something they can knock out, tried and tested, for regular drinking. The experimentals are "surplus supply", so you don't end up with nothing but a weird experiment to drink in the fridge/keg.

Goomba
 
Probably a dumb question here.

Is there any reason why you can't just pour some fresh cold water (a few litres ) into the fermeter . Then pour your just boiled wort onto that then top up the rest of the fermenter with cold water?

I assume it would bring the temp down pretty quick plus save you having to wait for the wort to cool normally.

Is it better to cool the wort as quickly as possible?
 
Is it better to cool the wort as quickly as possible?

Yes, I think it is better. But only by an amount so small it's not worth bothering with.

What you've suggested has issues due to volumes. Unless you boil your wort down to what is essentially a K&K volume (3-4L) for a 23L batch, the resulting temperature will be too warm for yeast ... and just about right for nasties.

Clean ice would be a better option.

Personally, I prefer putting a layer of gladwrap over the pot and sitting it on some cold concrete for 12 hours.
 
Personally, I prefer putting a layer of gladwrap over the pot and sitting it on some cold concrete for 12 hours.


ok cheers.
I will just keep doing it the same way.
So far I have been cruising along with no hiccups just using your technique.
 
Check out the method lots of stovetop people use - filling the laundry with ice (or those esky cooler blocks) and putting the pot in.

I've done it before, but it takes a while and makes the brew day way longer.

Also, why not give no-chilling a go? Just need to find a well-sealing container the same volume as your wort.
 
So how has the beer tasting using this technique?


good.
I have been doing variations of dr smurtos JSGA plus the one in this thread.
I have been mucking around with different hops and grain amounts.
 
This is why many have a "house beer" - something they can knock out, tried and tested, for regular drinking. The experimentals are "surplus supply", so you don't end up with nothing but a weird experiment to drink in the fridge/keg.

Well said Goomba, been there done that!!
 
First go at BIAB last night using this method and a 19l Big W pot.
Ended up with 15 litres of 1.061 beer, aiming for 1.049 for the CPA clone in the receipe DB.
So overall 19L of beer after dilution and the starter.

I think I lost some efficiency with the sparge. After dunking the bag in the sparge water and draining, the sparge water seemed to barely take any more sugar out of the bag, looking like very weak tea.
I got much more concentrated liqour out by sitting the bag in a colander over the pot and squashing it with the potato masher.

So I've moved up slightly, and scored one of the 40 litre crab cookers from Rays outdoors.
I'm going to make a Dr Smurtos Golden Ale on Thursday and wanted to double check some techniques.

I think I lost some efficiency with the sparge on my last batch, and talking to some other people, they think I may have some problems with atringency from squeezing the grain bag to get out more sugar.

My sparge with the last batch looked like REALLy weak tea, single dunk of a teabag brew. With a larger pot, I don't need to sparge do I?
Short answer- No, for a 23L brewlength you won't need to sparge in the 40L crab cooker, you should be able to Full- Volume BIAB or at least come very, very close.

I am not sure everyone sparges a BIAB by the same method, so it is a bit hard to generalise, however I'll get the equivalent of about 6L of beer out of it, so perhaps look at your method? Oh, and squeezing the bag is fine, your other friends are just hypothesising, I'd be more inclined to take the word of someone who does it and is more than pleased with the results, BTW so are the beer judges in comps. You don't need to squeeze the life out of it, just wind it up a bit and give it a gentle squeeze.
 
My sparge water looks pretty diluted usually .
I think for me it is more a case of adding the sparge water so when I boil I don't boil the wort dry ..almost.
I fill my 19 lt pot to within a few inches from the top. To stop it boiling over...and just ditch the leftover sparge water.

I did my/a version of Dr Smurto's JSGA last friday and OG was 1052 .
from memory
3.5 JW trad
0.4 weyerman pale wheat
0.4 weyerman caramunich 1
0.25 JW caramalt
12 lts of water
1 hr mash at approx 73 dgrs
sparge in 6 ltrs approx 76 dgrs for about 10 mins using a big spoon to prod the bag with.

90 min boil
60 min 20 gr Saaz hop pellets
20 min 20 gr Amarillo
10 min 1/2 whirlfloc , 20 gr Amarillo, 10 gr dried navel orange rind and 1 teaspoon crushed corriander seed.

I have been told the orange and corriander shouldn't be used in this type of beer.
..but I did it last brew with cascade instead of the saaz and saaz instead of the Amarillo and it was bloody awesome.
I am not really sure if adding that stuff would have made much difference.

My grain amounts are different to dr smurtos only because when I made it last time that was all I had left over..more or less.

anyway ...I don't think this making beer thing ( in the garage ) is as technically exact as I first thought.

oh ....sometimes I just couldn't be stuffed sparging at all.
 
73C was your strike temperature? Not the mash temperature?
 
73C was your strike temperature? Not the mash temperature?

probably ..my brewing terminology is very limited.
started at approx 73. ..then put the bag and grain in and stirred the crap out of it for a minute or 2 and wrapped in blankets.
My thermometer is a bit dodgy. bewteen 70 and 75 is a bit of guess work.
Need a precise one...the one I have is for sticking in lumps of meat I think.
and hour later ( mash out?? ) it was 66 .

no good?

Strike temperature is the water temperature before you put your grain in. 73C is good. It's advisable to use a Strike Calculator if you don't use brewing software.

Your mash was probably 67C dropping to 66C. No worries there.

Had you mashed at 73C you'd be in trouble.

If you're making tasty beer then it's all good. The lowest you want to mash at is about 62C; the highest, about 69C. You can go lower and higher than this, but there's not much point.

66C is a good mid-point that'll get you a nice rounded beer. Under 65C will give you a dry beer with more alcohol. Above 68C and it'll end with a high FG, be low alcohol and really malty. You can use mash temperature to adjust the beer to what you want - a couple of degrees either way makes for a quite different beer - so it's good to have a reliable thermometer.

Easy to chek it's reliable. Cup of ice water (half ice) should read 0C; boiling water (as long as you don't live in the Snowy Mtns) should read 100C.
 
Strike temperature is the water temperature before you put your grain in. 73C is good. It's advisable to use a Strike Calculator if you don't use brewing software.

Your mash was probably 67C dropping to 66C. No worries there.

Had you mashed at 73C you'd be in trouble.


cheers mate,

yeah I think I may have had it a bit high a few times ....77-78 strike .
I have had a few with a very slight sour taste to the brew...it was usually just that basic lager you posted.
First few times it was fine ..I think I have been getting it too hot or that tap needs to be cleaned.

Tap cleaning this friday.

Thanks again.

geeze you must be owed some beers from this joint.
 
As an addendum to Nick's method, and I willingly accede to his greater knowledge and experience, I thought I'd share a couple of shots of today's brew day and my altered stovetop method.

Why?

I do full sized (up to 30L) batches comfortably on the stove. Nick's method started me on doing AG BIAB-esque brewing, and I've altered it to do larger batches. This is handy when I know my house ale inside-out, and I just want to knock up some beer.

Advantages:

You can sparge (some say this is a disadvantage, but I like the increased efficiency).

Extra headspace (no boilovers)

Full sized batch

Good stepping stone if you don't want to pay for an urn, a bigger pot or Mongolian Burner.

Good if your space to brew is limited to your kitchen

Disadvantages:

Takes a little longer than the "true" BIAB method using an urn.

You can sparge (see above)

Requires a 2nd 19L big w pot (mine cost $12 on special)

What you need over and above Nick's method:

2nd big w pot

2 colanders and 2 receptacles for the sparged sugaz

What I do (differently to the Nick_JD method - I'm not going to outline the steps that are the same - I'm hoping that this is obvious):

Get my recipe into brewmate - I use the regular AG method (as I sparge), not the BIAB method setting.

Both pots are on the stove to get to strike temp (sorry for no pic, didn't think to do this until after), I'm doing single infusion, no mashout or anything else (though it is possible, given the extra headspace).

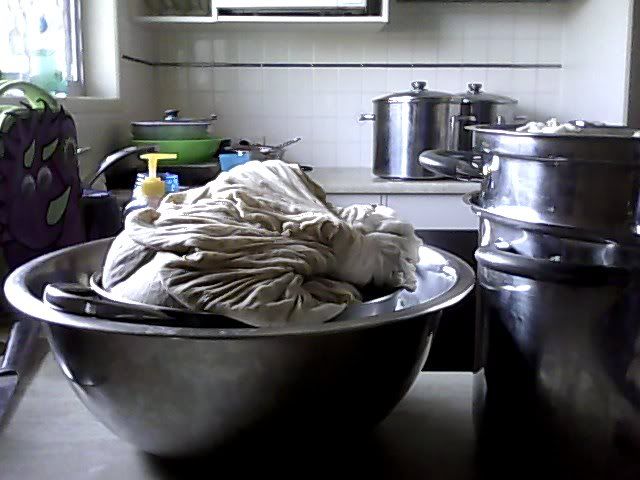
Material goes in (ignore later pic - I didn't put my piece in a gentle cycle, it got frayed and let out some grain - nothing a sieve doesn't fix).

Grain goes in, give it a good stir, put the lids on and insulate with doonas.

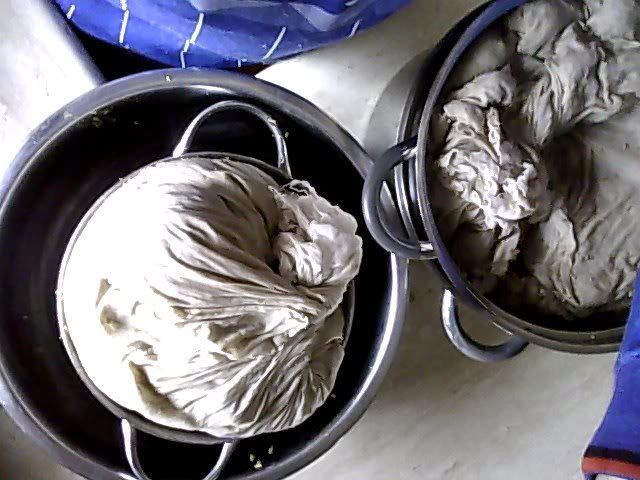
When mash is up, pick up each bag and put it into the designated colander sitting inside the receptacle so designated (piccy below):

Snapshot_20110805.jpg


(I took this after the sparge, but you get the idea).

Boil the kettle (or borrow another and run them concurrently to save time). Mine boils to 85 degrees, which according to brew mate is about perfect.

19L pots should be on the stove, working themselves up to boil temp.

Run the kettle over the bag of grain. Give the bag a bit of a squeeze. Return the sugaz back to the original pot. Repeat until you've sparged as much as brewmate says you should (in my case 17L all up, which means 8.5L per colander - this is the bit that increases the time. Having said that, it also increases the beer considerably, relative to 9L method)

Leave grain-bags in colander, as you will get a little leftover dregs to return during the boil:

Snapshot_20110805_1.jpg


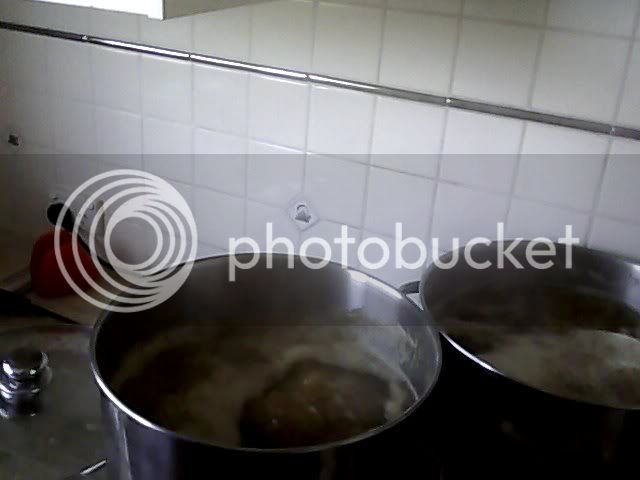
By the time you have finished sparging, the boiling should be occurring:

Snapshot_20110805_2.jpg


(to all the experts, yes I will scrape that break off, but pictures first).

The rest is the same, boil for the required time, add the required hops (though split them into two and share the hop-love between the pots), whirflow, whirlpool, etc.

I do chill (in the sink, stir water around outside of pot, when it gets to about 40 degrees (I guess this), chuck in an ice brick or two into the water (not the wort) to bring it down to 20 degrees). Those that don't will find this method quicker than I do.

I hope this is of benefit to someone. It certainly makes great beer, though it does take longer than the other methods. It's the trade-off for cheapness. It'll probably add another 1/2 hour or so to the brew day, over an urn-based BIAB (the "true" BIAB if it's advocates are to be believed).

More importantly, it shows that any idiot (I'm their king) can apply a little ingenuity to a method, as befits their equipment and circumstances.

Cheers all,

Goomba
 
More importantly, it shows that any idiot (I'm their king) can apply a little ingenuity to a method, as befits their equipment and circumstances.


Nice job Goomba. I like your method. I was doing something very similar, although with 1 larger pot, adding a sparge to BIAB. I agree that with a little imagination you can easily adapt AG to your available equipment and circumstances. I have since evolved to a 3V system, which I do think makes life easier and allows for more flexibility, but it's all home made or adapted, and I'm still using a bag until I finish making the grain screen for my mash tun. I'm all about DIY and think that AG brewing shoulds be within the reach of everyone, not just those with a Braumeister sized budget.

Cheers,
Rosscoe
 
A few places sell pre-made bags, I'm really happy with mine. Even though it is an urn shape, it works fine in an Esky, just tie it up and let it sit. A 47 litre cooler has done the trick for me. Pre-heat your water in your boiler, put it in the cooler and close it up. Then drain it back into the kettle after your mash is done, use gravity to run it. I liked that I didn't have to hoist the bag up, and drained off all the goodies leaving the crud. Coolers with drainage taps of course. A piece of tubing will do to direct your flow.

cheers,
Yandy
 

Latest posts

Back
Top