Braumeister NEXTGEN Build

Australia & New Zealand Homebrewing Forum

Help Support Australia & New Zealand Homebrewing Forum:

This site may earn a commission from merchant affiliate links, including eBay, Amazon, and others.
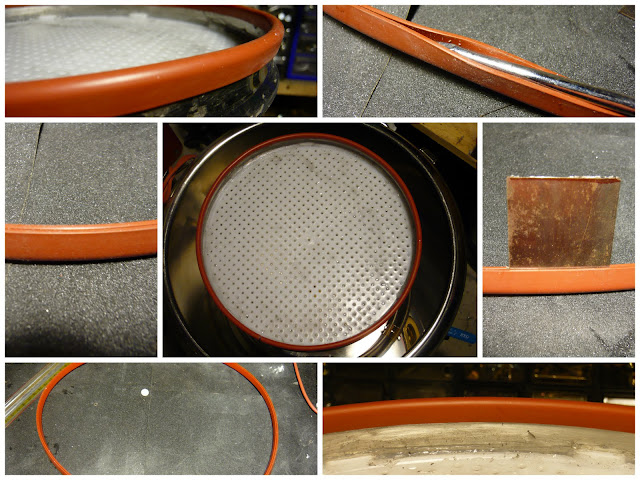
looks good davide I'm sure you will be able to sort it out the seal problem. With a thicker seal and more pressure and you will be right.

On the braumiser side of things I have sorted out a few problems with the way the pump rests works, now it waits ten minutes if the heat is still on it waits until the heat is off and turns the pump off for 2 minutes or until the PID calls for more heat. I had to put this in because the way i had it the pump would rest but the heat was still on, with the temp sensor on the bottom and no circulation the temp sensor would not see any temperature rise until the pump would kick back in and then the temp would overshoot.

I have also added, in auto, the ability to finish stages early by holding in the start button for 1/2 a second and also the ability to pause at any time, it won't be long and ill be able to post all the schematics and program information.

cheers matho

I'm tipping this will be the most anticipated post of the year coming up Matho! Can't wait to see the hole thing done and dusted.

Awesome work!
 
Thanks Nath,

here are some pics from tonights test

SANY1550.JPG

SANY1551.JPG

with German laws so prohibitive about the amount you can brew I would have thought that speidle would have made a 10l version. The braumiser is the perfect size to brew on the kitchen bench, I reckon that it would be perfect size for apartment brewing (that is if your better half likes the smell of brewing :p)

cheers matho
 
Hi

Still fighting with sealing issueI have received the spare part of the original malt pipeand it looks great for sealing pourpose : it's U channel ring enough thick and compressible

I had to cut in the middle and shorten the total length than I have applied to edge of my stove pipe. It fits quite well and stay attached on the edge as you can see in following pictures

Single%2520Vessel11.jpg

So I was expecting to fix the sealing issue once and for allbut filling the rig with water and starting the pump again poor sealing and non change to fill the malt pipe even applying a strong pressure on the top.

I have tried to troubleshoot again the situation filling the malt pipe from the internal and looking where the leakages occurs.than I have tried with a light inside the malt pipe in a dark environment in order to highlight any empty space between the silicone sealing and the bottom.

With both methodology I was able to detect some leakagesin few zones maybe less than 1mm

The point is that some imperfections of the bottom and the edge are presentand are not compensated by the silicone sealing.

I realize that the fittings and connector applied to the bottom have slightly modified it the stainless steel bottom is very thin and tightening the connectors in some way the bottom has been modified.

At this stage I have two chancecontinue with current approach or change the approach (using a pot with a quick disconnect connector or camlock connector)

Last idea I had is to use a liquid silicon rubber mouldable.!!


Silcone Rubber Mouldable


I have discovered a lot of interesting products that allow you to build your own moulds they are made of two component and you can mix in order to obtain a paste.

The idea is to use the paste to produce a custom sealing that perfectly compensate the bottom/pipe imperfections

What do you think about ?? It's worth while to try ?


Davide
 
hi davide, good looking work there

can you move the seal up away from the lip of the pipe to give a bit of play? might need to secure it with small machine bolts or something
 
Davide,

It could be worth a try, the only problem i can see is if you make a seal to fit the imperfections then you have to make sure that you fit the seal back in the exact location that the seal was made or it won't seal. I still reckon that if you get a thick walled silicon hose then you will be able to compress it enought to seal the bottom of the pipe.

The first pot i had, the bottom warped from drilling the holes but the second pot i was a bit more carefull and because i have a strap of 2mm stainless steel under the pot the bottom has remained warp free.

Edit: how thick is the braumiester seal on the bottom?
cheers steve
 
made up a mounting bracket for the march pump that should be here soon

mount1.JPG

mount.JPG

once the pump arrives ill be putting an IEC male plug on it and wire up a female socket so with the disconnects and the bracket it should be easy to remove

cheers matho
 
Oooooooo im loving this!

I have been planning my rig before i go to see a sheet matal place to have it's parts built....... and the one thing i have stumbled on is sealing of the malt tube.

I have considered having a SS ring welded on the base to form a flat surface, that i can run a good bead of food gade silicon on to seal, but getting the bead even would be interesting.

Im liking hte look of the origional sealing stuff.....anyone know where we can get it from?


Here bud.
 
Ahhhh awsome!!!!!!!!!!!!

Now..... does anyone know the diameter of a Spiedel 50 liter malt tube?
 
Well thanks to a fellow AHB'r i have discovered they are 350mm diameter...... PERFECT :)
 
So here is the mechanical part of the build in PDF

View attachment BrauMiser_Build_Part_1.pdf

the next part will cover the controller build and the final part will be and instruction maunal

I should have the second part finished in a couple of days hopefully

cheers steve
 
nice steve would love to see your thoughts after a few brews. I might wait to upgrade to a herms and go something like this. Although I still want to do doubles and dont like the idea of electric but its hard to automate gas haha.
 
nice steve would love to see your thoughts after a few brews. I might wait to upgrade to a herms and go something like this. Although I still want to do doubles and dont like the idea of electric but its hard to automate gas haha.
yep no worries mate
 
next few days he said. Sure there is a heap to put in its not a simple build even with the instructions I am sure if your not a electrician or a electrical engineer then you will have to get one to help you
 
Hi Tony

Do you know the height of the 50ltr malt pipe ?

Cheers


Copy / Paste:

the 50L malt pipe is 350mm OD x 472 long. It has a 10mm lip rolled over at 90 deg at the top as well as a 10 mm deep 'V' indent rolled inward 90mm up from the bottom to hold the bottom filter plate.


Mine will be 350 x 450 and will work something out to hold the bottom filter plate...... 4 bits of 12mm dia SS round bar, 10mm long, drilled and tapped and screwed in from the outside should work fine!
 
Arzaman,
Dont know what your malt tube diam is but you can get big hose type clamps. Put your filter in then tighten up, should seal it up nice i reckon.
Cheers
Sean
 
and dont like the idea of electric but its hard to automate gas haha.


Mate...... with gas, you lose about 90% of the heat energy you produce around the side...... not much goes into the kettle. With electric its the opposite.

Far more energy efficient thus cheaper to run!

Also i hate the noise of a big burner when i want to listen to music while brewing :super:
 

Latest posts

Back
Top