Braumeister NEXTGEN Build

Australia & New Zealand Homebrewing Forum

Help Support Australia & New Zealand Homebrewing Forum:

This site may earn a commission from merchant affiliate links, including eBay, Amazon, and others.
I think i'm going to get done for double replys.. but here goes..

Seals! seals between the mash pipe and the kettle and the mash pipe and the upper filter screen.

what are you guys doing in regards to this?? and what supplies are you using clark rubber etc.. Ive been lurking around the forum and it seem you guys have problems with the seals and the mash/trub leaking into your wort.

cheers

Andy,
 
Does anyone know of a good alternative low heat density coil like Blichmann boil coil? It is probably one of the more reasonable thing they sell, but I heard of talk about dip elements that hang over the side possibly. Only ones I've seen are low power.

I know there is the water heater element option, but those tend to get in the way and are relatively high watt density. Also wanted to avoid drilling more holes in pot if possible.

I know some have done custom bend parts, but I am looking for 'off the shelf' to keep it simple and quick. Please advise if anyone knows of other option(s).

Thanks...
 
Hi guys
A couple of update related to my all in one clone solution and Ardbir team development
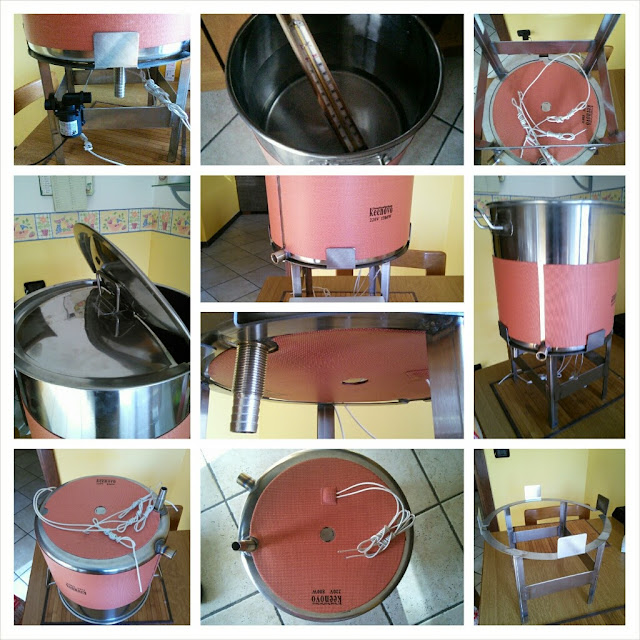
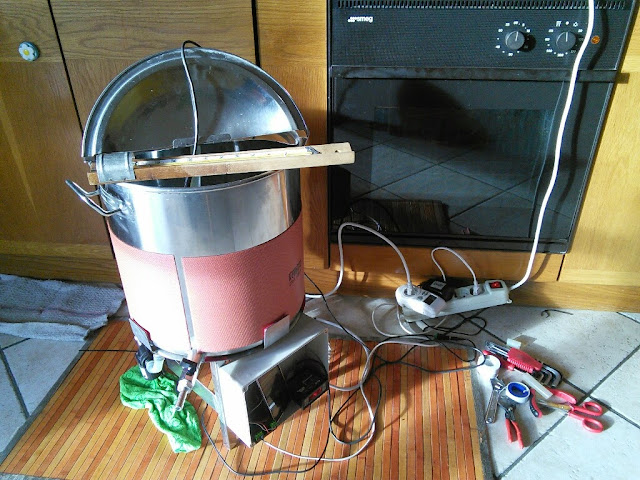
1) Silicone Heater

It’s an idea that I have since long time ago: use external silicon flexible heater band in order to mange the mashing and boiling process
The advantages are more than one, have uniform heating without scorching the worth with immersion heater, have an internal surface without any interference for whirpool, easy cleaning etc…

Now the idea is a reality and prototype, I have requested some custome silicone heater to a specialized company and I have mounted on my BIAB pot
The bottom pud is around 800W @ 220V while the lateral band is 1700W
They are self-adhesive with special 3M glue and easy to install

upload_-1.jpg


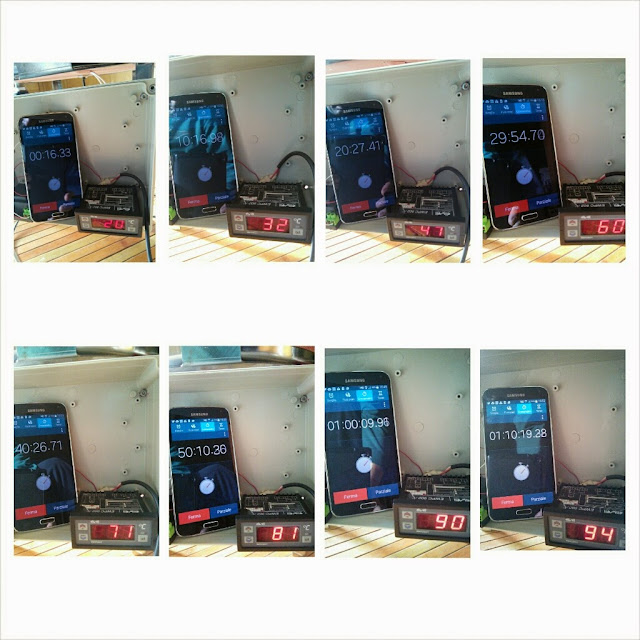
First test are promising , I would like to run a full test from cold water to boiling logging time/power/temperature and share the result


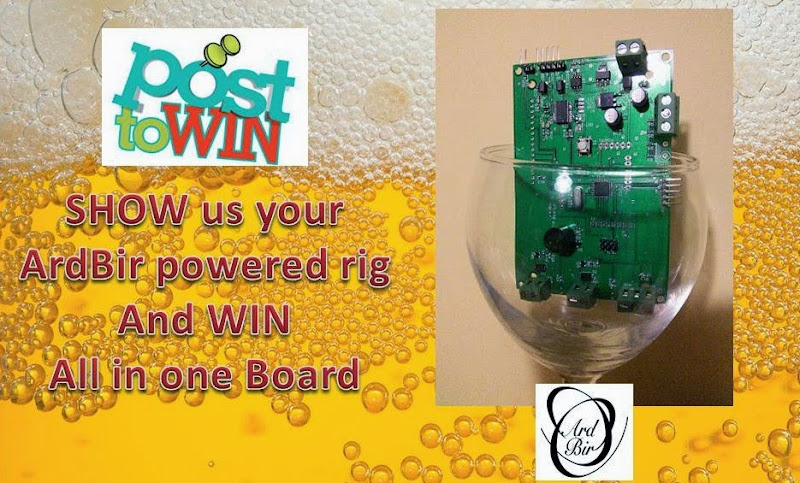
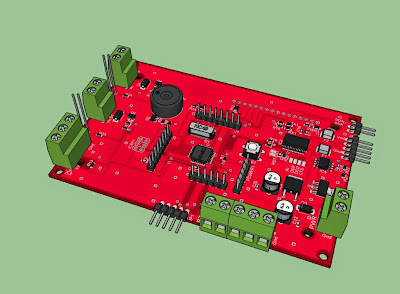
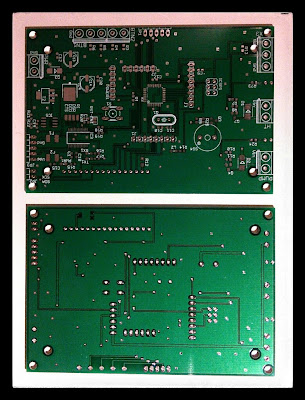
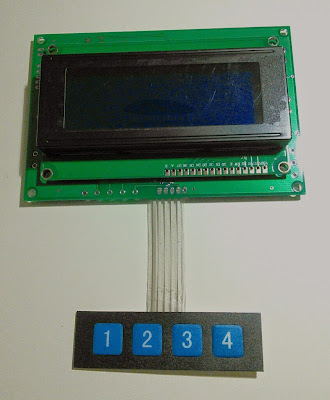
2) ArdBir automation - all in one board

The ArdBir project is proceeding on many threads ..from SW features…to new HW set up
We decide to engineer an all in one compact board with atmel micro on board, USB interface, all ordinary interface (heater, pump, keyboard..) with component on the bottom and display on top.
The design is completed and here you can view the 3D rendering

upload_-1.jpg


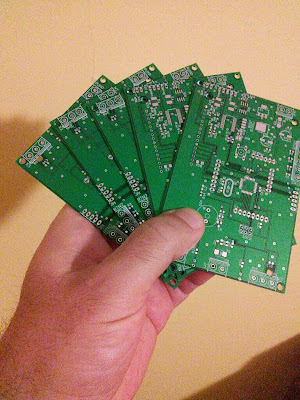
PCB for few prototype have benne produced and we have sourced component

upload_-1.jpg
upload_-1.jpg


upload_-1.jpg


In a short time we are ready to test and share the info

stay tuned
Davide
 
[SIZE=10.5pt]Las Sunday I have performed as promised some tests with current configutation:[/SIZE]

[SIZE=10.5pt]25L of water , silicone heater direct connected to power supply (220V AC) without any controller[/SIZE]

[SIZE=10.5pt]Recirculating pump always on, digital temperature probe and a wattmeter on the main supply[/SIZE]

[SIZE=10.5pt]
upload_-1.jpg
[/SIZE]

[SIZE=10.5pt]Every 10 minutes I have a temperature sample as you can see in the picture[/SIZE]

[SIZE=10.5pt]
upload_-1.jpg
[/SIZE]

[SIZE=10.5pt]The rump up is quite good with more than 1C per minutes[/SIZE]

[SIZE=10.5pt]After 1H 20’ the water start boiling and even if it is not a roll boiling like gas the evaporation was quite good.[/SIZE]
[SIZE=10.5pt]The video shows you the result[/SIZE]

[SIZE=10.5pt]http://youtu.be/_kmqVdywYiI[/SIZE]

[SIZE=10.5pt]The power absorption was around 2200W[/SIZE]

[SIZE=10.5pt]
upload_-1.jpg
[/SIZE]

[SIZE=10.5pt]I can conclude that the technology is promising and adding a good thermal insulation can be used effectively for small volume and compact systems[/SIZE]
[SIZE=10.5pt]Next steps adding the ArBir controller and complete insulation[/SIZE]

[SIZE=10.5pt]Stay tuned[/SIZE]
[SIZE=10.5pt]Davide[/SIZE]
 
micbrew said:
hi guys

im in the process of building a bm clone
and am wondering what is the best method of securing the 12mm s/steel rod to the base of my mash tun

drill hole and use hex lock nuts with silicone washers to seal
as this will be what the top and bottom filter plates will be used as a locating pin
could be prone to leaking :unsure:

or is there a better method
I will go with a round-shape stainless steel block that will have a thread in it, and braised to the bottom of the pot with silver soldering. The rod will have thread of the same size on its tip and will just be screwed in.
 
Hi all,

What a thread, I cant say to have read every last post but I've tried my best.
I have a few questions to ask of previous builders but I wont put them all into the one post, ill just ask a few this time round!

Has anyone tried this pinchweld for the seal on the malt tube: http://www.clarkrubber.com.au/epdm-rubber-small-pinchweld-with-side-bulb-21mm-x-13mm.html
The only potential issue I see is the material being too hard to compress the bulb and achieve a good seal, otherwise I think it would work quite well.

Second question - is the keg king pump suitable for the job? I am aiming for a clone similar to the 20l braumeister using the following pots: & http://www.livingstyles.com.au/40cm-45L-Stainless-Steel-Deep-Stock-Pot/10799/?search_words=stock%20pot I've found the pumps to be pretty gutless but perhaps its more than enough.

Third question: What height is the thermowell that comes with the lael kit? I notice most people seem to put the thermowell outside of the malt tube beside the pump inlet - no issues with it being so close to the heating element?

Cheers,

Fergal.

Edit: link removed to first pot, its the soga 21l off ebay. 30cm x 30cm
 
Hi Ferg

The clark rubber link did not work. Rubber is probably not recommended and anything with metal also not advisable. The recommended seal is the silicone tubing slit along its length and cut to length. Works for me and others. Have had people use seals from Braumister agents cut to length or the lid seals from pressure cookers. Big concern is is the seal good for the temperature and does it impart any flavour or chemicals?

You can use almost any pots providing there is space between the two for elements etc. i got a 50litre SOGO for main pot and it has sandwich base that has some advantage and some disadvantages. For internal pot go for one without I would think will make cutting easier.

I know some have been having pots made or even making their own. Getting a tall enough malt pipe can be difficult.


James
 
Hi James,

Not sure why that link didn't work, thanks for posting a working one stux.
The material is epdm which I feel would be suitable, the problem as you rightly pointed out it the metal inside the pinchweld part - assuming it does have metal running through it. I've dealt with a company called mills rubber who have hundreds of extrusions available which would be suitable for when you cut out the bottom of a pot, a lot of the 'e shape' ones would probably work, problem is they don't stock anything so I would either need to get them to do a run of an extrusion or find a stockist.
The braumeister malt pipe seal would not work as well for hole cut out of a pot as the seal is being compressed at the wrong angle (90 degrees). As you said though, silicone tubing with a slit down it will do the trick.

On the topic of the base - how do people normally cut out their hole? Does it being a sandwich construction make it harder or what? I would have thought with the aluminium layer it might have been easier to cut...
 
Hi
The problem with stainless steel is that it work hardens very easily and quiclky. Basically you can use normal drills but the stainless may blunten them very quickly and you may not get through if it work hardens.

I used standard drill bits to drill the smaller holes using small bit for pilot hole and then stepping up a couple of mm at a time drilling holes progressively larger to the size desired. For the big holes I used TCT hole saws. Tungsten carbide tipped hole saws cost a fortune but are cheap from China on Aliexpress or ebay. Can be around $10 each if you are prepared to wait. Or borrowed(thanks)

When drilling stainless use a slow speed, constant pressure and cutting fluid. Best is to use a drill press but big pots will make that very difficult. I have managed to drill holes with a hand held drill with care.

Sandwich base combines stainless with aluminium. Aluminium drills well but clogs the drill's flutes unless a cutting fluid is used. And if you back of the pressure when you hit the stainless you can work harden it. In some cases people sharpen masonry drills to cut stainless or use cobalt drills but the thickness of the pots means this is not required, just slow and steady with cutting fluid.

James

You may find someone local who can help or lend some of the bits.


Sent from my iPad using Tapatalk HD
 
Cheers for your reply James, much appreciated. Just wondering what's the consensus on the keg king pump? Is it up to the task? Really excited to get this build underway, hopefully I end up with something nearly as good as a braumeister. Well something that produces as good a beer as the brau anyway!
 
Hi Ferg
Not used a keg king pump

I have a chugger i bought new and a march i bought second hand. There is a pump called little brown pump and then kaixen (spelling?). I think many types work
I think I read the Braumister pump is a solar recirculation pump?

As long as the temperature is ok then it should work. The flow and pressure does not need to be very high. Infact many have to use extra valve to slow the flow.

James
Sent from my iPad using Tapatalk HD
 
I've got a chugger in my system and choke down to slow trickle for first 10 mins of mash cycle to soak the grains.
Very rarely use full flow on chugger. Prob run at half on ball valve. No idea what actual flow rate is though in L/m.
 
Hi everyone, yet another build inspired by this forum for your information. Thanks to all the pioneers for sharing your clever solutions.

This build started with a cheap set of stockpots off ebay ($100 for 50,35,20L) probably a 400 series ferritic stainless and prone to rust discolouration/corrosion but I'm hoping that phosphoric acid senitiser will passitivate them. What these pots do have though, is domed bases (also thin and flexible) so I've been able to use them metal on metal without any additional sealing between main vessel and malt bucket . The pots are also self locating so I've avoided the central tie rod, instead using a clamping assembly off the sides.

I was going to use a wedge wire screen for the base screen, but couldn't find anyone that would sell (cheaply) me a small offcut, so the he bottom screen became a stainless pie tin cut with a dremel tool. The pie tin side lift side lift the screen and allow effective dispersing water through the grain. The top screen is the pot lid cut with the dremel. I have only used the brewery once but the screens seem effective and did not clog.

Pump and fittings were sourced from KK and a marine chandlery, The heating element is from Tobins. Temperature control is via a cheap PID and PT100 RTD, which seems to be pretty accurate when pump is running but less so when not. Probably due to RTD being below the heating element. The electrics are pretty basic with direct switched pump motor and contactor and SSR switched heating element. Maybe one day I'll upgrade to a Braduino or similar system. I do plan to add a whirlpool pool pipe and maybe try a low pressure CIP system.

Cheers Mick.

IMG_5104 (800x600).jpg


IMG_5099 (800x600).jpg


IMG_5086 (800x600).jpg


IMG_5044 (800x600).jpg


IMG_4998 (800x600).jpg


IMG_4987 (800x600).jpg


IMG_4985 (800x600).jpg


IMG_4981 (800x600).jpg
 
The 3rd version of my braueister clone is almost ready
The differences and innovations compared to the others are

-heating with external silicone heater
-full process control trough the Open ArdBir software running on a dedicate all in one board

Few things to set up and I'm ready for first batch

Stay tuned
Davide

1425759911467.jpg


1425759937559.jpg
 
[SIZE=18pt]1st ArdBir Contest !![/SIZE]

[SIZE=10.5pt]Post on our Facebook page your BIAB system ArdBir powered and WIN a assembled all in one boar[/SIZE][SIZE=10.5pt]d[/SIZE]

https://www.facebook.com/pages/Open-Ardbir/606829852720387

[SIZE=10.5pt]Basic rules[/SIZE]
[SIZE=10pt]· [/SIZE][SIZE=10.5pt]write NEW post “ArdBir contest” on FB page[/SIZE]
[SIZE=10pt]· [/SIZE][SIZE=10.5pt]describe briefly your set up (SW and HW version, litre, recirculation, heating, pump..)[/SIZE]
[SIZE=10pt]· [/SIZE][SIZE=10.5pt]insert one ore more picture showing ArdBir integration and any relevant technical details[/SIZE]

[SIZE=10.5pt]The winner will be selected based on “like” on the post and ArdBir Team evaluation (criteria: most professional, innovative, original, well designed..)[/SIZE]

[SIZE=10.5pt]Contest duration 2 weeks[/SIZE]
[SIZE=10.5pt]people who has already posted their rig should resubmit ![/SIZE]

[SIZE=10.5pt]Enjoy[/SIZE]
[SIZE=10.5pt]Davide - ArdBir Team[/SIZE]

[SIZE=10.5pt]
ArdBir%2520Contest.jpg
[/SIZE]
 
Braking news !!

ArdBir software release 2.8.3 is ready for download !!

http://goo.gl/SXVZxn

It's the release candidate and we need your test and feedback

Please remember that after uploading the sketch you need to set all parameters!

Enjoy
Ardbir team
 

Latest posts

Back
Top