Copper Immersion Chillers

Australia & New Zealand Homebrewing Forum

Help Support Australia & New Zealand Homebrewing Forum:

This site may earn a commission from merchant affiliate links, including eBay, Amazon, and others.
from my experience leaving it just sit there will take the wort alot longer to reach pitching temp..

I'll make this baby and give you my rates of chill.. I'll be using a submersable pump with ice+salt bath..

I do neither. Chiller sits in the wort undisturbed until desired temp has been reached.
 
In the winter (Tap Water is 10.5C) I can cool over 40 liters of wort down to 20 degrees in 18 minutes.

In the summer (Tap Water is 26C) it takes over 45 minutes and only gets down to 27. I usually stop around 30C and put it into a bathtub full of 18 degree water to get it down to pitching temp.

I stir it almost constantly both times, and it makes a WORLD of difference.
 
That's interesting on the effectiveness of stirring. I've never done it myself because I've always been on the opinion that the wort runs clearer into the fermenter if left undisturbed. I will have to give it a go next brew.
 
if you want clear wort, check out whirlpooling...
 
well i coiled my new copper and put my old chiller next to it.. I think it might be a little better :)

med_gallery_9889_579_51678.jpg
 
Thought i'd give it a bash making my chiller today.. here are some happy snaps I took (sorry about pics from my phone)

First up is my "work bench" its fantastic! (little small) :)
med_gallery_9889_586_34447.jpg


This is my first attempt at the top part.. I stuffed up the highest solder
it failed the "water" test so I had to re-solder. (first time soldering copper)
med_gallery_9889_586_32863.jpg


resoldered the top and cut it down a bit to make it look a little better (past the water test, complete chiller without the whirlpool return)
med_gallery_9889_586_115606.jpg


The wort return (whirlpooling)
med_gallery_9889_586_14434.jpg


Placement of the return
med_gallery_9889_586_84077.jpg


and finally , picking up the wrong thing at the wrong time equals

med_gallery_9889_586_57931.jpg
 
looking very nice there, i like the whirlpool attatchment - given me some ideas for my brewery thanks!

bad luck with the fingers - been there done that :)
 
Ok, its finished.. had a test and its working a treat! still have to clean with PWB or something.

I have used a brass connection on the wort return with a SS camlock connected.. not sure what the brass might do with the wort.. i've heard that it could be bad.. is this true?

chiller test with the whirlpool flow
med_gallery_9889_586_123605.jpg


Some bits that were in the whirlpool tube and shows its whirlpooling nice..
med_gallery_9889_586_150930.jpg


Sitting in the pot with water test - bit concerned if the whirlpool tube will be in the wort after boil - hopfully the size of the chiller will raise the wort level enough
med_gallery_9889_586_11210.jpg


Sitting in pot again
med_gallery_9889_586_101141.jpg


Finished unit with Camlock for the wort return and the other two for the water..
med_gallery_9889_586_89617.jpg
 
Looks great Gava, I assume you would just run the whirlpool for the last 10mins of boil to sanitise?

As for the Brass, its not a problem if you pickle it as per John Palmers description here: How to Brew - Metals
 
Here is the best tutorial I have seen:

I made this one based on the tutorial:

Chiller.JPG

I found 6M lengths of annealed copper pipe half price at bunnings and joined 3 and a bit together to make a 19M coil for about $60. Good value.

Alf
 
Last edited by a moderator:
Cheers...

Yeah i'll whack it in the last 10mins to sanitise and start the whirlpooling a few mins before flame out..

no idea if thats what im supose to do but I'll give it a go :)

Cheers for brass info..

Looks great Gava, I assume you would just run the whirlpool for the last 10mins of boil to sanitise?

As for the Brass, its not a problem if you pickle it as per John Palmers description here: How to Brew - Metals
 
Oh thats a good idea!!!! hmm I got the 18m coil for $109 might have been better to check out joining.. well its done now :)

can't wait to see how quick it cools it.

whats the time it takes yours to get to pitching temp?

the one i made is suppose to do boiling to 18c in 15mins or something insane..

Here is the best tutorial I have seen:

I made this one based on the tutorial:

View attachment 34932

I found 6M lengths of annealed copper pipe half price at bunnings and joined 3 and a bit together to make a 19M coil for about $60. Good value.

Alf
 
Last edited by a moderator:
Gava,

I don't have a pump so mine is just a straight immersion chiller. Mine seems to be quite dependent on cooling water temp. This time of year tap water is around 24C so I can never cool it below that temp and it slows down a lot the closer I get.

I haven't used mine in winter yet, but the performance should be much better. Mine will chill 30L to around 30C in around 40 minutes with cooling water of 24C in 30C ambient temp. Not spectacular but I'm keen to test it out in winter- say 15C cooling water and 18C ambient.

You will have the same issue as mine but to a lesser degree- your cooling water has to be at or below pitching temp to get the beer that cold and it will be slow unless the cooling water is much colder than pitching temp. I don't think you will get to 18C in 15min unless your cooling water is say 12-14C. Some people have prechillers for chilling their cooling water but I haven't tried one.

The youtube video tutorial I linked above is really worth a watch for anyone else trying to make an IC.

Good luck with it.

Alf
 
my chiller water will be recirulated with a sub pump within a 100lt portable tank and will have large ice blocks with salt.. this should be very cold by the time I start pumping.. Hopfully I can chill the bajebus out of it..

I'll post the results when i get around to testing that..
 
my chiller water will be recirulated with a sub pump within a 100lt portable tank and will have large ice blocks with salt.

I think this will be the key to actually getting to pitching temp rather than just "much colder than boiling". What might be worth doing is using tap water for the first 2 min to remove most of the heat from the beer without heating your chilled water then start using your chilled water to drop it down quickly to pitching temp. The difference between the cooling water and the beer will be the biggest factor with your chiller- 24C tap water with 98C beer will chill quickly then use 5C chilled water with 40C beer.

I might have a look at getting a chilled cooling water tank and pump as it would improve cooling time and use less water. Le me know your results.

Alf
 
To answer the question on the tubing bender the easy way is to use the one that looks like a spring. One end has what looks like a cone on it. You need the correct size for the tubing. Anyplace that sells the tubing should have them for a few bucks. If not a good hardware store should have them. No need to solder fittings. I just use vinyl hose and clamps with a hose adapter on one end.

If I were going to solder I would make a counter flow chiller instead of a coil chiller. Not as great as a plate chiller but they have the advantage of being less likely to clog up. They use less water and copper then a coil chiller but require more skill to make. They can also be made with just vinyl hose, copper tube, and fittings with no soldering.
 
I was thinking of doing a counterflow chiller until I did some research.

A good write up is the follow link : http://www.mrmalty.com/chiller.php

Im sure the both have their good points and people will prefer different things.. but I thought the immersion chiller will be the way i go with a whirlpool attachment.

To answer the question on the tubing bender the easy way is to use the one that looks like a spring. One end has what looks like a cone on it. You need the correct size for the tubing. Anyplace that sells the tubing should have them for a few bucks. If not a good hardware store should have them. No need to solder fittings. I just use vinyl hose and clamps with a hose adapter on one end.

If I were going to solder I would make a counter flow chiller instead of a coil chiller. Not as great as a plate chiller but they have the advantage of being less likely to clog up. They use less water and copper then a coil chiller but require more skill to make. They can also be made with just vinyl hose, copper tube, and fittings with no soldering.
 
I've experimented with a 30 plate chiller and didn't like it.

What didn't you like about it? Curious, I guess.

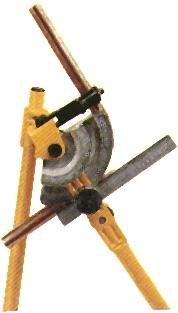
And Manticle, I do have a copper bending tool (if you want to do 90 bends without the need for elbows) like this:
bender.jpg

and flaring tool which you are welcome to borrow or drop by my place for a beer and finish the chiller over here, if you go diy. I'm inner city melbs.

Cheers
reVox
 

Latest posts

Back
Top