Tight Arse Stir Plate

Australia & New Zealand Homebrewing Forum

Help Support Australia & New Zealand Homebrewing Forum:

This site may earn a commission from merchant affiliate links, including eBay, Amazon, and others.
Have you got the same pole of the magnets towards the glass ? Pretty sure they need to be opposite, can't remember. Got it wrong when I built mine and had to swap the magnets over.


errrr... dunno... gonna be fun getting home tonight and un-glueing one of the magnets from the fan, then turning over. So you're saying 1 magnet with positive up and the other magnet with negative up?
 
Yup, one N up and the other S up. A hot air gun (or hair dryer i suppose) will soften the glue up nicely.
 
Ended up sorting it out... magnets were marginally too far apart.

Goes like a rocket now in 2L... psyched to get a starter going soon
IMG_0531.JPG
 
Just curious, do you run the the stir plate just at the start to airate it, or for the whole starter ferment proces?

Thanks
 
Thanks for keep bringing up my name and "has no idea what the hell is he is doing" all the time, guys :D

Just wanted to say a big THANKS again to Steve/matho for taking pity on my electronics skills and building a controller "thingy" (I know, I know..)

It works brilliantly, it spins the fan beautifully and by turning the little bar I can control it from slowly moving yeast around to full-on tornado.
Very cool little thing!

thanks again
Bjorn
 
It's good to hear that you got it working bjorn I have a 2l starter going at the moment

Cheers steve
 
Just curious, do you run the the stir plate just at the start to airate it, or for the whole starter ferment proces?

Thanks
For an active "starter" just run the stir plate until you see some signs of fermentation... ie bubbles running up the side of the flask, start of a krausen etc. Then turn it off. You don't want to be adding oxygen to the wort once fermentation is underway. This will oxide the wort giving off flavours when you add the entire contents of the active "starter" to the waiting wort. You want to pitch active "starters" to the wort at the peak of fermentation, this gives the yeast a running start at the main wort.

For yeast culturing/stepping up, keep the stir plate going the whole time until fermentation is complete. Then crash chill the wort to settle the yeast. Decant the oxidised beer from the yeast cake and either pitch just the slurry to the wort or add more wort to the flask for a step up, in order to produce more yeast.
 
Thanks, thats exactly what i was after. My plan it to run it during the step up phase and then following crash chilling, re suspend using fresh wort and then pitch.

For an active "starter" just run the stir plate until you see some signs of fermentation... ie bubbles running up the side of the flask, start of a krausen etc. Then turn it off. You don't want to be adding oxygen to the wort once fermentation is underway. This will oxide the wort giving off flavours when you add the entire contents of the active "starter" to the waiting wort. You want to pitch active "starters" to the wort at the peak of fermentation, this gives the yeast a running start at the main wort.

For yeast culturing/stepping up, keep the stir plate going the whole time until fermentation is complete. Then crash chill the wort to settle the yeast. Decant the oxidised beer from the yeast cake and either pitch just the slurry to the wort or add more wort to the flask for a step up, in order to produce more yeast.
 
Hi Argon

I built one of these but can't get it to work properly. I have a feeling that the magnets may be too far apart.
What size stir bar do you use?

In response to the above that was in the other thread (not wanting to derail that one)

I use the 25mm stir bars as available from digitalhomebrewer.com

I too had a problem with the bar "taking" so I moved the magnets much closer together. This sorted it out immediately. The bar was kinda jumping about and would spin. Definitely move them in a bit and see how that goes.
 
Got a weekend night to myself away from SWMBO so started noodling around in the shed and by late evening got stuck into pulling the drill press out of storage and reassembling it.

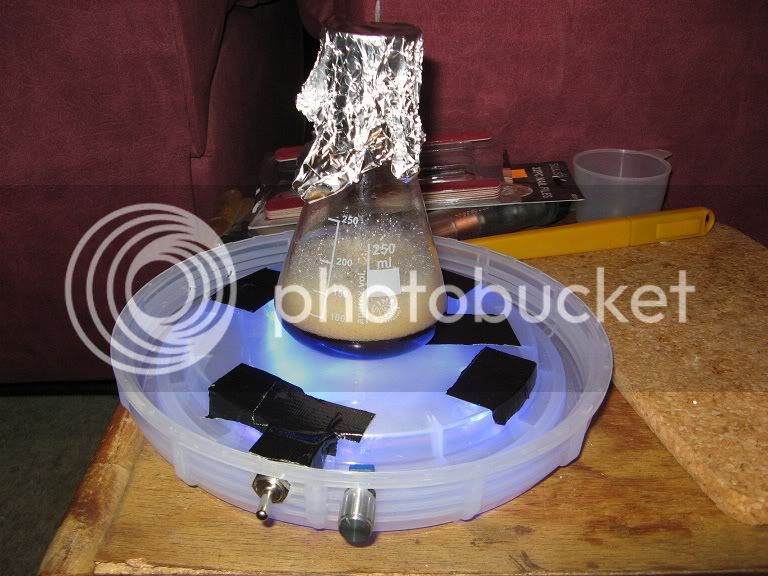
Prototype 240Volt AC Stirplate.

Cooling holes on all sides, large venting holes below.

I have ditched the top for now as will use either clear acrylic top or simple idea of using a rubbermaid or tupperware style container, square in place of the lid. The Flask sits in the tupperware container which is a spill containment receptacle in case of excessive foaming.

I have to go look at plastic containers and see how much if at all they depress under different weights to build the magnetic disc height to get the magnets right up against the plastic container while not touching. This should get the magnets up close as possible to the flask while keeping them as far away from the fan as possible.

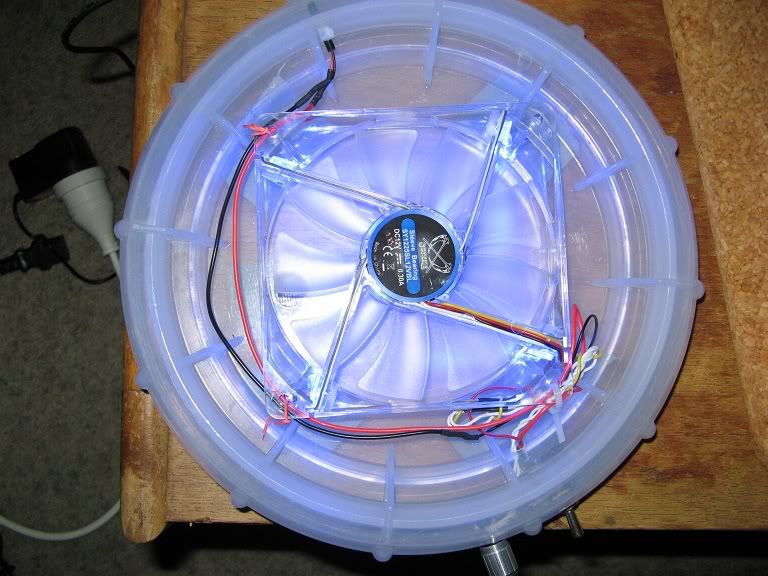
Full 240 Volt Shaded Pole Fan controlling Triac with 240Volt switch and noise suppression circuitry.

I have a conduit box I will cut down to make a sealed environment in which to do all the wiring. Thinking about a silicone seal around the Triac compression fittings.

As you can see this is a monster fan with enough guts to pull through some large batches. Not a bad eBay buy at $14 compared to Jar Car.
View attachment 26847


I ordered all the gear for an AC stir plate but I only got a 80mm fan. As long as the stir bar is the right length, I'm hoping it'll still work. Obviously I haven't put it together yet but wanted an opinion.
 
Its time to build up some large lager-yeast starters so I needed another stir-plate.
Here is my DIY Stir-Plate V3.

120mm speed-controlled PC cooling fan. ($12 on special at PC Case Gear)
12V power adapter. ($2.05 Ebay)
8x small rare-earth magnets. ($4.50 for 20 from DealExtreme).
On/off switch. (~$2 Electronics shop)
Solder, a few bits of wire and some gaffer-tape so the screws don't scratch the glassware.
stirplateV3.jpg

... and a good use for old fermentor lids, no need for them if you cling-wrap.

Total cost was under $20.

There is an abundance of 'LED Dimmers' on Ebay now that also make good speed-controllers, but I was lucky and got it built-into the fan.
 
Nice one there Wolfy!! I'd love to see the underside in pics.
 
Nice one there Wolfy!! I'd love to see the underside in pics.
Didn't really think to make it neat on the underside, but here you go:
stirplateV3b.jpg


Assembly:
(If you were happy to turn it on/off via the wall-plug, wire the red/black wire from the adapter-cable to the matching red/black wires from the fan and mount/house it - nothing more!)

What I did for what you see above:

Cut adapter plug and fan connector off.
2 lengths of wire to run the power from the 'back' to the 'front' where the controls are.
Then black wire from the adapter goes straight to the black wire from the fan.
Red wire from adapter goes to one terminal on the switch, then the red wire from the fan goes to the other switch-terminal (essentially connecting the two red wires together when the switch is turned on).
(Yellow fan wire is cut/not used).
The white wires are for the control pot, and come pre-assembled with the fan (I had to cut/rejoin them since the fermentor lid has a double-lip).

Fan is "Scythe 120mm Blue LED with VR Fan (SY1225SL12VBL)" and setup like this seems to stir stuff well through the speed range of the fan which the specs say is 800-1600RPM.

Magnets are super-glued to the fan-hub same as my old one: http://i184.photobucket.com/albums/x37/k_w...r/stirplate.jpg
From my limited tests, seems best to place the magnets as far apart as the length of the stir-bar, just the 2 inner ones are fine for a small stir-bar, but the longer one needed the addition of the extra magnets. There are 8 magnets used (stacked 2 high) I don't know if doubling them up makes it stronger or just lifts them a little closer to the 'surface' but it works better for me that way.
 
very cool, sure beats spending $50 to get one from O/S
 
Hey Wolfy , I hear the little green men want their ride back ! S.E.T.I may come knocking at your door too.


Its time to build up some large lager-yeast starters so I needed another stir-plate.
Here is my DIY Stir-Plate V3.

120mm speed-controlled PC cooling fan. ($12 on special at PC Case Gear)
12V power adapter. ($2.05 Ebay)
8x small rare-earth magnets. ($4.50 for 20 from DealExtreme).
On/off switch. (~$2 Electronics shop)
Solder, a few bits of wire and some gaffer-tape so the screws don't scratch the glassware.
stirplateV3.jpg

... and a good use for old fermentor lids, no need for them if you cling-wrap.

Total cost was under $20.

There is an abundance of 'LED Dimmers' on Ebay now that also make good speed-controllers, but I was lucky and got it built-into the fan.
 
Awesome stuff, planning and visiting ebay now.

It's difficult to search for speed-controlled fans on the net and that model isn't on PC case gear. In the spirit of being a tight arse, i am looking for the cheapest option. Are the LED dimmers easy to connect up to a PC fan? Would i be looking for a specific type of fan if i went the LED dimmer route?


Found this one for around $15 shipped from US which isnt too bad. http://www.ebay.com.au/itm/Antec-3-Speed-1...=item53e7ef8e3e

They have a little switch that you can flick and it changes the speed.
 

Latest posts

Back
Top