Recirculating Single Vessel Breweries

Australia & New Zealand Homebrewing Forum

Help Support Australia & New Zealand Homebrewing Forum:

This site may earn a commission from merchant affiliate links, including eBay, Amazon, and others.
I tend to stir half way through the mash so it has plenty of time to clear up again. I don't think it makes much difference as long as you dont have channeling. I get around 80% efficiency using my vull volume mashing procedure.
I have also noticed reduced break material now that I have started recirculating.
 
I've stirred a bit but more out of curiousity. I don't think it is too neccesary with recirculating setups as the constant movement should have the wort find it's way into and back out from each spot, but stirring should make sure of it. I don't expect stirring to cause much of an issue. I run my pump constantly while mashing. My system as is suits full volume as the sparge water runs through the grain quickly to do an effective sparge.


I tend to stir half way through the mash so it has plenty of time to clear up again. I don't think it makes much difference as long as you dont have channeling. I get around 80% efficiency using my vull volume mashing procedure.
I have also noticed reduced break material now that I have started recirculating.

When I started recircing, I stirred halfway through the mash because I read in one of the braumeister threads that someone was getting much improved efficiency from it. Stirring resulted in a large amount of bubbles and dusty shit coming up, but would settle down again pretty quickly apart for some foam on the surface.

When I didn't stir, I got the same thing happening on it's own, 5 minutes into the mashout step. I assume that the bubbles are air trapped 'twixt husk and crushed grain. Efficiency was spectacularly good when I stirred, not so hot when I did not. I think I'll continue to stir in future.

In other news, I have come up with a replacement for my ghetto sparge distribution system.

shower.jpg


50 bucks including shipping from fleabay. 210mm diameter, and probably costs less than trying to make something similar from copper tube.

1 left
 
Heres mine, has a stainless inner basket inside a 75L vessel. I have tried with and without the BIAB bag and its definatly easier to clean up with it. Recirculates through a RIMS system controlled by a PID. Very simple and minimal effort to run. Possibly too simple and easy, Im now thinking of 3V so I have more stainless to play with.

post-10137-1340191879_thumb.jpg


post-10137-1340191893_thumb.jpg


http://www.aussiehomebrewer.com/forum/inde...80&start=80


The inner stainless basket on your rig is on top of my wish list, it's a thing of beauty!
 
Showerhead turned up in the post today. Not brewing this weekend so I can set it up properly. Will post pics when it's done

Last weekend's brew saw a return to 86% efficiency after stirring halfway through the mash. Was aiming for 90% efficiency, but I figure 86 is close enough given that I was using a new lot of grain and I have no control over the crush that the LHBS decides to do.

I ran the pump slower this time and saw a lot more crud in the bottom of the kettle, which I did not dump. I guess we'll see if this as any effect on the final clarity of the beer. I cracked the Aus. Pale Ale I did for my 2nd recirc brew over the weekend, and it's by far the clearest brew I have ever done, after less than 2 weeks in the bottle. I dumped the mash trub on that one, so i guees the next one to be ready will show the effect.

How fast do you guys run the pump when recirculating?

Cheers,

FB
 
I have the pump outlet ball valve set around 1/2 way. If I have it any more open I can see the height in the inner basket rise up to 50mm higher than the level in the main kettle as it struggles to keep up filtering through the grain bed.
I try to run as fast as I can keeping the level in both pots the same ie maximum flow rate through the grain bed.
 
How fast do you guys run the pump when recirculating?

I agree with this from husky....
v
v

I have the pump outlet ball valve set around 1/2 way. If I have it any more open I can see the height in the inner basket rise up to 50mm higher than the level in the main kettle as it struggles to keep up filtering through the grain bed.
I try to run as fast as I can keeping the level in both pots the same ie maximum flow rate through the grain bed.

I blew my first (and so far the only) element in my single vessel by not thinking about recirculation speed. I ended up pulling the wort out from under the basket in my rig way faster than it could filter back through properly. Element saw air and bang......puff of smoke, and then a painfully slow and pitiful boil, as i was down to one element...

Nowadays, i have installed two of these on my wort return silicone hose...one at the pump end, and a second near the input connector in the lid of my rig...

I now run the valves at halfway, and it seems to work well.

http://www.bunnings.com.au/products_produc...-12mm_2498.aspx

piccy...

3110386d.jpg
 
Why do you use 2 Big Nath?

I was thinking of just controlling it using a single ball valve to the pump (of course that is the plan (hanging for a pump to arrive to try it out)).
 
I just changed to a more open weave voille from the standard stuff and found that with "normal" grain bills (around 4-5.5kg) I can run the ball valve wide open without sucking the wort from around the element, and I get much clearer wort. However, the grainbed tends to get a bit kicked up by turbulence and is kind of uneven. I suspect the faster it runs, the better efficiency I get too.

The first time I tried the recirc I ran it flat out with a 9kg bill and scorched the element, but I'm hoping that the more open voille will prevent this happening again, because there certainly seems to be a correlation between recirc speed and wort clarity. Even at flat out though, I can't seem to clear up the wort under the bag as much as I would like to!
 
Why do you use 2 Big Nath?

Ahh, that's the "genius" part right there....

The top one (where it returns the wort to the top through the lid) controls the re-entry speed.
The bottom one helps to keep the hose worth of wort in the hose whilst i either carry the whole pump and hose assemble to the sink to clean it, or hold it above the kettle and add it back in. Without a valve at each end of the hose i used to dump little puddles all over the ground or my feet.

Basically, at the end of the mash, i shut off all three valves. The brass ball valve that feeds the pump and my dial thermo, the one that is attached just after the pump, and the third one at the top of the lid.
I then disconnect the pump assembly, and lose only the contents of the pump, then disconnect the hose, hold it over the kettle, open both valves and collect the contents of the hose.

Too easy.

It doesn't add any other benefits to the rig apart from practicality.
 
yeah i've found the bag clogs up with fine particles when you constantly recirculate, and is the main reason i'm going towards a BM style rig

i found that limiting the amount of mash steps to about 2 and only recircing when raising the temps helped a bit - so i would go from a 67 mash in for 45-60mins, then recirc & ramp up to 72 for 10, then ramp up to mashout. but i only did this a couple of times before i got the shits with it and started mashing in a 25L bucket in a real ghetto 2v+herms setup
 
Here's a piccie of the new single vessel rig i built last night...

Just in case my earlier ramblings didn't make sense to the people who asked about recirc speed and all that....

Im calling it "The EZBrew V2"

EZBrew_V2.0.jpg

and yes, before someone else mentions it.....i need to buy more coffee.
 
Big Nath, what do the internals look like. Very tidy setup BTW.


And yeah there aint enough coffee to get me to the next day, hope that got sorted right quick!
 
Here you go...

internal shot:
internal_shot.JPG

thermowell on the left, wort return on the right:
return_and_thermowell.JPG
 
basket inside the pot:
basket.JPG

basket with legs:
basket_with_legs.JPG
 
Does that little element get 40 odd litres to a full boil, or do you bang an immersion element in?
 
Does that little element get 40 odd litres to a full boil, or do you bang an immersion element in?

it will get it to, and maintain a nice simmer with a gentle roll, but i wouldn't really call it a boil.

In the first build (in my signature) i have two of those elements in the pot and no worries boiling 46/47lt's vigorously.

Just wanted a slightly neater setup this time around, and nearly forgot i had my handheld, so for the time being, i'm gonna use that and only have one element installed.

I only use one element for the brewday apart from the boil ramping and maintaining. Initial strike water is from the hot water so it only takes the little element 10mins (while i crush my grain) to reach strike temp.
 
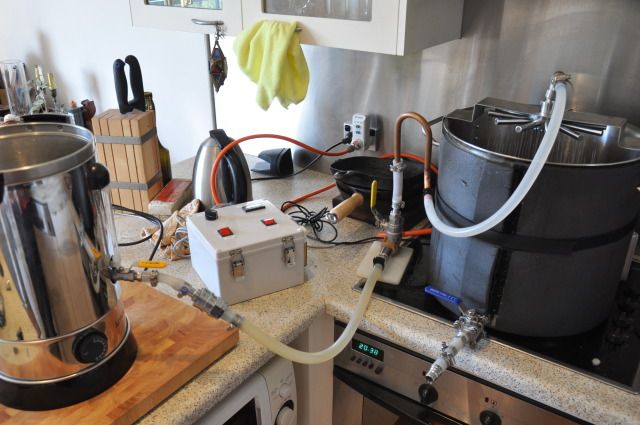
in a perfect world, if i had the time and inclination, i'd probably go with a bottom upwards recirculation like the braumeister, braumiser etc. but the beauty about this design is that i literally knocked it up in around 2 hours. The rest of the maybe 5 hours i spent on it was dawdling and dicking around with calibrating sightglass, thermometers, cleaning it up and generally standing back with a beer looking at it.

Way too simple a build to produce a decent beer surely....

the only things i'd mention if someone is thinking of doing something like this, are:

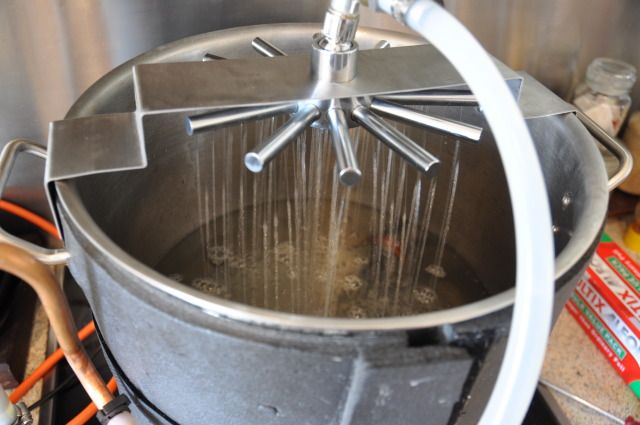
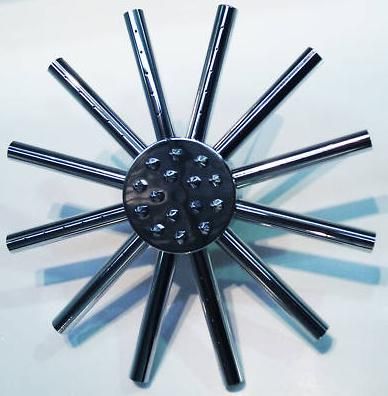
1. make sure you throttle back, or at least keep a good eye on the recirc speed otherwise the wort wont filter through the grain bed as fast as the pump will suck it out. You'll expose an element and then it's game over for that brew.

2. Have a spare element. I've blown one of these, but i'm pretty confident i've sorted the issue (as above) and haven't had a problem since the first brew. Done maybe 6 on it now. Well, i've done 6 on the first build. This new one is exactly the same but a bit neater, bit bigger and a bit simpler so it won't be a problem.

Total cost for the build is approx:

$150 pot
$16-30 for the pump depending where you get it from
$10 silicone hose
$10 kmart kettle for the element, or spend a similar amount for a different element from ebay
$40 hose fittings if you want the valves in the return line
$30 maybe, for all of the brass fittings, copper length for the thermowell and return line, and ball valve.
$30 stc controller
Can get away with not having the dial thermo and the sightglass, but they are handy additions that i already had lying around.

So $300 total, and two to three hours work.

piece of piss.

of course if your thinking about building something like this, chances are you already have access to some of this stuff. The first build cost about that much for me, but this second build obviously only cost me the price of the pot, as i've stolen the parts needed from the original build, which if i ever use it again, can be put back together very quickly.
 
awesome work - if you could fix that lid to the inner basket you could 'force' recirculate
 
Showerhead arrived a few days ago, so instead of doing something "constructive" I've been doing something constructive.

DSC_0002-3.jpg

DSC_0001-2.jpg


My S/S tee fitting arrived (finally) too, so I really need to have a good hard think about plumbing a temp probe into the recirc. circuit. If I fit it behind the ball valve I think it will make things a bit too long and awkward for storage, so I may fit it to the recirculation pump inlet. Not sure I even need it, because I've done 5 brews without it, and while there is a bit of temperature lag in the system, it does equalise pretty quickly.

I'm also thinking of adding a second ball valve and pickup into the kettle/tun for recirculation only, so I can run a hop screen on the other. I'm still not happy with the trub cones I get from whirlpooling and it starts to collapse and get into the pickup once there's only a couple of litres of wort left in the kettle.
 

Latest posts

Back
Top