Matho's controller

Australia & New Zealand Homebrewing Forum

Help Support Australia & New Zealand Homebrewing Forum:

This site may earn a commission from merchant affiliate links, including eBay, Amazon, and others.
I see from the photograph that there is a small error on the display after the symbol of Fahrenheit.
I will look to fix this bug, but looks correct other errors reported before upgrading.
 
MaxN68 said:
I see from the photograph that there is a small error on the display after the symbol of Fahrenheit.
I will look to fix this bug, but looks correct other errors reported before upgrading.
I've just put it in my controller and after a couple of minutes flicking through the menus it seems to be working very well. As I'm not an American I've also switched it over to Celsius :) . I'll spend more time with it tomorrow and report back if I find any problems. Great work! Not I just need to get the manual and learn Italian so I can use it properly :lol: . Thanks again.
 
arzaman said:
Also the amazing and powerful Italian branch of the controller from maxN68 is on github

https://github.com/MaxN68it/Open-ArdBir

I'm working to nanual translation in English so you can really understand the great improvement performed

Stay tuned
Davide
How is the translation going mate? I am keen to try this out when you are finished. Looks great.
 
djar007 said:
How is the translation going mate? I am keen to try this out when you are finished. Looks great.
Hi djar007,

I've been told there's a final version of the Italian manual coming out shortly with all the latest updates to ArdBir, closely followed by an English first draft version using Italian pictures.
 
The work on the translation of the manual is going on.
We have translated all the text and made ​​a first correction, we have to finish only a few images 20x4 before publishing it.
 
Got them thanks.

There only seem to be the user manual and the code, are there any build instructions? That is instructions - connect wire to X. And so on?

Atb....... Aamcle
 
aamcle said:
Got them thanks.

There only seem to be the user manual and the code, are there any build instructions? That is instructions - connect wire to X. And so on?

Atb....... Aamcle
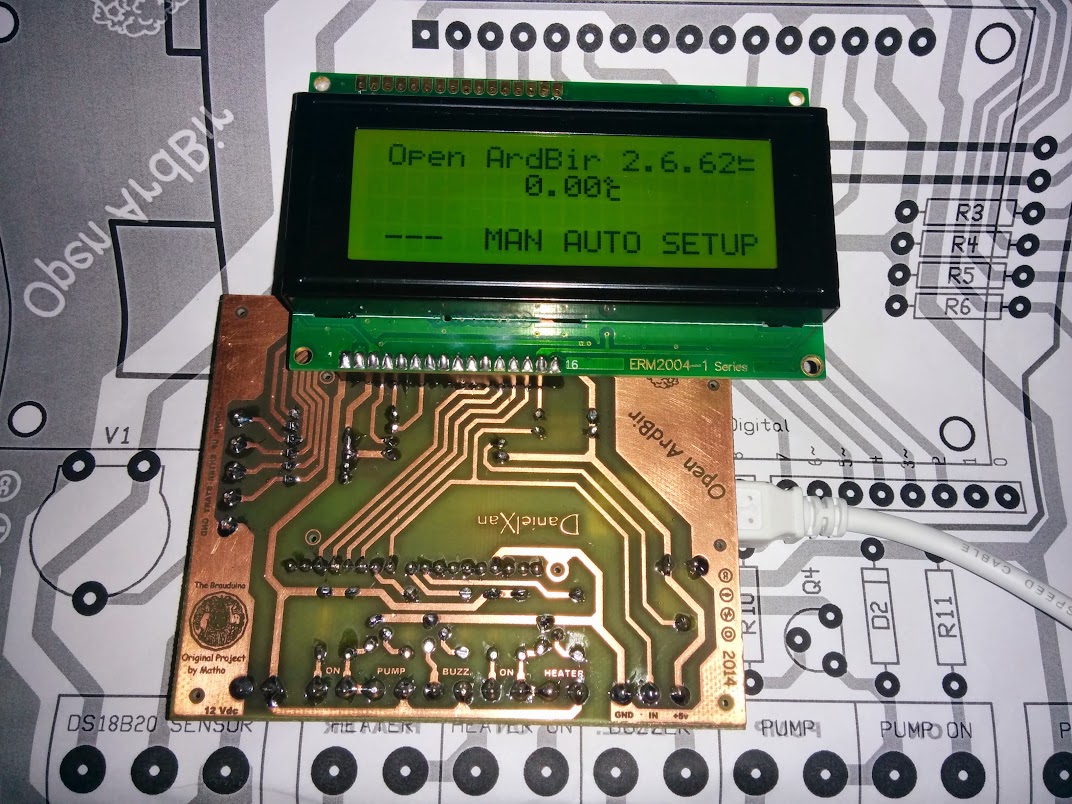
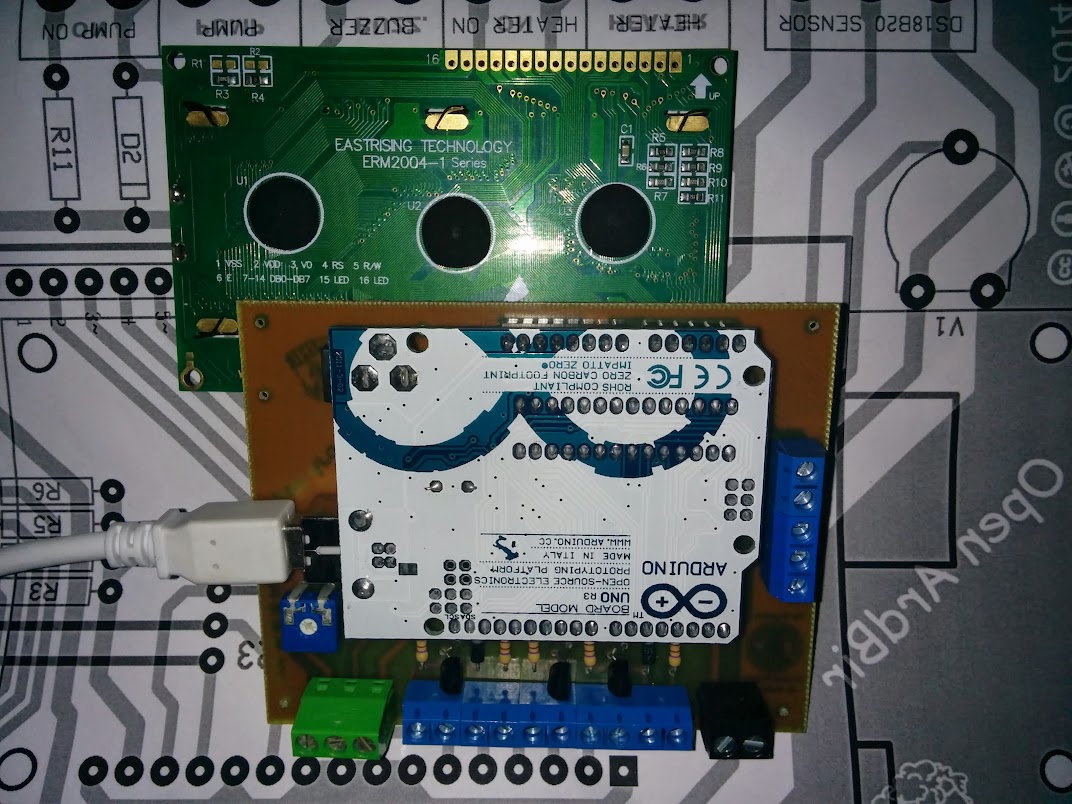
It's all based on the "Original Braudino Board" build 2 sided board and later adapted for the one sided versions others have developed since. You can choose whatever version of the board you've built in the sketch and set it by removing the // in front of the include code.

// Supported PCB
//#include "Pcb_Brauduino_DanielXan.h"
#include "Pcb_Brauduino_Original.h"

You do the same to select the language and also select between if you have chosen to build your controller with a 2 or 4 row LCD.


// SETTING LCD*****
// Select your LCD

// LANGUAGE ITA
//#include "LCD16x2_ITA.h"
//#include "LCD20x4_ITA.h"

// LANGUAGE ENG
#include "LCD16x2_ENG.h"
//#include "LCD20x4_ENG.h"


The program adds extra features like storing up to 10 recipes you want to keep on the controller just to name one.

A few people experiencing EMI might be interested in the following. I've had trouble with EMI scrambling my screen when the controller started priming the pump, so I asked Max the following:

----------------------------------------------------------------------------------------------------------------------------------------------------------------------------
Max, I prime my 'March Pump' manually and don't need the 'Prime Pump' feature on my controller. The main reason is because the EMI produced always scrambles my LCD Screen. What code should I block out too remove it?

My screen works fine for the rest of the time when I unplug & resume the cycle.
------------------------------------------------------------------------------------------------------------------------------------------------------------------------------

Max answered:
-------------------------------------------------------------------------------------------------------------------------------------------------------------------------------
The "Pump Prime" Function is called by pump_prime(); in VOID auto_mode.
Is just one line, in Manual Mode the Pump Prime is not present.
-------------------------------------------------------------------------------------------------------------------------------------------------------------------------------
On my Auduino IDE its at line 1040 in this section of code, just // the pump_prime() like I have. I haven't had an issue with EMI since blocking it.
--------------------------------------------------------------------------------------
Menu_2();

if(!(resume)){ // if starting a new process prompt for water
prompt_for_water();
wait_for_confirm(b_Enter,0,2);

Menu_2();//pulisce lo schermo

if(!(b_Enter))return;
hopAdd =0; //reset hop count at teh start of the processes
EEPROM.write(85,hopAdd);
pumpTime =0;
pumpRest =false;
// pump_prime();
x = 0;
}
-----------------------------------------------------------------------------------------------

So basically ArdBir is updated code that can be tweaked easily to work on the various boards based on the original "Braudino" by Matho. If you've built one of them you'll be able to load the sketch code onto it and gain the extra features.

Cheers
 
MaxN68 said:
We finally finished writing the manual in English including all images.
Probably our translation will not be 100% perfect but I hope someone can help us improve it.
ArdBir Manual
Max, thanks for your work.

Page 3: "Exist form CONFIGURATION menu" == exits from?
 
MaxN68 said:
Thanks.
I've just correct and updated the file
1. Max, I'm sorry - but the word "exists" happens 2 times more in the document.

2. Page 7 - names of phases are in Italian while English LCDs type them in English.

3. I'm trying to translate the document into Russian if you don't mind. A small problem is that most LCDs don't support cyrillic - so I'm going to leave English menu for now.

4. Concerning recipes. As there are tons of them and Arduino is bad for surfing - maybe it is good to add SD card, create a txt/xml file renewed by community and load recipes from it?

5. Small note just FYI. We use Arduino Pro Mini, and its max sketch size is 30720 bytes (not like 32256 for UNO) - so we have to remove recipes support to compile successfully. And if to add support of SD card and external recipes - we will really need to switch HW to Mega.
 
Reply to 1-2
Thanks for the recommendations to improve the writing of this manual.
I'm providing for the correction of errors, but also to improve the translation of ArdBir.
As suggested by Arnie the menu "Manage Settings" will be changed to "Manage Recipes."
Again in the menu Manage Recipes I've added a couple of functions in the process of entering the name of the recipe:
1) START button allows you to go back one character to correct
(This feature is already present but not indicated in the manual)
2) UP + DOWN finish entering the name automatically adding the missing spaces to complete the length of the name.

In addition to these changes I also fixed the break with confirmation " iodine test" retaining only volumes one.

As soon as I finished the corrections let you know the update of the manual and firmware


Reply to 4

We are currently occupying 99% of the resources Arduino.
I tried to load the SD library to manage the recipes but the space required is far beyond the 32K without a single line of code to handle then the recipes.


Reply to 5
If you want to try to free space, you can remove the sprite initial and the credits

The ArdBir sprite at start i called by ArdBir() in line 1636
The Credits are called by
if (btn_Press(Button_dn,50))setupMenu = 4; in line
and the entire section that goes from row 1592 to row 1597


case(4):
Menu_3_5();
if (btn_Press(Button_start,50))setupLoop=false;
if (btn_Press(Button_up,50))setupMenu = 3;
if (btn_Press(Button_enter,50))Credits();
break;

This solution frees 1000bytes

In addition to this I have noticed a considerable difference if you compile with different operating systems.


I tried to compile with Lubuntu and I got these results

Lubuntu vs Windows XP = 852bytes
OSX Windows XP vx = 48bytes


Trying to compile as I've explained this result: 29.806!!!
 
PreTest New PCB OpenArdBir O.C Ok
I am attaching files engraving PCBs and high-definition picture
so are of no help to mount

IMG_20140428_235234.jpg


IMG_20140428_235248.jpg

https://lh3.googleusercontent.com/-3Rf3W8P_sY4/U1ZQIUiq7yI/AAAAAAAAYKM/9dpFSiiAk00/w906-h504-no/ComponentiOpenArdBir.jpg

Donwload PCB Files

www.saviot.com/BrassaturaCasalinga/PcbBirraDefinitivi/OpnArdBirOC.rar

Foto Hi Def 36Mp over 20Mb

www.saviot.com/BrassaturaCasalinga/PcbBirraDefinitivi/OpenArdBirOC_ResistenzeDiodi.jpg
www.saviot.com/BrassaturaCasalinga/PcbBirraDefinitivi/OpenArdBirOC_StreepLine.jpg
www.saviot.com/BrassaturaCasalinga/PcbBirraDefinitivi/OpenArdBirOC_StreepLCD_LatoRame.jpg
www.saviot.com/BrassaturaCasalinga/PcbBirraDefinitivi/OpenArdBirOC_InsiemeCompo.jpg
www.saviot.com/BrassaturaCasalinga/PcbBirraDefinitivi/OpenArdBirOC_InsiemeCompo_2.jpg
www.saviot.com/BrassaturaCasalinga/PcbBirraDefinitivi/OpenArdBirOC_InsiemeCompoRame.jpg
www.saviot.com/BrassaturaCasalinga/PcbBirraDefinitivi/OpenArdBirOC_Montato.jpg
www.saviot.com/BrassaturaCasalinga/PcbBirraDefinitivi/OpenArdBirOC_Montato2.jpg

Def
Code:
// sensor and lcd
OneWire ds(7);
LiquidCrystal lcd(A4, A5, 2, 3, 4, 5);

// push buttons
const char Button_dn    = A3;
const char Button_up    = A2;
const char Button_enter = A1;
const char Button_start = A0;

// outputs
const byte Pump = 6;
const byte Buzz = 8;
const byte Heat = 9;
 
MaxN68 said:
Reply to 1-2
Thanks for the recommendations to improve the writing of this manual.
I'm providing for the correction of errors, but also to improve the translation of ArdBir.
As suggested by Arnie the menu "Manage Settings" will be changed to "Manage Recipes."
Again in the menu Manage Recipes I've added a couple of functions in the process of entering the name of the recipe:
1) START button allows you to go back one character to correct
(This feature is already present but not indicated in the manual)
2) UP + DOWN finish entering the name automatically adding the missing spaces to complete the length of the name.

In addition to these changes I also fixed the break with confirmation " iodine test" retaining only volumes one.

As soon as I finished the corrections let you know the update of the manual and firmware


Reply to 4

We are currently occupying 99% of the resources Arduino.
I tried to load the SD library to manage the recipes but the space required is far beyond the 32K without a single line of code to handle then the recipes.


Reply to 5
If you want to try to free space, you can remove the sprite initial and the credits

The ArdBir sprite at start i called by ArdBir() in line 1636
The Credits are called by
if (btn_Press(Button_dn,50))setupMenu = 4; in line
and the entire section that goes from row 1592 to row 1597


case(4):
Menu_3_5();
if (btn_Press(Button_start,50))setupLoop=false;
if (btn_Press(Button_up,50))setupMenu = 3;
if (btn_Press(Button_enter,50))Credits();
break;

This solution frees 1000bytes

In addition to this I have noticed a considerable difference if you compile with different operating systems.


I tried to compile with Lubuntu and I got these results

Lubuntu vs Windows XP = 852bytes
OSX Windows XP vx = 48bytes


Trying to compile as I've explained this result: 29.806!!!
I did almost exactly this on monday to get the shield to upload to my arduino.
 
seem to get the following error when trying to update


avrdude: verification error, first mismatch at byte 0x7800
0xe1 != 0xff
avrdude: verification error; content mismatch

any ideas?

cheers tate
 
Avr is a collection of utility.
I don't have never used this for loading code in Arduino, is the first time I read of such the problem
I use Arduino IDE and don't have any problem
 

Latest posts

Back
Top