Few Snaps Of The Up And Coming (herms) Brewery

Australia & New Zealand Homebrewing Forum

Help Support Australia & New Zealand Homebrewing Forum:

This site may earn a commission from merchant affiliate links, including eBay, Amazon, and others.

gibbocore

Well-Known Member
Joined
9/8/07
Messages
668
Reaction score
0
Hey blokes,

I've been building my HERMS brewery for a few months now and its finally ready for a few snaps i think.

Few jobs to be completed yet;

*Elements to be installed in the herms, HKT and Kettle.
*Insulation on all vessels, i'm going to make neoprene jackets for them all so they will look like a happy family.
*Control panel, two set point controllers, bunch of illuminated rocker switches. It will be a raised angled panel made from leftover ply and a sheet of perspex on the right front of the brewery table.
* And a bunch of unscrewing nipples and valves to do put more pink plumbers tape on and a crud load of sillicone.

As you can probably tell, i just did a flow test, while all vessel trasnferes happened reasonably flawlessly, there was the odd droplet of water from some of the joints.
IMG_0635.jpg


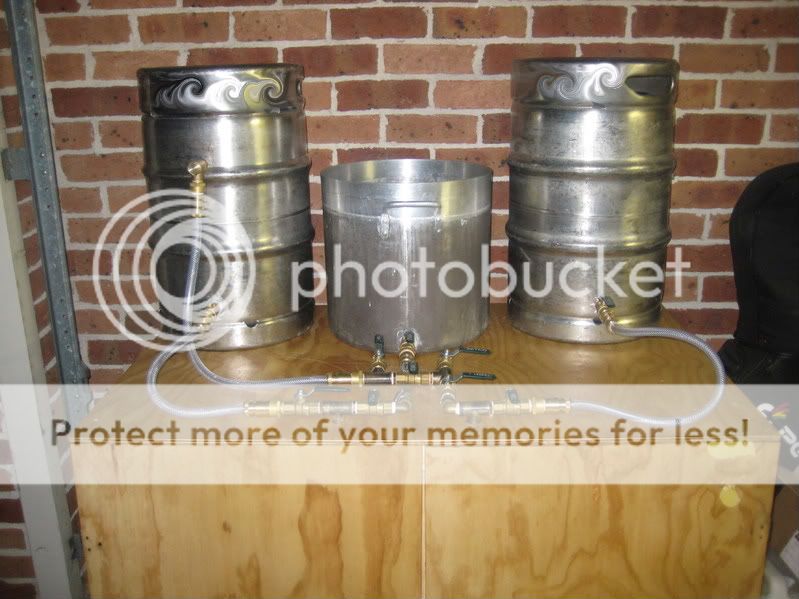
I made the box from about $25 worth of 35x70 from bunnings and got Mr ply and wood to cut up some 12mm construction ply for about $80 i think it was. I waterproofed it with clear satin.
IMG_0636.jpg


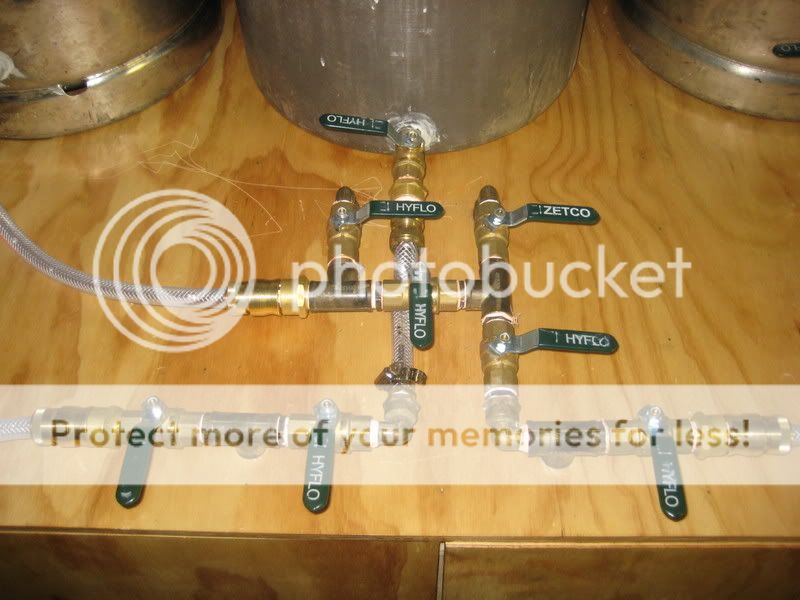
Plumbing manifold, i can move from HLT to MLT and recirc and transfer from MLT to Kettle from these valves.
IMG_0638.jpg


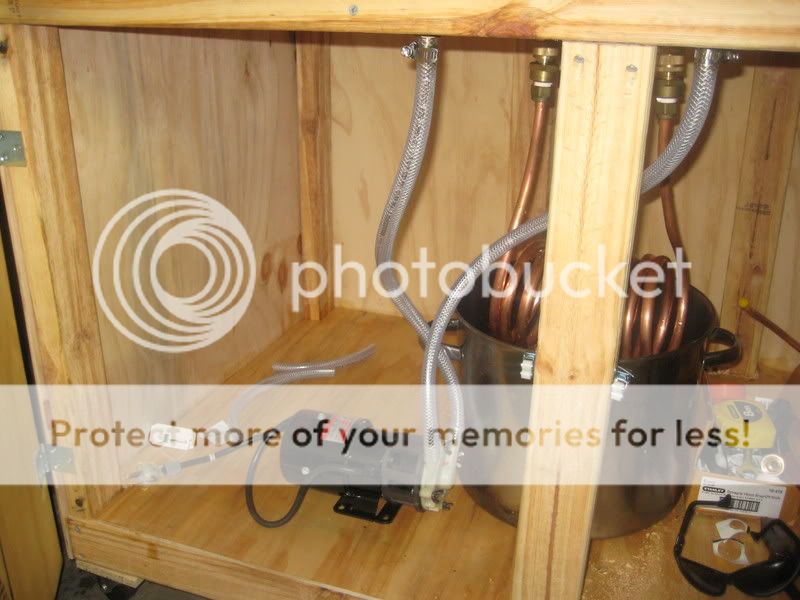
And the guts of the box, i can remove the Heat exchanger so that when i fit the element to the pot shown, i can slip the coil over the element so it sits up the middle of the coil, then i raide the pot on a block so it sits up high eneough. And the all important heart of the beast, my march pump from the states (thanks ebay, $130 to my door).

Also a big thanks to all the great advice from this forum, especially Mike (screwtop) wouldn't have put hammer to nail without ya mate.

....Oh and i plan on insulating the bottoms of the vessels to prevent any timber damage.
 
Hey blokes,

I've been building my HERMS brewery for a few months now and its finally ready for a few snaps i think.

Few jobs to be completed yet;

*Elements to be installed in the herms, HKT and Kettle.
*Insulation on all vessels, i'm going to make neoprene jackets for them all so they will look like a happy family.
*Control panel, two set point controllers, bunch of illuminated rocker switches. It will be a raised angled panel made from leftover ply and a sheet of perspex on the right front of the brewery table.
* And a bunch of unscrewing nipples and valves to do put more pink plumbers tape on and a crud load of sillicone.

As you can probably tell, i just did a flow test, while all vessel trasnferes happened reasonably flawlessly, there was the odd droplet of water from some of the joints.

IMG_0635.jpg


I made the box from about $25 worth of 35x70 from bunnings and got Mr ply and wood to cut up some 12mm construction ply for about $80 i think it was. I waterproofed it with clear satin.

IMG_0636.jpg


Plumbing manifold, i can move from HLT to MLT and recirc and transfer from MLT to Kettle from these valves.

IMG_0638.jpg


And the guts of the box, i can remove the Heat exchanger so that when i fit the element to the pot shown, i can slip the coil over the element so it sits up the middle of the coil, then i raide the pot on a block so it sits up high eneough. And the all important heart of the beast, my march pump from the states (thanks ebay, $130 to my door).

Also a big thanks to all the great advice from this forum, especially Mike (screwtop) wouldn't have put hammer to nail without ya mate.

....Oh and i plan on insulating the bottoms of the vessels to prevent any timber damage.


I love the enginuity of home brewers, each brewery is different according to each individual brewers level of comfort working with different materials. No way I would use wood/timber, scares the **** out of me, I like metal and welding, you can make things fit by welding and filling :lol: Electronics was my trade so thats easy, but sawing etc no way, always get the measurements wrong. Well done Gibbo, - best of all it's Gibbo's Brewery

Brewed with Jay today, his system is a basic 3 level gravity system with cooler mash tun but big volumes, first AG was a double batch with 84% efficiency into the kettle, so much for basic eh :eek:

Good Stuff

Screwy
 
haha, cheers mate. It was a toss up between buying a welder and learning to weld, or buying a bunch of timber. So i adapted. :p
 
noice work mate - very nice

The ideas that come from brewers around here are genius
 
There goes Franko's "Red Rocket" for another 12 months trying to pollish cool looking waves into the top of the vessels.

Great work, its a work of art!

cheers
 
cheers guys, its nice to see it start to take some functional shape.
 
one little thing and please corect me folks if im wrong.

You say your going to mount the elemet in the pot with the HERMS goil in it in the middle of the coil.

I would have said that mounting it under the coil in hte bottom of the pot would be more efficient as heat rises.

just a thought

cheers
 
Good work Gibbo looks like your nearly there mate, love that wave thing you got happening in the top of the kegs, its great to see different designs of breweries they've all got some great ideas that everyone else can pinch for their own gear. keep up the good work, whats your Brewery name ? :icon_cheers:
 
Not wanting to sound like a smart arse, but I think the swirl pattern on the top of the kegs were photoshopped in to protect the identities of those keg-shaped vessels....

:)
 
one little thing and please corect me folks if im wrong.

You say your going to mount the elemet in the pot with the HERMS goil in it in the middle of the coil.

I would have said that mounting it under the coil in hte bottom of the pot would be more efficient as heat rises.

just a thought

cheers


Have to say, if what Tony says is true you might have some thermal layering issues ( as i did) with my herms coil, because the hot part of the element is sitting so high in the pot it really only heats the top part of the water, i did some tests and all the way through the heat range i had a 20 degree difference between the bottom of the pot and the top !IMG_7068.jpg but because my goil :lol: starts up a little way off the bottom it hasn't really been much of an issue, on my first batch anyway, but as with everything my issues are my issues, your setup might work perfect, just something to think about. Cheers and good luck .
 
Have to say, if what Tony says is true you might have some thermal layering issues ( as i did) with my herms coil, because the hot part of the element is sitting so high in the pot it really only heats the top part of the water, i did some tests and all the way through the heat range i had a 20 degree difference between the bottom of the pot and the top !View attachment 21352 but because my goil :lol: starts up a little way off the bottom it hasn't really been much of an issue, on my first batch anyway, but as with everything my issues are my issues, your setup might work perfect, just something to think about. Cheers and good luck .

And don't forget Bulp that you have a snazzy little stirrer to go in yet, and I'm keen to see what changes that makes.
Really nice Brewery Gibbo, looks the parts but stay away from the beers on brew day cause there's a bloody lot of valves there. And I'm with Screwy, when it comes to carpentry I'm somewhat challenged.

Jay
 
cheers guys, thats why i popped up a few snaps. My limited knowledge told me to put the element in the middle of the coil, thinking it would radiate out, it would be a stack easier to just put a little 3.6kw jug element in the bottomm of the pot.

I know it looks like a lot of valves, but its really pretty easy to know whats going on, there is an in side and an out side, a re-circ circuit and a bypass circuit, but i guess i have been drawing plans for this for about 3 months now, i'd wanna know whats going on by now...hahaha
 
There goes Franko's "Red Rocket" for another 12 months trying to pollish cool looking waves into the top of the vessels.

Great work, its a work of art!

cheers


LOL :lol:

thats enough Tony lol :lol:

Franko
 
cheers guys, thats why i popped up a few snaps. My limited knowledge told me to put the element in the middle of the coil, thinking it would radiate out, it would be a stack easier to just put a little 3.6kw jug element in the bottomm of the pot.

Hi All, i'm still curious on this matter? Any thoughts??
 
Nice work Gib.

My future plans for a HERMS had a kettle element being mounted in the bottom of a pot.
 

Latest posts

Back
Top