Biab Bag Stand

Australia & New Zealand Homebrewing Forum

Help Support Australia & New Zealand Homebrewing Forum:

This site may earn a commission from merchant affiliate links, including eBay, Amazon, and others.
I should also add that most of the time for a single batch I don't use the pulley system. The pulley is setup for when I do a 50L batch. With the 50L batch the pulley saves your arms.

For single batches I have a large wide bowl with a cake rake in the bottom, and I just lift the bag out of the pot and dump it into the bowl to drain. Later on I just drain the bowl into the kettle. It is so much quicker/ easier than stopping to play with the pulley.


bowl.jpg


QldKev
 
As promised, pics of the simple stainless basket setup.

basket.jpg

basketAndBag.jpg

basketAndBagInBoiler.jpg

basketOnRack.jpg


As I said earlier, this is actually a yabbie/cray cooker my old man and his mate made. It is not designed for brewing, I'm just making do until cray season eventually opens here in SA (thank you state government!) or I finish my 3V, whichever comes first. However for BIAB, it works a treat, especially if you're the sparging type of bagger.

Pics aren't great, but it's basically a piece of stainless all-thread as the main hoop, with stainless 12mm or so square mesh for the basket. Mesh attached to hoop with liberated cable ties for that extra adjunct addition that even BeerSmith can't calculate for. Think they call it "Sparkyus-matosis" or something similar that only rabbits and home brewers can contract... ;)

I only do 23 litre batches with this, if you double batch then you'll probably be looking at something similar to QldKev's rig or the other similar designs due to the weight, especially if you're a solo brewer.

Husky, keep us informed with how you get on with your new rig, in particular with your plans of dispensing the bag altogether.

:)
 
Just had a quick read through the above but not a thorough one.

I went through a stage where I really wanted to put my bag inside a strainer that sat inside the pot. This stage persisted for quite some time and I never found anything readily available that would work well.

I'm quite glad now that I never found anything. The bag with it's saggy bum, gives me everything I need. Nearly every batch I do now is a double batch (50 L into fermenter) and the saggy bum plus pulley allows the wort to drain right into the top of the existing wort in the kettle without exposure to the air though whether HSA is important or not at this stage, I don't know.

I'll remove the bag somewhere between mashout temps and the boil, give it a bit of a squeeze (not a great deal) and then dump it. I don't sparge and still get over 80% efficiency into the kettle on double batches of standard 5% ABV brews.

So, all works out well.

The problems I now see with having a strainer holding a bag is that firstly, they are flat-bottomed. If you are going to have a strainer, I would go conical. Secondly, with a strainer, you can't see how high above the existing wort you are. Thirdly, BIAB is very efficient. Buggering around trying to squeeze every last drop out of your brew is only going to delay your boil.

The third point is what is most important. Any BIABrewer or traditional batch brewer can increase their efficiency by simply delaying the time between mash end and boil start as more liquid (of same gravity) will always drain out of the bag or mash tun. It never seems to stop :).

There's always at least one ugly side to every method of all-grain brewing. Pulling the bag is the ugly side of BIAB but it is only a matter of a few seconds swinging the bag away from the pot. No matter how long you leave it, that bag is always going to drip so you might as well do it sometime and certainly not retard starting your boil as soon as you can.

For those who want to gain even higher efficiency* than BIAB already gives, suspending the bag over a food-grade bucket and adding those runnings during the boil is going to be a better method than having a strainer suspended over one's kettle and waiting until it completely drains before you start the boil.

Spot ya,
Pat

* A lot of new brewers express their efficiency as their efficiency into the fermenter. This is always about 10 - 20% lower than efficiency into the boiler or end of boil efficiency. BIABrewers should be looking at around 80% efficiency into the boiler or end of boil efficiency.
 
The only efficiency that matters to me is into-fermenter efficiency as that it what I use when building recipes.

Also, I'm pretty sure everyone that drains or squeezes their BIAB bag does so as they are ramping up to boiling. I have never heard of anyone delaying their boil to squeeze the bag. In fact fully draining the bag is 'something to do' while waiting for the boil IMO.
 
Hey superjim, thanks for posting your pics!

Don't let my above post discourage you. I love seeing pics like yours and people really thinking about and getting into their brewing set-ups. I have a heap of stuff in my brewery though that I no longer ever use so I think it is important that we don't get too attached to our ideas in case they aren't as convenient as we first imagined them to be :).

If I had your strainer, I would try and find a plastic food-grade bucket/tub that you could swing it into after mashing out. Then, sometime after the boil starts, pull your strainer/bag from the bucket/tub and add the rewards to your kettle. On a 90 minute boil, you could add it as late as 45 minutes I would think so...

Good stuff!
Pat
 
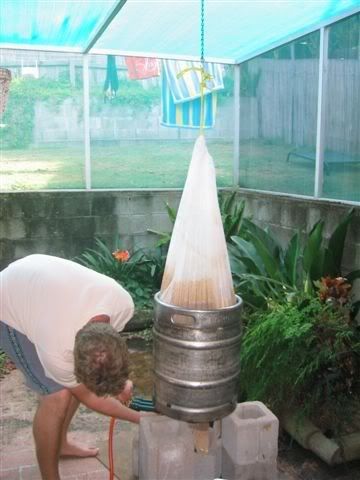
Something that might be a useful combination of the hoisting and the basket over the pot, is what I usually do.

That is, just hang it from a hook over the pot. You pull the bag by hand as usual, and as the OP would have to anyway if he wanted to put it in a separate basket... But instead of going in a container of some description, it just gets hung off a hook, or off a nail in a beam or whatever... Preferably above the kettle and with the very bottom of the bag touching the surface of the wort to stop splashing... As pat described.

Truly, on a single batch,

Even with a fairly large grain bill, the bag just should not be very heavy... I honestly think that if your bag is particularly heavy, even when you first lift it.... Then you are perhaps using a less than ideal version of the fabric. At the G&G demos we do occasionally... I always answer the "Jeez, how heavy is that bag?" questions by lifting and holding the bag by hand... with one hand only. Now i'm a tubby bloke at only 5 foot 9 & if I can do it with one hand, I really can't see how the "heaviness" of the bag can possibly be an issue for anyone who doesn't have a physical impairment of some description.

A hook, or indeed a pulley, addresses pretty much all the pertinent issues. It allows the bag to drain, allows squeezing, allows this to happen over the pot as it is being raised to the boil - without requiring a vessel or basket as additional gear, which needs to be cleaned, stored, purchased etc.

What it doesn't do is allow for easy sparging, but my point of view on sparging BIAB brews is fairly well known. So if you have sparging as a primary reason for deciding on which method to use, I have little faith in your ability to distinguish common sense from dross anyway, so just ignore me and save us not the trouble.

I hate to sound like an "old hand" who just wants newer brewers to take whatever they say on faith... But if you go back through the relevant BIAB development threads... Pretty much all this sort of stuff was thought of and tried out before the common paradigm of pot, bag & pulley was arrived at. There are good reasons why they were't the processes that ended up being adopted as the standard.

Now I'm not saying that a lot of these things (even sparging) are wrong, bad or don't work... They aren't and they do generally work... It's just that in general, they add to the complexity of process and equipment, take away from the simplicity and in return, add very little of benefit to the end result in the way of ease or quality.

BrewingwithCol16.jpg


Hook off a bit of rope is as complex as it needs to be... Why would you want to make it more than that? Mind you if you do actually want to make it more complex than that, I think that's fine too... But if you are just looking for an effective solution - Then thats been done already.

TB
 
Some very valid points there PistolPatch. Cheers for your input :)

No discouragement taken, and I certainly don't claim to be anything other than a novice in the AG field. Merely sharing my experiences with fellow brewers, which is what I love about this forum.

It's great you get over 80% efficiency into the kettle, I myself wasn't so lucky before devising my cunning yabbie cooker plan late one night while I should have been sleeping. Little did I know that every other home brewer in both polar hemispheres had been thinking about the basket in a boiler idea I had and many, many years before me.

As far as HSA goes, there is potential for this with this method for sure, however with the basket you tend to get a very uniformed drip pattern across all of the grain bed rather than a single concentrated point and the individual droplets tend to be lower in volume than with the "saggy bum" method, at least in my experience. It is also very dependent on the dimensions of your boil pot. A squat boil pot suffers less than a taller one simply due to less distance to travel to the reclaimed wort level, but obviously batch size has a big effect on this. PistolPatch's (and other similar posted rigs) pulley/sling method systems certainly have the advantage of being able to adjust the height of the bag as the levels change, which is a great workaround, especially if you're on-hand to monitor it and adjust for best results. Equally there's no reason you couldn't do this with a basket. Hanging it from a hook at set height may vary in results, I couldn't say from experience. But I agree with PistolPatch, I don't know how important HSA is in this situation, especially if you don't sparge.

Just for the record, there is no problem seeing how high above the wort the basket is. In my case I can see no worries between the basket/boil pot/grill and see exactly how much is draining and at what rate, whether it's first runnings or sparge water. Obviously this depends on the clearance of your "oven rack" (any suitable grated device to drain wort into your boil pot).

Mark^*******, you are correct again, there is no retardation of the boil initiation time with this method. The best thing I've found about the yabbie cooker is I can mash-out, lift the basket and start sparging while I fire up the gas burner and sink some heat into the wort for the boil. I typically sparge at a litre p/min (again, recipe dependent), therefore I usually kick the burner in at about 1/3 to 1/2 the way through my sparge water. That way at sparge end, I'm not far away from the boil and my brew day is shortened considerably less than if I'd poured a beer and waited for both processes to finish... Wait a sec... :unsure:

Bear in mind that the basket isn't an "off the shelf" item (as far as I know) so if you're not handy with liberating/welding/fabricating stainless, then this isn't for you.

PistolPatch, I'm a little unsure of your suggestion of (paraphrase) "swinging my grains into a bucket/tub after mash-out". Do you mean for a non-sparge method here?

This post took me a while, Thirsty Boy's post came in prior and it's very valid too. I say if a hook on the end of a rope works, then go with it. Shit, I'm using a fricken yabbie cooker!

Do what you have to to make good beer. And bring on yabbie/cray season! :)
 
I have pics uploading now that I will add at the end of this post.
I realise BIAB is supposed to be simple however I like to tinker with things because thats what I enjoy doing. If I was a millionare I would still brew beer so my BIAB rig is by no means off the shelf type.
My aim was not to squeeze any more efficiency out of the process but simply make brew day a bit neater. The fact that I like shiny stainless also has alot to do with it.

I have the height of my basket set so I can run a double batch and have the grain just above water level, this means the wort will have a little further to drop when running a single batch(99.9% of the time). If this turns out to be an issue I can add additional tubes to the basket to sit it further in the pot. Theres plenty of clearance around the basket to observe the wort height.

My initial design had a basket made from the same mesh used on all the commercially available false bottoms (2.06mm from memory). However at $1200 a sheer or something rediculous like that I opted for a sheet I had already with 3mm holes. This will get me up and running using the voile bag inside. Down the track I plan to experiment with a solid side basket and a false botton just to see of it works.
More likly than not I will try it in my current basket with no bag and just see if much grain gets through.

Anyway, heres some pics.

DSC_0383.jpg


DSC_0377.jpg


DSC_0376.jpg


DSC_0373.jpg


DSC_0372.jpg


DSC_0369.jpg


DSC_0386.jpg
 
Nice looking rig there husky, puts the yabbie cooker to shame.

Hope it works out for you, looks pretty sweet to me. :)
 
husky just had to one-up super jim didn't he. I mean look at that rug, it's much better IMO.
 
Even his back-drop is better. I had a crusty shed roller door. This guy plays hard ball...
 
A basket that does away with needing a bag would be ultimate IMO.
Brewing without a bag? Crazy talk! It'll never work!!!

Very nice work on the false bottom-and-sides, Husky. Looks like a bought one.
 
I was planning a simple camping mat type insulation with some velcro or similar straps to make it easily removable.
There is a recess in the bottom of the basket which will allow for a s/s element as soon as craftbrewer have them back in stock. Thinking of putting 2 x 2400W elements in there which will allow for small energy additions throughout the mash if required. With the bag in the basket it should be the same as ramping the temp in an enclosed element urn since the bag cannot contact the element.
 
Nice work husky!!! (You too might enjoy the links below.)

PistolPatch, I'm a little unsure of your suggestion of (paraphrase) "swinging my grains into a bucket/tub after mash-out". Do you mean for a non-sparge method here?

This post took me a while...

Your post was longer than mine - lol!

Great post and it looks as though you have the concerns I mentioned well under control so good on you! I do really enjoy seeing pics/posts like yours and husky's.

You and husky will probably end up throwing your bags away and just brewing in a basket :). This is how the Braumeister machine works. You guys would probably enjoy reading this thread. mimeryberg posts about the Braumeister in Post 138. He also explains it some more in this thread.

Re your question I quoted above, yep, I was referring to no sparge though you can also sparge in the bucket. Like ThirstyBoy, I would really only bother with a sparge if your pot was not large enough to fit all your water and grain in it.

Thanks for the good reads and pics above. WIll look forward to seeing what you guys come up with.

Cheers,
Pat
 
I have pics uploading now that I will add at the end of this post.
I realise BIAB is supposed to be simple however I like to tinker with things because thats what I enjoy doing. If I was a millionare I would still brew beer so my BIAB rig is by no means off the shelf type.
My aim was not to squeeze any more efficiency out of the process but simply make brew day a bit neater. The fact that I like shiny stainless also has alot to do with it.

I have the height of my basket set so I can run a double batch and have the grain just above water level, this means the wort will have a little further to drop when running a single batch(99.9% of the time). If this turns out to be an issue I can add additional tubes to the basket to sit it further in the pot. Theres plenty of clearance around the basket to observe the wort height.

My initial design had a basket made from the same mesh used on all the commercially available false bottoms (2.06mm from memory). However at $1200 a sheer or something rediculous like that I opted for a sheet I had already with 3mm holes. This will get me up and running using the voile bag inside. Down the track I plan to experiment with a solid side basket and a false botton just to see of it works.
More likly than not I will try it in my current basket with no bag and just see if much grain gets through.

Anyway, heres some pics.

DSC_0383.jpg


DSC_0377.jpg


DSC_0376.jpg


DSC_0373.jpg


DSC_0372.jpg


DSC_0369.jpg


DSC_0386.jpg

That looks awesome - you should use it!

Seriously, have you ever used it? looks too clean!
 
I was planning a simple camping mat type insulation with some velcro or similar straps to make it easily removable.


I wonder if you could incorporate one of those thermal emergency blankets into an insulation layer with the camping mat?
Might help.
 
That looks awesome - you should use it!

Seriously, have you ever used it? looks too clean!

Not used yet, only got it finished on Monday, its been about 3 months in the making. It may be a couple of weeks before I get a chance to try it out, hopefully I can squeeze a brew in one night next week.
 
I wonder if you could incorporate one of those thermal emergency blankets into an insulation layer with the camping mat?
Might help.

Actually, you have just given me an idea! I have a few mentrs of 14w/m heat mats that I wrap the fermenter in and connect to a tempmate. Might put this between the pot and insulation to apply a small amount of hea tto the system and help maintain the temp. Im expecting a small prob maintaining temp since the pot is 75L and I will really only be brewing 25L batches. The heat mat should help.
 
Back
Top