Fix For Crown Urn Boiling Issues

Australia & New Zealand Homebrewing Forum

Help Support Australia & New Zealand Homebrewing Forum:

This site may earn a commission from merchant affiliate links, including eBay, Amazon, and others.
Like this. The plastic is polypropylene and the gasket is butadiene-acrylonitrile rubber ( I spoke to the supplier)
 
BribieG,

O/T

Just found your next upgrade on that ljstuart site.......

Start saving your pennies for this..... http://www.ljstuart.com.au/shop/shop2232.html

and a tame sparky to install...... :D

growler

Mate that would probably appeal to the guys on another thread who are doing a 800L brew. Might need a cherry picker to hoist the bag, though :lol:

As for the Birko Postage, they are not actually all that big in the box and I have sent similar boxes of SWMBO's art work all over Australia for as little as thirteen bucks.
birkobox.JPG
 
ok got it, but it means drilling a hole in the base of the urn to fit the switch.
As i use the urn only for brewing i would rather bypass the boil dry switch and be done with it than fit the float switch.
Brewing is not something i do and forget it, i set my urn up and fill it the night before then plug in the power and test the timer.
Then i check the water level again and check the timer again.
 
So - this mod comes out AFTER I get my immersion element!!! <_<

If anyone is able to, would they be able to post up a 'how to' with pictures for those who might follow this mod?

cheers,

Crundle
 
Agree with Crundle, the original pics are hard to follow, are the two browns just disconnected or joined together?
 
So - this mod comes out AFTER I get my immersion element!!! <_<

If anyone is able to, would they be able to post up a 'how to' with pictures for those who might follow this mod?

cheers,

Crundle

You can make a bucket o death real cheap now and do double batches :icon_cheers:
I inspected a Crownie for the first time when I was in Ross's last week and it's a nice piece of kit. I noticed that the one in Ross's shop has a stainless steel insert in the top like a false 'lid' with a big basket thing in the middle that projects downwards into the urn like a sort of tea strainer. Does that come standard with the urn (I can imagine it being used with Bushells to make tea for fifty old chooks at a time) or was that an addon? It got me thinking all sorts of hop related thoughts. Didn't have time to enquire and the staff were flat out as usual :icon_cheers:
 
It's a separate item that can be purchased from Crown if you want it...

As for a pictorial guide, I'm happy to bust out the camera when I do mine next week.
 
It's a separate item that can be purchased from Crown if you want it...

As for a pictorial guide, I'm happy to bust out the camera when I do mine next week.

Thanks Pollux, remember to dumb it down suitably for me!

cheers,

Crundle
 
Waiting for an update Pollux, i considered ploughing ahead but i don't want to damage the urn so todays brew was on an unmodded crown....
 
Sorry guys, been away on the Gold Coast for 5 nights, just landed back today.

If I can find time tomorrow, I'll do it, otherwise it will have to wait until Friday as I'm off to visit the parents on Monday for 3 nights....
 
Lucky you, i'm stuck at home cooking !!!!!
 
Looks like I may need some help here, I tried the modification today based on the pictures, and it all seemed to go ok, everything looked the same as in the photos which is a good start, but when it came time to heat up some water for a brew, I was finding that the light came on to show power was going to the element, but there was no action from the element. Normally there would be bubbling from the element to show that it is heating up water, or at the least I should see convection currents just above the element.

I added hot water from the laundry as normal, and when I turned the dial on the urn the light clicked on and I heard an audible click at 50 degrees which normally tells me the temperature of the water according to the temperature sensor on the bottom of the urn.

Being a brew day, I have opted to use my immersion element for this brew, but hopefully the issue can be sorted out, as this mod looks like being very useful for many users of this urn.

Here are some photos I took during the procedure, so hopefully we can sort out what I have done wrong so others can avoid this.


View of the 3 plugs

With the plug attached to the lid

Prior to being taken off

After being taken off

Being left off as in the original posters photos


Crundle
 
Crundle,

It looks like the wire connected to the middle of the element is not actually connected to anything. The connector with the brown & white wire appears to be the wire that is live. The white wire goes to the neon lamp & the brown wire goes back to the thermostat.


**DISCLAIMER**
**billgill is not a sparky, nor affiliated to Crown. No responsibility is taken for any property damage or loss of life caused by following the above advice.**

LOL! love the disclaimer, actually pretty ironclad from a legal perspective also!

I will open it up again tomorrow to have a closer look at what is connected to what to get an idea of what is happening with it. My brewday turned out well regardless, but I an keen to see this modification work out. I will take the urn to work tomorrow to see what the sparkies there have to say (and put up with the inevitable head shaking and raucous laughter aimed at me). I am a man much a'feared by electricity, so when I saw it not working, I disconnected it quick smart and posted the results up to make sure others were warned.

Hope to get it solved tomorrow, so will let you know how I messed it up!

Crundle
 
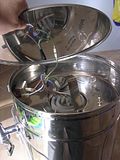
Alrighty! Thanks to DrunkSkunk for getting back to me to let me know what I did wrong, here (hopefully) is the process that will get the Crown urn to boil continuously rather than switching on and off resulting in a fairly poor evaporation rate of about 7%/hour in my case.

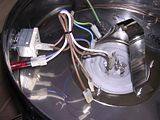
The underside is held on with a single screw, and it may take some effort to dislodge the bottom from the urn once this is undone. I had to carefully use a metal skewer to stick in the screwhole while pushing down on the side of the bottom to get it off. NOTE: The bottom of the urn is attached to the urn by an earth wire connection which is fairly short, so be gentle when removing the bottom cover so as not to damage the wire or connections. You will need to undo the connection on the bottom cover to be able to work freely.


You will see the element in the centre of the urn, with 3 wires connected to it.


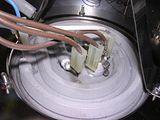
Take all three wires off and reconnect the brown wire with a white wire connected to it onto the end of the element as shown below. The other connections that you have taken off are actually both ends of the same wire, which is now not connected to anything at all. You may remove them if you wish, but I have left mine in case the urn ever needs to do normal duty as a hot water urn (not likely but I have left it there anyhow).


Now it is time to reconnect the green earth wire back up to the bottom cover and put the screw back in. You are now done and should be able to enjoy a nice vigorous boil from your Crown urn, giving you the best of both worlds with a concealed element for ease of cleaning and now a boil as good as a Birko!

Once again thanks to DrunkSkunk for putting this idea out there, and for helping an idiot like me get the wiring right finally!

Crundle
 
Top work Crundle, straight forward clear instructions even i could follow. Will give this a try when i get the time.
 
Top work Crundle, straight forward clear instructions even i could follow. Will give this a try when i get the time.

Trust me lastdrinks - if I can do it, anyone can. I am good with some stuff, but electrical thingy's are not amongst them....

Crundle
 
Good to see someone got around to doing a clear set of instructions while I've been away....

I'll be doing mine tomorrow, stocks are getting low and I have new kegs to fill.
 

Latest posts

Back
Top