BrewPi - Fermentation control

Australia & New Zealand Homebrewing Forum

Help Support Australia & New Zealand Homebrewing Forum:

This site may earn a commission from merchant affiliate links, including eBay, Amazon, and others.
standalone. pi software on old pc running debian wheezy. arduino usb goes to laptop usb. arduino also powered from pc usb port
 
I see, mine will be set up with pi as a server as the main fermenters will be over a 100km away.
I am going to set one up a home first to get the hang of it .
 
Online Brewing Supplies said:
I see, mine will be set up with pi as a server as the main fermenters will be over a 100km away.
I am going to set one up a home first to get the hang of it .
Nev,
posting at that hour in the morning (WA time) has me wondering if you did it while sleeping. Or is sleep just optional?

The next hard bit is making it available to the web, rather than the local network, though there plenty of ways to sort that, Just remember to password protect the config page, you don't want someone changing the config half way through a brew.
 
gezzanet said:
Mines been working fine with the 240 and arduino in the same box.
Thanks Gazza. Will see how it goes with mine.
 
MastersBrewery said:
Nev,
posting at that hour in the morning (WA time) has me wondering if you did it while sleeping. Or is sleep just optional?

The next hard bit is making it available to the web, rather than the local network, though there plenty of ways to sort that, Just remember to password protect the config page, you don't want someone changing the config half way through a brew.
I often sleep early then wake around 3am then back to sleep for another few hours.
I have looked at the security concerns already, not that I am up to that stage yet. ;)
 
Need some help.

Been using my brewpi for a few months now and its been great.

Im working on putting an LCD screen into the enclosure and am unsure which wiring diagram to use.

The link most ppl would have used was - http://www.homebrewtalk.com/f258/howto-make-brewpi-fermentation-controller-cheap-466106/index118.html#post6273297

There are two wiring diagrams on that post and im not sure which is the revised one.

I wired up one tonight and it wouldnt show me any data.

Can someone advise me pls of the correct wiring, or even some photos of their wiring so i can see what goes where?

Thanks heaps
 
The image called "BrewPi Rev.C - Jeff's Shield(2.0)_bb.jpg" is the 1 to use.
 
cool, i'll double check it all this morning. thanks for hat
 
If you just get a blank screen with the backlight on you may need to add a potentiometer or resistor to the vo pin. My module didn't have a pot built in so I added a 1k resistor to vo pin. 1k was probably not enough (it lights up the whole room).
 
I had it wired on a prototype shield, so i took it off that, wired up another setup on a breadboard to make it easier.

It all appears correct, but i just get a solid line of squares on the top row & the middle row.

if got the potentiometer wired in so i can adjust that.

Not sure what im doing wrong. It seems wired correct
 
I just finished setting mine up too. Looking forward to playing around with it. Do you guys have pics of the ssr setup you went with. Be keen to see wht others are doing. I put all mine in a box. Pics to come. Just running a test first.
 
I 3d printed a case that puts everything in 1 place. I'm doing my first brew now but not without issues. I tried to make it all as compact as I could which caused some interference when switching the ssr's on/off. I killed the sd card in the picture, I now have a micro sd card hooked up and its still alive after a week.

Just from my personal experience, I would keep some distance between the ssr and pi/arduino.

34qoead.jpg
 
I was wondering why the arduinos are required for these systems ? Can't the raspberry pi be used ?
 
The raspi is only a webserver/datalogger for brewpi. Most of the work is done by the Arduino. The raspi does absolutly zero I/O. It can be replaced by pretty much any linux based computer.

The brewpi spark is the next revision of hardware which pretty much makes the whole thing easier/less hacky. But for the people that have an arduino and computer/pi laying around, the arduino version is much more cost effective.
 
Has anyone built brewpi on the spark yet? I think I might wait for the photon to build mine :)
 
brewermp said:
Has anyone built brewpi on the spark yet? I think I might wait for the photon to build mine :)
By the looks release has been delayed, they're not available on the site, Slated to be available 15 December. With all the celebratory holidays etc we might be looking closer to the end of January.
 
Here is my little setup. Seems to work well so far. Free fridge painted black. Fits a 60 litre fermenter in it. Will add the beerbug to it next brew and tidy it all up. Box behind the fridge has two 25 amp ssrs. 2015-01-03 10.53.57.jpg2015-01-03 10.54.14.jpg2015-01-03 10.54.38.jpg2015-01-03 10.53.50.jpgBrewPi reporting for duty .png
 
This project has been on my todo list ever since I saw it ... and i've finally gotten around to doing it. Great little project to tinker with, not much soldering and the instructions on how to make it cheap are dead easy to follow.

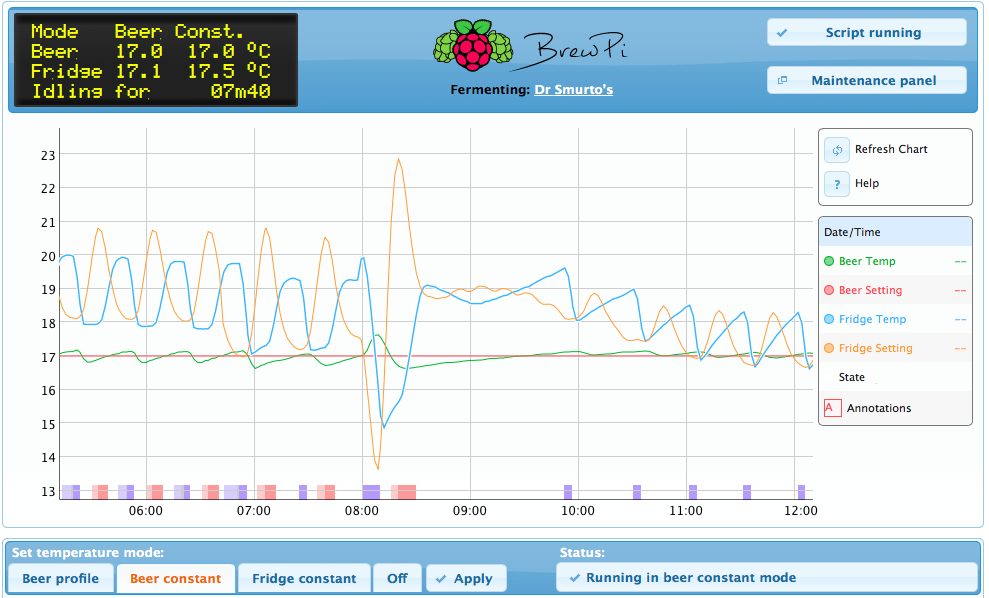
Thought though I would share my experience with running it with my first brew - the important lesson that I learnt is how sensitive the PID is with respect to the beer temperature probe and how well you need to insulate it if you aren't using a thermowell (which I hadn't really thought necessary). As you can see from the graph, the PID was oscillating between heating and cooling - I was playing around with a stack of settings trying to get the PID to not be so aggressive until I read on the brewpi forum that a guy posted a similar photo of how I had taped my probe to the fermentor. So - 8am you can see that I opened up the fridge and put a large piece of foam around the sensor and the cord, taped it all up to ensure that no air could get to the sensor and what a difference! Temp is holding between 17.11 and 16.94.

brewpi%2Bscreenshot.jpg
 

Latest posts

Back
Top