A Guide To All-grain Brewing In A Bag

Australia & New Zealand Homebrewing Forum

Help Support Australia & New Zealand Homebrewing Forum:

This site may earn a commission from merchant affiliate links, including eBay, Amazon, and others.
No. With the flame completely off the loss is about 1C per 11 Minutes. I do step mashes with rests of 20 minutes and the longest at 30 minutes. I also know that at flame out that the residual heat transfer will raise temperature 0.75 C anove flame out temperature in the pot. With reduced flame the temperature is maintained.

This knowledge of brew gear comes in handy for times when you say wheres my phone and drop the thermometer into your brew pot and without thinking 1 second later dash in after it and get burned. Ask me how I know :)

With intimate knowledge of your brew gear through taking such notes with all the previous brew sessions, I can run the remainder of a mash on timings resulting from calculations alone and know I am close to 1 C of my targeted temperature. Lets me focus on more important things like tending to my hand :p

Most of my brew sessions run on calculations and temp readings only confirm and bring a smile as I hit my calculated targets. With the setup above I have a pretty easy time as I know how long I can work on another project in the adjoining room before returning to adjust the flame.


Cheers,
Brewer Pete
 
Well ive read the checklist, the PDF, the first few pages of this whopping big thread, and the last few pages, but im still a bit unclear on a few things. This is what ive got so far:

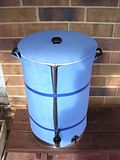
Birko 40L urn - delivered today! yay!
3m of un-dyed voile cloth and nylon thread - going to have a friend sew a bag for me, basically in the shape of a grain bag but 5x bigger.
hop sock, large - ordered from craftbrewer today
Silicone Hose - Heavy Duty -ordered from craftbrewer today
camping mat to wrap around urn - getting this from rays outdoors tomorrow
PH Papers -ordered from craftbrewer today

My Q's:

mash paddle - will the stirring paddle I got with my coopers HB kit do?
Siphon - is this neccessary given that I have a tap on the bottom of the urn that I will use to pour the wort straight into the cube?

Now im buying up the ingredients to make the good doctors GA and Tonys LCBA. So I think next weekend will be the day of reckoning, ive only done partials so far so im a bit nervous...but ill just dive in and give it a go I reckon :)

Best of luck phoney!

If you want some dimensions on how to sew your bag up send an email to here and I'll email the relevant section of the BIAB FAQs.

Also, remember to read the corrections to the original guide in Post #1 of this thread, namely add the grain after heating the water not before.

If you need a hand with water volumes, PM me or email me on the link above or ask crundle or BribieG who have urns and knows their figures well. (Email is easier for me to keep track of than a PM.)

The paddle that Katie and BribieG pictured above is the correct one. The one with paint on it won't give you as good agitation, is heavy and the paint is a no no. A traditional mash paddle is unsuitable and in my opinion is also unsuitable for most mash tuns compared to these little beauties. The ones pictured work brilliantly with BIAB and traditional. The stem is nickel or chrome plated and the end is nylon so no problems there.

You won't need a syphon seeing as you have a tap on your kettle and the silicone hose. You will need to learn how to pull apart your kettle tap for cleaning as these can harbour infections even though they are exposed to high temperatures. Crundle or BribieG might be able to help you out there.

Also PM BribieG or Crundle on as to how to protect your bag from the element.

Another important thing is to have a decent thermometer. The one pictured at the top of the page here for $12.95 are usually quite accurate and available at most HBS. Start with one of these.

We'll look forward to hearing how it all goes.

:icon_cheers:
Pat
 
About a month ago, I posted [post="486529"]here[/post] asking whether it was worthwhile in attempting a BIAB in a 19L pot, wanting to try a Roger's Amber Ale clone. I finally got organised & have just got the fermentor sealed up. Being a first attempt at an AG beer, I don't have all the numbers & I don't know if it will be anything close to a Roger's but I can't wait to find out how it tastes.

Congratulations Ben :icon_cheers:

It looks as though you have done really well. I'm totally impressed!

Trusting that your first sip will be delish!

:chug:
Pat
 
I just run the wort from the tap into the cube. As it gets nearly full it starts to froth out through the hole so I just run short bursts in until it's full ... the foam seems to retreat as it comes out and meets the cool air. I have bought a length of silicone hose but it won't fit over the urn spigot so I'm saving it for when I get a ball valve tap to replace the current urn tap and that should fit. No problems with hot side aeration which I reckon is probably an old wives tale but I'll eventually use the hose as an each way bet.

The hopsock is probably the best investement you will make. It's amazing how much the hops get boiled even inside the sock.
 
Excuse the consecutive posts but there have been about 50 posts here in the last 2 days. This is my last one :).

This knowledge of brew gear comes in handy for times when you say wheres my phone and drop the thermometer into your brew pot and without thinking 1 second later dash in after it and get burned. Ask me how I know :)

LOL Pete!

Get some of those thick red rubberised chemical gloves from the hardware. They are tops for not only retrieving things but also pulling the bag :).

Mate, you have been very creative! I have only one question and that is, "How do you stir the grain?" I give mine a stir fairly often to ensure even mash temperature and better extraction of sugars. Does the tied up bag pose a problem with this?

Whoops! That's two questions!*

Spot,
Pat

* Reminds me of the guy who goes to the lawyer and says, "Can I ask you one question for free?" The lawyer replies, "Of course you can. Now what's your second question?"
 
Sorry, one more post and a very important one that I meant to do first.

Congratulations to BribieG and PocketBeers who did a great job in sewing up the BABBs competition. The BABBs guys are very skilled brewers so this is no small feat. The fun and games including a tongue in cheek post from ThirstyBoy can be read here

Top effort guys. Most impressive :beerbang:
Pat
 
You won't need a syphon seeing as you have a tap on your kettle and the silicone hose. You will need to learn how to pull apart your kettle tap for cleaning as these can harbour infections even though they are exposed to high temperatures. Crundle or BribieG might be able to help you out there.

Also PM BribieG or Crundle on as to how to protect your bag from the element.

Another important thing is to have a decent thermometer. The one pictured at the top of the page here for $12.95 are usually quite accurate and available at most HBS. Start with one of these.

Thanks Pat, you're a bloody legend :)

I tested the urn today with 30L of water, started at 67.7C and 60 mins later it dropped to 65.7C. That's with a camping mat cut to shape & fitted around, then secured with electrical tape. I guess im either going to need to wrap it with a sleeping bag/doona and test again. Or test it with the thermostat on and set to 67C. Which is the preferred method?

I bought a digital probe thermometer from 'House' for about $25 that seems to be incredibly accurate, ive also bought a stainless steel colander that sits up side down over the element perfectly.

One more question, once the wort is drained out down to the tap level, whats the best way to drain the remaining ~5L? Im thinking either siphon or a funnel and tip the whole fermenter on it's side.

I will email you for the other info soon. cheers :)
 
When you get the wort down to the tap level and assuming the cube is full by this stage, you can tip the rest into some sanitised glass jars (I have some proper lab bottles but V8 glass 1.5L jars are good) then decant the clear wort into the fermenter along with the wort in the cube. The lids of those juice jars can be a bit suss so you could just cling wrap them and they should be ok. I normally get about an extra litre and a half of usable wort that way.

Because everything is bloody hot at that stage I just wear a pair of suede leather / canvas gardening gloves about ten bucks from hardware stores.
 
Phoney, I was just starting to write how I was totally unfamiliar with urns and was about to say that Bribie and crundle should be the urn advisors and there you have it - a post from bribie!!!

I have a few questions too Phoney for the urn experts...

1. How do you clean your kettle tap?
2. Do you stir the mash?
3. Is there any need for a camping mat? (Can you apply heat easily during the mash?)
4. What do you use to cover the element?

I know very little about urn brewing and always feel at a loss trying to give advice in this area. Some pics of how you cover the element would be great :)

Look forward to your email Phoney though I am scared I won't be of much help compared to these guys.

;)
Pat

P.S. Great to see that you already have most things sorted.
 
I just want to say that my first BIAB nabbed a gold for Mild in the ESB comp, another small testimony to the merits of the method, even in inexperienced hands.
 
Urn tap should be cleaned every time, it's easy with a Birko. There's a knurled plastic knob ... hang on I'll fire up paint and do a piccie:

OK

urn_cleaning.JPG

The black plastic knurled top cover can be screwed off carefully and pull out the complete plastic tap assembly which has a soft silicone plug that seats down inside the metal tap body. Wash it and then you can get into the metal cast body quite easily with cotton buds or steel wool or whatever. I usually just run boiling water through it. The important thing is that sometimes hop fragments or hot break material can get caught up in the tap and cause infections. Then just screw the upper plastic assembly back on, very careful not to cross thread it, and slowly tighten up until completely sealed up again. :icon_cheers:

A temperature drop of 2 degrees is fine. However probably better still to wrap the whole thing again in a doonah as well and you should get virtually no temp drop over an hour. Most of the conversion takes place in the first 20 mins anyway.

I give the mash a good pump with the paint stirrer initially, then when I take off the doonah I then give it another good pumping.

If you passively lag the urn effectively during mashing there is no need to apply heat therefore the element is not on so won't bother the bag.


Cheers
BribieG
 
I just want to say that my first BIAB nabbed a gold for Mild in the ESB comp, another small testimony to the merits of the method, even in inexperienced hands.


Great stuff mate!

Just dont tell Maxt, or it wont count :ph34r:

:lol:
 
Phoney, I was just starting to write how I was totally unfamiliar with urns and was about to say that Bribie and crundle should be the urn advisors and there you have it - a post from bribie!!!

I have a few questions too Phoney for the urn experts...

1. How do you clean your kettle tap?
2. Do you stir the mash?
3. Is there any need for a camping mat? (Can you apply heat easily during the mash?)
4. What do you use to cover the element?

I know very little about urn brewing and always feel at a loss trying to give advice in this area. Some pics of how you cover the element would be great :)

Look forward to your email Phoney though I am scared I won't be of much help compared to these guys.

;)
Pat

P.S. Great to see that you already have most things sorted.

1 - I clean the tap after every brew day (sometimes brew twice in one day so not in between those brews) as outlined by BribieG

2 - I stir the mash as I am pouring in the grain, and then stir it for a good 5-10 minutes once it is all in. Then I stir it again at 15 minutes after wrapping it up, then once again at 30 minutes. I figure the hard work is done by then, and at the 30 minute mark I normally give it a burst of heat to bring up temp then wrap it up for the final 60 minutes undisturbed.

3 - I love my camping mat! It is the best thing I have bought for my urn yet. I have the sides wrapped the whole time (also during the boil) and during the mash I also have a circle of camping mat cut out to fit over the lid.

4 - No cover for the element in my Crown with concealed element, but I lift the bag up while applying heat to make sure. If you wanted, something like a colander or an
Ikea foldable colander would work a treat.


plus 1 for using thick gloves for wringing out the bag when it is hot!

EDIT: it sounds like I only use the camping mat from what I wrote, but I use the camping mat alone when I am boiling and heating up any steps, but when mashing I follow BribieG and wrap the camping mat covered urn with blankets and a doonah to insulate it.

cheers,

Crundle
 
I just want to say that my first BIAB nabbed a gold for Mild in the ESB comp, another small testimony to the merits of the method, even in inexperienced hands.


Its nearly time for a BIAB WIN REGISTER....

well done Bizier... :icon_cheers:
 
I just want to say that my first BIAB nabbed a gold for Mild in the ESB comp, another small testimony to the merits of the method, even in inexperienced hands.

Top effort mate!

Please make sure you have more Gold beers for me to drink when I visit in Dec/Jan :)

Spot!
 
Get some of those thick red rubberised chemical gloves from the hardware. They are tops for not only retrieving things but also pulling the bag :).

Mate, you have been very creative! I have only one question and that is, "How do you stir the grain?" I give mine a stir fairly often to ensure even mash temperature and better extraction of sugars. Does the tied up bag pose a problem with this?

Whoops! That's two questions!*

Spot,
Pat

* Reminds me of the guy who goes to the lawyer and says, "Can I ask you one question for free?" The lawyer replies, "Of course you can. Now what's your second question?"


I find the tea totler technique of continual gentle agitation has not needed stirring for temp. And I have a long glass lab therm I buried down hard into the bag to get readings in the beginning. All the dunking motion gets the entire pot mixed well. I do a full spent grain inspection on every brew as it all goes into the veggie patch preparing the soil for this years hops plantings. So far no signs of hydration issues, clumping, etc. I will be doing a Belgian variant of hefeweizen hopefully this upcoming weekend so that will be a real good test of the setup.

You can simply not tie off the bag in the beginning but wrap the single long piece of twine and with a twist of the two ends you have a temporary locking wrap held tight from suspension or change to a specialty knot (I have a sailing book with what looks to be over 20,000 knots :p) but its hard to explain in words so I might have to get out the camera if I give a new tie technique a go.

I think the book is called "Ashleys Book of Knots", back when I was sailing...

I thought about gloves as well but that brilliant thought came a minute after nursing the hand. :p
 
Thanks for the above Pete!

From your post above it sounds as though you have considered my worries really well. My internet access is via my mobile phone for the next few days so I have to be a little more brief than I am used to - lol!

Can you possibly post or PM me your figures using the template I put up recently in the BIAB Brewer Register thread?

While you're at it, tell BribieG to do the same as we need more urn figures!!!!

:)
Pat

P.S. Yep, gloves are one cheap thing in brewing you think is money well worth spent!
 
im sort of new to biab, got quite a few under my belt now due to the weird hours i have free i was wondering is there anything wrong with
1) mashing in the morning
2) straining bag
3) covering and leaving till i get home in the afternoon
4) boiling chilling fermenting


or... set mash @ 66 wrap in blanket and come back in the afternoon
i do double batches and when i wrap in a blanket i notice there is no need to turn on the burner during the 90 mins

however i guess it will drop to around 50deg by the time i get home if i left it this way. is this bad or can i get away with it without problems
it wont be a 8-9hr work day, usually about 5 hrs
 
Mikey, I think that depends on what beer style you are brewing and how particular you want to be.

There are some threads here somewhere, if my memory serves me correctly, on overnight mashing and I can't remember there being any violent problems.

I think you would be best though leaving the bag in the whole time rather than straining it early. I can't see any downside to doing this compared to pulling the bag early.

Give it a go but if you come across a problem in the resulting beer, the first thing you should change is this ultra-long mash.

:)
Pat
 
Back
Top