Onederbrew: Affordable Plastic Conical Fermenter?

Australia & New Zealand Homebrewing Forum

Help Support Australia & New Zealand Homebrewing Forum:

This site may earn a commission from merchant affiliate links, including eBay, Amazon, and others.

Malted

Humdinger
Joined
15/5/10
Messages
2,301
Reaction score
115
OnederBrew. Affordable plastic conical fermenter???

Caveat: I have no commercial interests in this product. I am just a backyard brewer that thought it looked worth a try.

Summary
(for the TLDR crowd):
Question: Is this a good product? Is it value for money? Should I get one?
Answer: Not too bad all things considered. Expect some compromises, if you can, make up your own mind if it might suit you.

So a stainless conical fermenter will cost you upwards of $800. The Onederbrew plastic conical fermenter retails for $200 USD, plus postage to Australia. Those who have bought large items from the states will know that postage is not cheap. To be honest I did not pay retail (don't count on getting the same deal I did) and I got two unassembled units sent in the regular single packaging so postage per unit was half (postage alone was $99 USD for the two units).

Enough text. Let's see some pictures!

1.JPG
It was quite a large box that they came in and delivery time was quite quick. I found the Onederbrew team to be very good with communications.

2.JPG
Here are all the bits and pieces with assembly instructions. You can see the inverted cones and the clamping rings that secure them to the 5 gallon buckets. The legs and other components are in the bags. It is basically a cone that goes onto a bucket that is available in the USA.


15.JPG
Here is how it looks assembled compared to a VB style of fermenter. You can see the Onederbrew is significantly taller, as you would expect of a conical fermenter. Having said that you can see the total height has been reduced as much as possible.
It has a pressure relief port, racking port and a yeast removal port. The idea is that you can brew with it pressurised to minimise oxygen in the wort. There are supposed to be a number of advantages to brewing beer in a pressurised vessel.

The makers claim that can brew in it, remove the yeast, condition in it, chill in it and dispense from it all without introducing any oxygen. With the pressure assembly, you use the fermentation to carbonate your beer. One vessel rather than fermenter, secondary vessel, bulk priming vessel, bottles or kegs etc.

Now more about how it goes together and what I think of it.

13.JPG
You put your cooled wort into the bucket (base to ground, opening skyward), put the inverted cone onto the bucket, secure it and then once sealed, flip the whole unit for brewing. There is a red gas relief tube that extends into the headspace to allow venting of excess CO2. I think the tube could benefit from being a little longer as I'd rather it closer to the top (which was the bottom) of the bucket; I would want it venting CO2 rather than wort. Even though the bucket is not located over the main silicone gasket you can see approximately how far the tube extends into the bucket.

3.JPG
Here is a cone with the inner reinforcing ring (right) and the main silicone gasket (left). It is quite a thick and robust silicone gasket. The cone itself is much thicker than I had anticipated.


4.JPG
The reinforcing ring goes in. Note that it partially covers the pressure relief port hole which we will see more of later.

5.JPG
Here is the main silicone gasket fitted to the cone and inner reinforcing ring.

6.5.JPG
All of the taps and fittings have a half inch thread as well as double o-rings. There are two of these taps pictured; one for the racking port and one for the yeast port. You could swap them out for taps of your choice.

6.JPG
Here is the first fitting that goes into the pressure relief port hole. The red tube just presses into this fitting. If you press it in too far, it could block the hole that allows the CO2 through.
 
7.JPG
Here is the fitting in the cone. I'd think the hole to let the Co2 out could be a little larger but since it is a gas under pressure, the hole diameter probably does not matter. With a larger hole it probably would not grasp the tube as securely.

9.JPG
Now this bugs me. You can see that since the reinforcing ring is partially covering the port hole, it forces the gas relief tube to the side. I should imagine that this might well put stress on the gas relief tube fitting that meets the cone. The other issue I have is that you have to insert the cone into the bucket of wort and potentially when you then invert the whole unit there could be some liquid in the tube. With it not being as long as it perhaps could be, it might also force wort through the assembly instead of gas from the headspace. This may not be an issue but I think there could be a chance of either wort or kraussen entering the gauge which ultimately would not be good for it or for sanitisation.

10.JPG 10.5.JPG
These two valves are assembled in this position with the one on the left joining the fitting that holds the red pipe into the cone. As per manufactures recommendation, I have used a food grade lubricant on all of the o-rings and the main silicone gasket.

11.JPG
Here is a detail of the pressure relief assembly. I think it could be easy to over tighten these fittings and perhaps damage them. To get them to align properly I have slightly over tightened them and this has led to some flaring of the outer lip of the fittings. It is probably not a cause for concern.

12.JPG
Here is the complete pressure relief assembly. It is a pity the gauge face plate is not aligned vertically. That would probably require an item that is not 'off the shelf' and perhaps could increase cost of production. The manufacturer recommends that in the first few days of brewing you should allow excess pressure to be released and once the vigorous fermentation is slowing, you can then close the valves to continue brewing in a pressurised environment. With the valve in the closed position, you can undo the cap nut of the valve to allow some gas to escape so that you can maintain a constant pressure. You can dial that pressure in to what you want it to be by adjusting and watching the pressure gauge.

16.JPG 17.JPG
Somewhere above 20psi and this safety bung in the bucket will pop out. It can be resanitised and reinstalled.

14.JPG
This is the main compression ring that secures the cone and bucket together; it is quite robust. It has this clamping latch on one side and two bolts on the other side.

14.5.JPG
Once you have the unit clamped together in the upside down position you should adjust the bolts until the gap is about " with the bucket side slightly tighter (as per directions). These carriage bolts have a smooth dome head and a small square section underneath. The square section quickly chewed out the plastic and allowed the bolt to freely rotate as I was trying to tighten it. I think a " gap is probably too tight and next time I will swap the bolts out for some hex head or Allen head bolts.
You can see how the clamping ring goes underneath the bucket lip and over the cone lip to hold these together with the main silicone gasket. You don't seem to be able to adjust the bolts to " and THEN use the clamp latch on the other side as this does not seem to allow enough diameter to wrangle the clamping ring over the unit.

Once the cooled wort is in the bucket and you've clamped it together and adjusted, you then flip it over into the brewing position like so.
22.JPG
Here it is in my fermentation fridge, it only just fits. If you are going to invest the money into a conical fermenter I reckon you must be half serious about brewing. If you are anywhere near serious about brewing you would use it in a temperature controlled environment. You can see the top of the bucket starting to bulge.
 
23.JPG
It was bulging quite a lot at over 20psi as I had not opened the valves or twiddled the valve caps at the start of fermentation. I think the safety bung did not pop out because it was forced up against the ceiling of the fridge! Please note, the unit did not leak anywhere at this pressure (well above what it should be which was entirely my fault).

24.JPG25.JPG
When I realised my error and cracked the pressure release valves I was instantly greeted with large quantities of foam; I then put a catch container under it (but the mess was already made). Since then I have been able to adjust the valve caps to maintain my desired pressure (which has been about 7 psi).

I found that extracting the yeast from the bottom port was very easy and it came out cleanly. Extracting a sample from the racking port for the hydrometer is another story. With the beer in a carbonated state, there is quite a head on the sample that needs to subside before you can get a hydrometer reading. This is not exclusive to this device, I have had the same from regular fermenters (not at 7psi of pressure though).

My brew is currently cold conditioning and then I will rack it out into a keg that will have a squirt of CO2 added to it. I expect to use a length of silicone hose to transfer from the fermenter to the keg so as to try not to over oxidise the beer. I am not sure I want to try and hook beerline up to a disconnect etc to pressure transfer to the keg but in theory I probably could with this device.
 
Thanks for that post Malted.

So the fermenter is just a plastic bucket? Nothing wrong with this I'm just thinking if these could be sourced locally it would save on shipping.

Why did the US get rid of surface freight? Still happens in Canada.
 
What do I think of Onederbrew?


To be honest, it needs some improvement. At the moment there are quite a number of moulding blemishes and moulding marks that potentially could lead to cleaning and sanitisation issues. Of the two units I bought, one is useable.

18.JPG
This is a moulding fault on the inside of the cone that corresponds with the socket for the leg on the outside. I expected it to leak from here but it did not.

19.JPG
In the same area on the other unit there is a crack above the leg union to the cone. I did not notice this until I did a water test on the first unit I assembled and upon finding the leak, I observed this crack. This cone is therefore useless to me. You can see a moulding line on the inside of the cone towards the bottom of the photo.

20.JPG21.JPG
Here is the racking and the yeast extraction ports without the taps fitted. It appears to me that these holes have been added with a hot poker after the cone was moulded. I'd like the holes to be a bit bigger but it probably doesn't really matter. If a larger hot poker was used it may damage the port thread. I am still likely to drill it out or use a die grinder to enlarge the holes myself.

Pros:
- Much lighter than a stainless conical fermenter.
- Much cheaper than a stainless conical fermenter.
- Shorter than most other stainless conical fermenters.
- Conical fermenter is at the optimal 60 degrees not some other whacky angle.
- Yes you could do away with regular fermenters, secondary vessels, bottles and kegs etc.
- Yeast harvesting is very easy (not unique to this device).
- Sample collection is very easy (not unique to this device).
- You most certainly can brew in a pressurised environment (not unique to this device).

Cons:
- Much more expensive than a regular plastic fermenter (not unique to this device).
- Lots of parts that need to be pulled apart for cleaning and sterilising.
- Taller than a regular fermenter (not unique to this device).
- Not as simple as I was anticipating.
- It is quite difficult to wrestle the conical onto the main gasket/bucket and use the clamping ring all at the same time.
- Moulding process needs improvement.
- I think you would have little to no chance of finding a replacement bucket of the right size in Australia.
- Some minor product improvements are needed (not unique to this device).
- It would be difficult to make mid fermentation additions of fermentables or spices and dry hoping in secondary stage would also be difficult but not impossible (not unique to this device).
- You can't see what is going on inside the fermenter (how much krausen, wort/beer level) as you would with an opaque regular fermenter (not unique to this device).
- You would have to be careful not to scratch the plastic during cleaning (not unique to this product).


I think this product has a valid niche in the home brewing/hobby brewing market. It will not appeal to some folks but I am sure that it will appeal to quite a lot of others. It is a bigger market place in the US and I am sure there will be plenty of sales over there.

At present this device has some advantages but also some disadvantages when compared to either a regular plastic fermenter or a stainless steel conical fermenter. I think that if it had a clear bucket that you could see through, this would be a major advantage and would set it apart from a stainless steel conical fermenter. Some folks might worry about light strike to the brew, hence the black bucket but personally I think you would be a clown if you let this happen.

Things I'd like to see in future versions (and I am sure most will be implemented):
- A longer gas relief tube to reach the top of the bucket.
- Pressure relief assembly port on the conical moved slightly lower down so that the gas tube is not compressed by the inner reinforcing ring.
- The pressure gauge face in a vertical orientation.
- A clear or opaque bucket.
- Larger holes in the ports.
- Allen head bolts on the clamping ring.
- Better mouldings.


I think it would be unfair to focus too much on the negatives of this product; it is only a quarter of the price of a stainless steel conical but is almost on par in terms of usefulness.

The Onedebrew team are very good with their communication. They have informed me that they are shipping the units with a little suction pump to help secure the conical to the gasket/bucket and have sent revised documentation to me as it is developed. I was able to get one of the pumps from eBay for stuff all.

This is the message I received from the Onederbrew founder:
We are making improvements on the cone. We will ship you new units at no charge as soon as these are available, we are also improving the bucket and we will get those to you also along with any other improvements.
Sorry for the defects, we are now 100% pressure testing the units before shipping.
Bear with us and we will work hard to make sure you are happy.
Thanks for the support.

I honestly don't think I could have got a better response to my communications. You can not deny that this is good customer service. I only hope that the improvements that they are making to the Onederbrew do not drive the cost of production and hence retail price upwards. Its lower price is its best advantage.

For more information see www.onederbrew.com
 
good to see you take a punt on the product,great review.
 
So the fermenter is just a plastic bucket? Nothing wrong with this I'm just thinking if these could be sourced locally it would save on shipping.

Ha ha you jumped the gun Batz.
See Point 7 in Cons.

Yes it uses a 'regular' bucket available in the USA. The only modification to the bucket is a hole drilled in it to accomodate the pressure relief bung.

This is exactly the thought train I was riding before my purchase. In the end it seemed too difficult to determine via email if we might have a an easily available bucket to suit in Australia. It was a case of suck and see and perhaps they gave it to me at a good price so I could do that leg work and testing.

I am skeptical that we would have a bucket to suit in Australia. Our buckets seem to have a tapered rolled lip whilst the supplied bucket has a square rolled lip. The compression ring has been constructed to suit the square US bucket lip, I don't think our buckets with a tapered rolled lip would be suitable as there is not enough to actually clamp too. It is hard to photograph the lip of a black plastic bucket but I shall try some more.

There is also the issue that buckets are not uniform in their diameter. I can confirm that a 'Handy Pail' from Bunnings appears to be about the right size but will not fit. The bucket lip and diameter would need to be pretty spot on to be suitable. I'll keep looking.
 
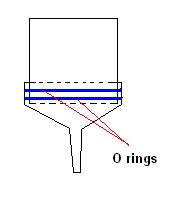
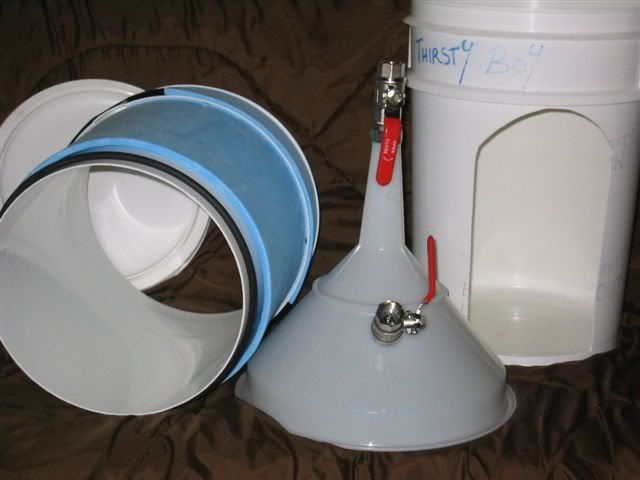
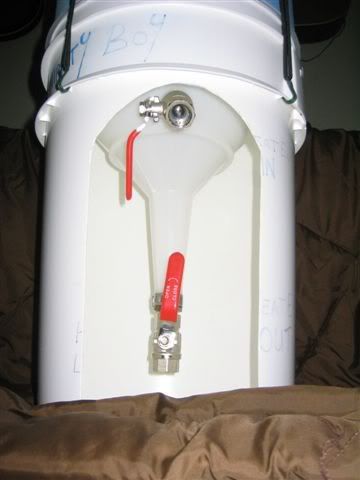
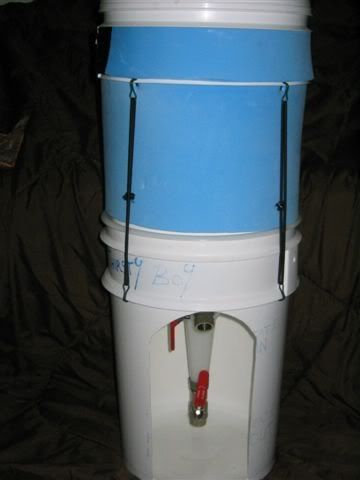
Similar to this one I made - the difference being that they had the brainwave of turning the bucket upside down. Handy, because teh problem I had was that in order for the bucket to seal to the funnel, I had to cut it down to a wider point and that reduced the volume too much. I just had a quick look and upside down, its actually too wide for my funnel.... but only just. A teeny tiny bit of trimming and I reckon it would be fine. I also think that there is a slightly larger funnel than mine, which might already be perfect.

Plenty of fettling to be had for the DIYers out there.

Thanks Malted - an interesting concept indeed.

Conicaldiagram.gif

IMG_1028.jpg

IMG_1021.jpg

IMG_1018.jpg
 
That whole pressurisable vessel concept and pressure relief valve seems like a bit of faff to me, it'd be better to have a sturdy plastic opening in the top that'd accept a corny keg lid. You could then put a blow off tube fitting in the lid and be able to open the hatch for additions.
 
Similar to this one I made - the difference being that they had the brainwave of turning the bucket upside down. Handy, because teh problem I had was that in order for the bucket to seal to the funnel, I had to cut it down to a wider point and that reduced the volume too much. I just had a quick look and upside down, its actually too wide for my funnel.... but only just. A teeny tiny bit of trimming and I reckon it would be fine. I also think that there is a slightly larger funnel than mine, which might already be perfect.

Plenty of fettling to be had for the DIYers out there.

Thanks Malted - an interesting concept indeed.

Conicaldiagram.gif

IMG_1028.jpg

IMG_1021.jpg

IMG_1018.jpg
Hi Thirsty Boy

joe is my name. I am in the process of making a conical fermenter using a 30lt conical tank from Rotamold WA. This is a sealed type and is presure tested to 10psi. In plan to set up the unit similar to the way the big boys brew (lucky for me a school mate has 20years experience as a chemist for a large brewing company, knowledge you can'tbuy)
30 Litre Cone Bottom
Code SP30CB Description 30 Litre Cone Bottom Tank Dry Weight 4kg Height 750mm Width 300mm Length Diam Lid Size 170mm Cap - Sealed or Vented Outlets Blank - DIY RRP inc GST $198.00
Mounting is achieved by attaching legs to the moulded in bolts and nuts on each side.​
sp30cb.jpg
This was only $218.00 delivered to qld!!

My question is what type of valves have you used on yours, and does the draw off valve in the cone have a "tube" fitted to it that you can "turn" to ensure a clean draw?

Thanks

Joe
 

Latest posts

Back
Top