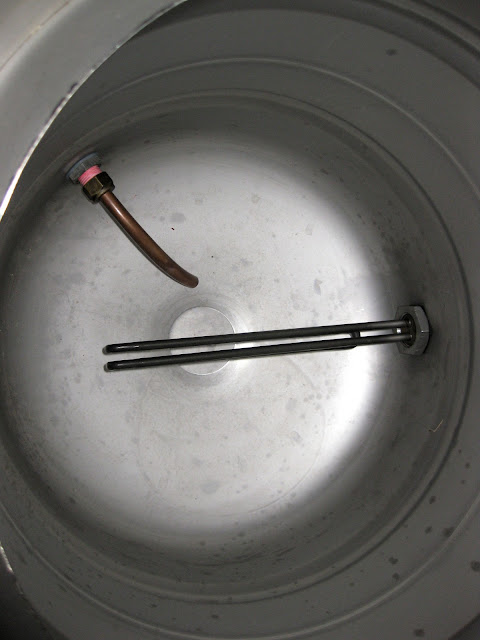
Keg King Elements

Australia & New Zealand Homebrewing Forum

Help Support Australia & New Zealand Homebrewing Forum:

This site may earn a commission from merchant affiliate links, including eBay, Amazon, and others.
You can get a 4800 from stokes. Don't forget it'll draw 20 amps though :eek:

Two 2400's on seperate circuits is more realistic for most houses. ;)


I'm allowing 3 x 10amp and 1 x 5amp lines for the brewery. The 5amp is a line sharing with march pump, a fan, stereo etc

The HLT has 2 x 10amp, the RIMS is 10amp, HERMS 10amp (actually 1800w so 7.5amp) and now I want to power up the kettle with elec.

Brew day is something like this
Start - HLT x 2 to get to temp as quick as possible (takes 1hr)
Mash time - HLT x 1, RIMS x 1, HERMS x 1, pumps etc on the 5amp line
Planned boil - once at mash out temp, use HLT and RIMS power onto kettle, once all wort transferred frees up third 10amp line.
 
I wonder how good these things are ebay 2000w element

They would have a lower heat density as a bonus.

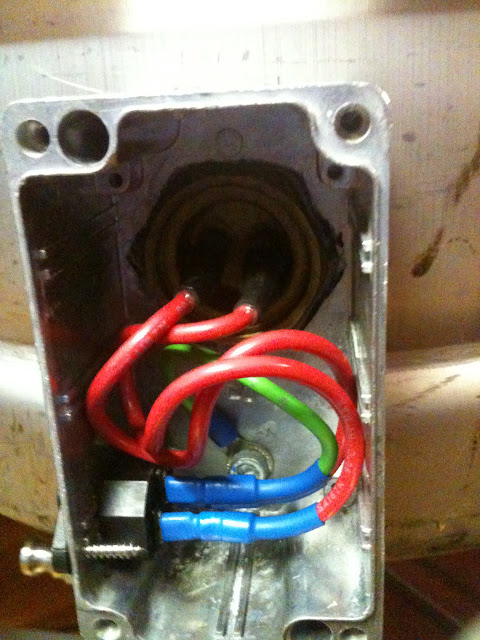
Just need a basic box to house the connection and pick up the earth.

My element got here today, looks like I'll have a chance to get it hooked up this weekend, and see how it runs. It's heavier duty than I expected form the pic. Fingers crossed it will be more reliable than the keg king ones, not that will be hard.

QldKev
 
My element got here today, looks like I'll have a chance to get it hooked up this weekend, and see how it runs. It's heavier duty than I expected form the pic. Fingers crossed it will be more reliable than the keg king ones, not that will be hard.

QldKev

mate can you give us a pic of it and a review once you get it in

how are you attaching a earth ? would a spade-O terminal thing under the nut through the pot wall might be the go?
 
mate can you give us a pic of it and a review once you get it in

how are you attaching a earth ? would a spade-O terminal thing under the nut through the pot wall might be the go?


I'll grab some pics and may even write a how-to for it.

The Wiring and Earth will be same as This one, with the changes to suit the element.

QldKev


edit: Fixed up the link, the one to LS1 forum may not be much need on a homebrew forum :huh:
 
mate can you give us a pic of it and a review once you get it in

how are you attaching a earth ? would a spade-O terminal thing under the nut through the pot wall might be the go?

That's how I was going to earth the HLT (not using the same element, although another ebay one)

Pretty sure there was a photo of someones setup that had the o-ring terminal attached to the nut that held the housing for the element to the HLT.

Haven't been able to find it again though, sorry.


Sponge
 
Any chance of a screenshot or something similar Kev?

Can't access the link you sent through..


Sponge
 
i am ordering a couple of 1" screw in ones on Monday, a 2400 and a 3600
might use the same box on the back but a 15amp male plug and bit of heavy lead sticking rather than a jug plug thing

or maybe this sort of idea
clipsal_inlet__54783_zoom.jpg
 
Pic stolen from here

View attachment 54115


They also had a $5 off card in the package with a link to their website.

http://www.uxcell.com/220v-2kw-type-stainl...h-p-191036.html

Element $8.99
Post $5 for the first and $2 after that.

Also got plenty of other useful toys on their site

QldKev

Ahh yes, thats the picture I was thinking of, cheers for that.

Pretty simple way of ensuring that the brewery remains plenty safe after DIY electronics. Every homebrew setup should really ensure its earthed. Not much extra hassle for a whole world of safety


Sponge
 
Test completed

Pic showing size against a bottle, and my $5 voucher
270420121038.jpg


Temp vessel drilled to suit mounting, mounted easily and no water leaks.
All wired up, earth picked up from the element housing, as the vesslel is plastic.
270420121039.jpg

Got warm pretty quick.
270420121042.jpg


Tested for voltage leak into the water, passed.
Draw 1900w (ok since spec'd at 2KW)
Noted V at input was only 229v :angry:


Notes:
Main probe is stainless,
Bulk head fitting is Copper, including the inside of the vessel.
Soldering work of the probe to the bulkhead is decent workmanship.

Overall for the money, so far, excellent value.

The only thing left to mount it properly into the main vessel including an appropriate house for the wiring, which I will use a die-cast box. Then following that the last test is time trials for how long it lasts.


QldKev
 
Test completed
Very interesting! Looks like it'd be easier to mount in a vessel due to its smaller hole sizes. You mat be onto something here kev!
Cheers for paving the way!
 
I have a keg king element in my HLT, after 4 brews its still like new. I've always had good dealings with Kee and Keg King, its unfortunate that your experience has not been great.

As far as alternatives, I purchased an element from these guys for my kettle:

http://www.thermalproducts.com.au/hotwater...erheader.html#3

I use part number H03569 which is 3600W, but H03566 & H03565 are 2400W and 2000W. It was about $55. They use a 1" screw in boss. I purchased a stainless steel 1" lock nut from Geordi for a few bucks and works a treat.

You do need to do some handy work to box in the back and connect a lead, but its not overly difficult. Here is mine using an alloy jaycar box, I used to have a power lead wired onto the element but it was a PITA to move and clean the kettle with a lead permanently hanging off it so I just changed it to a male IEC socket.

IMG_0508_v1.JPG


photo.JPG


Nice install and safe................ well maybe those long ST screws should be cut off or replaced with shorter ones.

Nice Frothie!!

Screwy
 
Test completed

Pic showing size against a bottle, and my $5 voucher
View attachment 54120


Temp vessel drilled to suit mounting, mounted easily and no water leaks.
All wired up, earth picked up from the element housing, as the vesslel is plastic.
View attachment 54121

Got warm pretty quick.
View attachment 54122


Tested for voltage leak into the water, passed.
Draw 1900w (ok since spec'd at 2KW)
Noted V at input was only 229v :angry:


Notes:
Main probe is stainless,
Bulk head fitting is Copper, including the inside of the vessel.
Soldering work of the probe to the bulkhead is decent workmanship.

Overall for the money, so far, excellent value.

The only thing left to mount it properly into the main vessel including an appropriate house for the wiring, which I will use a die-cast box. Then following that the last test is time trials for how long it lasts.


QldKev

Kev.

Nice install. As usual lot of overkill re elements. My old 1800W clunker has worked well for 6 years. All depends on your process.

Set timer to heat to 77 to start at 5am. Wake at 6am and go to the brewery. Water in HLT is at 55 so drain strike water to MLT. Start recirc with HEX set at 54. Once temp in the MLT/HEX system is at 55 add grist. After 10 min adjust HEX controller temp to 66 and check after 10 min. Rest at 66 for 60 min then ramp to 72 for 20 min then ramp to 77 for a 10 min mash out rest. Remainder of brewing liquor (water) has been heating in the HLT at the set temp of 77. Begin draining to the kettle (gravity) as the 77, sparge water is pumped to the MLT at the same rate as the wort is draining to the kettle (continuous/fly sparge) maintaining level.

Why use/need large power hungry expensive elements?????

Screwy

I think the size of the elements will depend on the size of the system and where they are used. What you use will not suit everyone a we have different requirements. If I just had a single batch system life would be easier.
HLT
I'm not as concerned about the initial time to get to strike temp, at the moment it's a bit over 1hr with the current 4400w worth of elements. Good time to workout recipes, and measure / crush grain etc.
It then takes almost an hour to recover from when I drain the initial strike water, and top up with the extra water needed for mash out, to get to 78. So it doesn't allow too much spare time against a single step 60min mash on brew day. That's how I calculated it, and that is also ok. Obviously I could get a lot larger HLT and offset more time prior to the strike, by my brewery vessels are big enough as it is.
HX
Basically I've got enough heating so I can get almost 1 degree per minute with a good strong recirc.
KETTLE
These days I'm brewing in the main carport of the house as I don't have a brew shed at this house, and most likely wont have a brew shed for a couple of years. While I love the NASA burners for pure grunt work, I'm looking to get rid of LPG burners from my system as inside I find them too noisy and hot. A 1800w element wont boil a 140L pot, plus the heat density of a kettle element will cause issues in the kettle; hence my research for elements to run the kettle.


QldKev


Agreed, must suit the application. My 1800W is in a 90L HLT works fine given my process and location.

Screwy
 
My 1800W is in a 90L HLT works fine given my process and location.
Screwy
Nice install. As usual lot of overkill re elements. My old 1800W clunker has worked well for 6 years. All depends on your process.

My replacement Keg King element is going ok after three brews even though I need to passify the ongoing rust with pickling paste ASAP. ;) ;) :lol:

With the expectation that the Keg King element isn't going to last the full 3-year warranty I've been looking around for a decent 2400w element to replace it & hopefully have found the answer thanks to other brewer's posts? :icon_cheers:
No affilation yadda, yadda, but if you're needing a 2000w element then CraftBrewer stock a Plug & Play (copper) 2000w element for a reasonable price. It's not on their website but IMHO absolutely good for a HLT if you're not looking for a 2400w.

TP
 
Test completed

Pic showing size against a bottle, and my $5 voucher
View attachment 54120


Temp vessel drilled to suit mounting, mounted easily and no water leaks.
All wired up, earth picked up from the element housing, as the vesslel is plastic.
View attachment 54121

Got warm pretty quick.
View attachment 54122


Tested for voltage leak into the water, passed.
Draw 1900w (ok since spec'd at 2KW)
Noted V at input was only 229v :angry:


Notes:
Main probe is stainless,
Bulk head fitting is Copper, including the inside of the vessel.
Soldering work of the probe to the bulkhead is decent workmanship.

Overall for the money, so far, excellent value.

The only thing left to mount it properly into the main vessel including an appropriate house for the wiring, which I will use a die-cast box. Then following that the last test is time trials for how long it lasts.


QldKev


Just pulled the trigger on a pair of those, good find.
 
Just pulled the trigger on a pair of those, good find.


I've just ordered 3 from their website (I plan on running 2 on my kettle, and want one spare). I did notice the sizes are slightly smaller, and the pic is a stainless bulkhead. But with the $5 discount card from the ebay one, it cost $30.97 all up for 3 posted.

QldKev
 
Had a keg king element blow on me yesterday during a brew. It was towards the end of the boil and I was about 10m away when it happened. Pretty scary. My GFCI tripped but there was quite a loud bang and some smoke from the element. Basically the insulation seems to have melted just where it joins the body of the element and let the neutral and live wires touch. I had already retired an older keg king element because I could see some fraying at the same point, but this one was bought about a year back and I was careful to inspect it before each brew day. There was no sign of any fraying before this happened, and it has only seen about 15 brews. Disappointing.
 
My replacement Keg King element is going ok after three brews even though I need to passify the ongoing rust with pickling paste ASAP.

With the expectation that the Keg King element isn't going to last the full 3-year warranty I've been looking around for a decent 2400w element to replace it & hopefully have found the answer thanks to other brewer's posts? :icon_cheers:
No affilation yadda, yadda, but if you're needing a 2000w element then CraftBrewer stock a Plug & Play (copper) 2000w element for a reasonable price. It's not on their website but IMHO absolutely good for a HLT if you're not looking for a 2400w.

TP


Well you've obviously have used it out of water and overheated it causing this issue! ;) ;) :lol:

Wonder why craftbrewer doesn't put the element on the website. I think they would sell quite a few, if they were ok in the wort. So far I'm pretty happy with this ebay one. I'll post a couple of pics soon.
 
Back
Top