Chest Freezer Collar.... How Do I Make One?

Australia & New Zealand Homebrewing Forum

Help Support Australia & New Zealand Homebrewing Forum:

This site may earn a commission from merchant affiliate links, including eBay, Amazon, and others.
well dont i feel silly. worked out that the fan should only be drawing ~300mA so the phone charger I have should be plenty powerful enough. plugged it in again and held the fan wires to the terminals and it worked. unplugged it, cut the end off and made a more permanent connection, plugged it in again and it didn't work. it seems that the socket i plugged it into on the powerboard the first and third time to test it is faulty or something; works fine in any other one. it's now whirring away happily at the bottom of the freezer :)
 
Overkill? Probably... I'm running my 12V fan at 13.5V. :ph34r: I have been thinking of adding a resistor to slow it down a bit... :lol:

edit.. I's stupid.
 
sorry for double post, but I originally put this in the wrong thread :blink:

The simplest freezer conversion ever. No drilling, no holes. Takes 5 minutes to build and cost $5. Works a charm.

cheers

Darren

001.JPG


003.JPG


005.JPG
 
Overkill? Probably... I'm running my 12V fan at 13.5V. :ph34r: I have been thinking of adding a resistor to slow it down a bit... :lol:

edit.. I's stupid.


A question for you guys with chest freezer fans,

Where can I get a small fan or parts and how can I build a circuit etc. for it? Im not electronically minded.

Can parts be purchased from DickSmith Electronics?
 
A question for you guys with chest freezer fans,

Where can I get a small fan or parts and how can I build a circuit etc. for it? Im not electronically minded.

Can parts be purchased from DickSmith Electronics?

Any computer repair place should be able to help you out. If you have an old mobile phone charger take that with you and tell the guy what its for.

FROGMAN
 
Any computer repair place should be able to help you out. If you have an old mobile phone charger take that with you and tell the guy what its for.

FROGMAN

Frogman,

Are you saying that its possible to hookup a computer fan to a phone charger and get it working?
 
Frogman,

Are you saying that its possible to hookup a computer fan to a phone charger and get it working?

Exactly that. I got the electronic techs at my work to knock one up for me with a two speed switch for the grand total of three bottles of brew.

FROGMAN.
 
Exactly that. I got the electronic techs at my work to knock one up for me with a two speed switch for the grand total of three bottles of brew.

FROGMAN.

Sweet,

Do you know what wires attaches where on the fan? Do you have a photo you can post?

Cheers.
 
I'm interested in seeing a pic of a fitted fan in place.

Where do they go? Somebody said they had one whirring away in the bottom. Wouldn't moisture be a problem if you actually put it inside?

Cheers
 
Hey Ebandit,

Computer fans are great for freezers, helps keep temp even, and circulates the air past temp probes of temp controllers, and up into the collar as Lucas said.

I sourced my computer fans from a computer fair in ACT, its one of those fairs that travel all over the place so finding one shouldn't be hard,
try here http://www.computermarkets.com/
or here http://www.computerfairs.com.au/index.php?...t&Itemid=38

I picked up my fans for $3 each, cheapest i could find by far. Make sure the fans have the connection like the one in picture below, four pin to suit a power supply.
fan.JPG

As for powering them, find an old obsolete computer (shouldn't be too hard to find), and take the whole power supply out of it (DO NOT TAKE IT APART, very dangerous inside)
The only electrical work you need to do is run a wire between black and green ports in the P1 connector.
Get some wire, and run it between the green wire port and one of the black wire ports (can be any of the black wire ports), as shown by the red line in the picture. We need to do this so the power supply will turn on, (usually the motherboard does this with the power button).
ATX_power_supply_jumped.JPG
Here a pic to show you what it should look like (don't use a paper clip, use an insulated wire)
ATX_power_supply_photo.JPG
Now, plug your fan(s) into the matching connector and your set. Add more if you need to, power supply should be able to handle more than a few.

Try to mount the fans clear of obvious condensation/water, i've had no troubles with mine.

If you feel like messing around, you can get different voltages out of the power supply just by connecting to different ports on the P1 connector.
ATX_power_supply_voltage.JPG
for instance, by default, the 12 volt fan is connected between the yellow wire (+12v) and the black wire (0v), so 12 volts.
You could make it run faster by connecting it between the blue wire (-12v) and the yellow wire (12v), so 24 volts, so on and so forth.

Good luck with it.
 
Hey Ebandit,

Computer fans are great for freezers, helps keep temp even, and circulates the air past temp probes of temp controllers, and up into the collar as Lucas said.

I sourced my computer fans from a computer fair in ACT, its one of those fairs that travel all over the place so finding one shouldn't be hard,
try here http://www.computermarkets.com/
or here http://www.computerfairs.com.au/index.php?...t&Itemid=38

I picked up my fans for $3 each, cheapest i could find by far. Make sure the fans have the connection like the one in picture below, four pin to suit a power supply.
View attachment 15284

As for powering them, find an old obsolete computer (shouldn't be too hard to find), and take the whole power supply out of it (DO NOT TAKE IT APART, very dangerous inside)
The only electrical work you need to do is run a wire between black and green ports in the P1 connector.
Get some wire, and run it between the green wire port and one of the black wire ports (can be any of the black wire ports), as shown by the red line in the picture. We need to do this so the power supply will turn on, (usually the motherboard does this with the power button).
View attachment 15285
Here a pic to show you what it should look like (don't use a paper clip, use an insulated wire)
View attachment 15286
Now, plug your fan(s) into the matching connector and your set. Add more if you need to, power supply should be able to handle more than a few.

Try to mount the fans clear of obvious condensation/water, i've had no troubles with mine.

If you feel like messing around, you can get different voltages out of the power supply just by connecting to different ports on the P1 connector.
View attachment 15287
for instance, by default, the 12 volt fan is connected between the yellow wire (+12v) and the black wire (0v), so 12 volts.
You could make it run faster by connecting it between the blue wire (-12v) and the yellow wire (12v), so 24 volts, so on and so forth.

Good luck with it.


Good Post Sanders, But a lot of overkill for most , and anybody not confident with electricery ..

A lot of computer fans have 3 wires Black , red and yellow. most phone chargers only have 2 red/black or white/black, chop the plug off the fan and the charger, join the black wires together . Then the red to red or white to red , insulate your conection and switch on , in Most cases the third wire is for a temp monitor/rpm monitor...

My fan once fell off the shelf and landed in half an inch of water next time I opened the door i got a shower of fine mist sprayed out at me , it must of been sitting in the water for 3 days or more and was still going and whats more its still going about 12 month on. Not recomending that you put one in water but they are preety tough..

With a fan in my serving fridge it pulls a hot keg down in under 24 hours , without the fan running it can take 3 days to get down to drinking temps..


Cheers
 
Brewers,

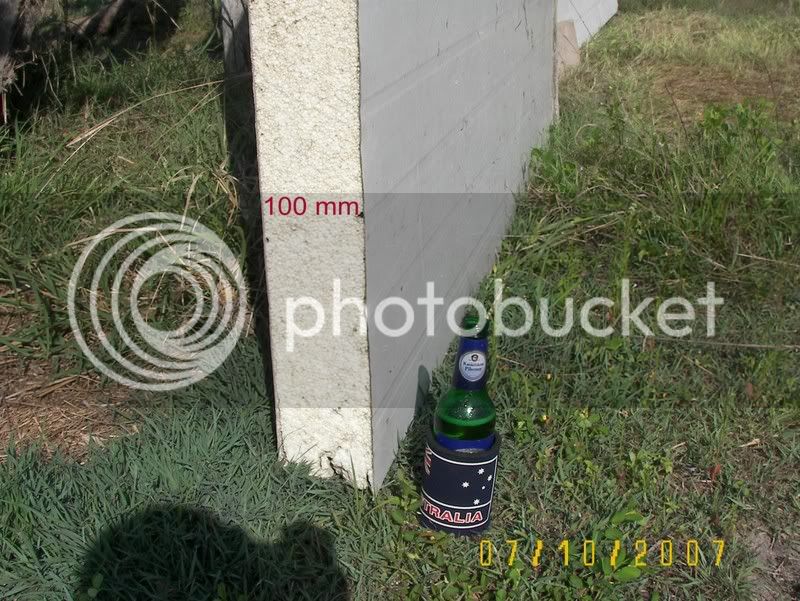
still debating wether to go with a collar or font, i've got a few sheets of this and want to know if you guys have any experience using it, if i cut the corners @ 45* will normal silastic or no nails be sufficient to hold it together ?

i suppose i could cut extra length on the front and back sections of the collar, scrape away the polystyrene and fold the tabs around and pop rivet them for extra strength, thoughts ? ? ?

also any ideas how to finish off the top of the collar where the polystyrene is showing ?

100mm.jpg


Cheers
 
Hi Yard,

I think that might be more trouble than it's worth. A timber frame is easy to construct, cheap, strong & looks good.
I think fixing those panels to the freezer would be a pita.

cheers ross
 
Yeah a trip to bunnings, with them cuttnig the timber to size) and a bit of glue and a few screws is all thats needed. Took longer to give it a few coats of paint than it did to build it.
 
Yeah a trip to bunnings, with them cuttnig the timber to size) and a bit of glue and a few screws is all thats needed. Took longer to give it a few coats of paint than it did to build it.
Yep, what he said.

Watch them though, they only guarantee their cuts accurate to within a certain margin of error, so if you can trim it at home (I used a compound mitre saw), give them a bit extra, so you don't get a length that's too short.
 
Or just have a chat with the guy and ask him to be close :icon_chickcheers:

Worked for me.
 
Brewers,

still debating wether to go with a collar or font, i've got a few sheets of this and want to know if you guys have any experience using it, if i cut the corners @ 45* will normal silastic or no nails be sufficient to hold it together ?

i suppose i could cut extra length on the front and back sections of the collar, scrape away the polystyrene and fold the tabs around and pop rivet them for extra strength, thoughts ? ? ?

also any ideas how to finish off the top of the collar where the polystyrene is showing ?

100mm.jpg


Cheers
yardy,as far as glueing the panels goes you would best use sikaflex, it is used in marine applications and sticks like you know what to a picnic blanket.
silastic just does not have the guts in this case,and no nails will melt the polystyrene inside the panels
with the panels in your pics it would be best to use internal and external ally angles on all corners to hold/finish the job.
and the cost add,s up very quickly,as for capping you can buy ally caps to suit the panel you have,or make some from timber to suit. oh and sikaflex is about 20/30.00 dollars a tube.so sorry mate seems too expensive, but you could make a good fermenting cupboard with what you have.?...cheers...spog..
 
yeah bugger it, i'll go the timber.

thanks for the replies

Yard
 
Hey Ebandit,

Computer fans are great for freezers, helps keep temp even, and circulates the air past temp probes of temp controllers, and up into the collar as Lucas said.

I sourced my computer fans from a computer fair in ACT, its one of those fairs that travel all over the place so finding one shouldn't be hard,
try here http://www.computermarkets.com/
or here http://www.computerfairs.com.au/index.php?...t&Itemid=38

I picked up my fans for $3 each, cheapest i could find by far. Make sure the fans have the connection like the one in picture below, four pin to suit a power supply.
View attachment 15284

As for powering them, find an old obsolete computer (shouldn't be too hard to find), and take the whole power supply out of it (DO NOT TAKE IT APART, very dangerous inside)
The only electrical work you need to do is run a wire between black and green ports in the P1 connector.
Get some wire, and run it between the green wire port and one of the black wire ports (can be any of the black wire ports), as shown by the red line in the picture. We need to do this so the power supply will turn on, (usually the motherboard does this with the power button).
View attachment 15285
Here a pic to show you what it should look like (don't use a paper clip, use an insulated wire)
View attachment 15286
Now, plug your fan(s) into the matching connector and your set. Add more if you need to, power supply should be able to handle more than a few.

Try to mount the fans clear of obvious condensation/water, i've had no troubles with mine.

If you feel like messing around, you can get different voltages out of the power supply just by connecting to different ports on the P1 connector.
View attachment 15287
for instance, by default, the 12 volt fan is connected between the yellow wire (+12v) and the black wire (0v), so 12 volts.
You could make it run faster by connecting it between the blue wire (-12v) and the yellow wire (12v), so 24 volts, so on and so forth.

Good luck with it.


Is this the sought of power supply needed???

Linky


Cheers, Pok
 
Any power supply around 12V DC will work. I have a 13.5V one scavanged from an old dead printer. just make sure it's DC, check the polarity (which wires go where ie. black to black, red to red etc) when you wire it up to make sure it spins the right direction and make sure it supplies enough juice to spin the fan (they don't need much).
 

Latest posts

Back
Top