Basic Ag With Pics For Noobs

Australia & New Zealand Homebrewing Forum

Help Support Australia & New Zealand Homebrewing Forum:

This site may earn a commission from merchant affiliate links, including eBay, Amazon, and others.
+1 Cloudy

By the photo's it's sitting right on top of the burners without any free space, yeah?

Chappo
yes and that will cause the problem also but it should not have all of the orange flames when it is burning by itself as demonstrated above.
 
ad a play with the burner today...couln't get it to burn any better....but heres some pics of it running just on its own...what do you reckon?


gallery_10325_462_19808.jpg


med_gallery_10325_462_16328.jpg
hi Mr Tyreman, i would be looking at this set up because there is a problem, you should have no orange flame at all. i have the same burner.
cheers.
 
Can some one please get some photos up for me...i'd love to see how other peoples mongo's look on full noise...thanx
 
brutus11.JPG.jpg


It's a smaller burner than yours but you can see what it's supposed to be doing.

I didn't realise how close you has it to the bottom of the keg, thats one issue, but it's still not running right.
 
Well today was brew #8 and i have my method pretty well sorted.

So i thought i'd post up some how too for anyone who is a little lost, like i was not so long ago.

This is not a definitive guide to brewing and i dont believe i have any idea on how to brew great beer, but this method does make beer and its a good start.

Here goes...


Step 1) Fill your vessel with approximately 17L of water, fire up the burner and get it up to approx 78 degrees

gallery_10325_462_17038.jpg


Step 2)

Transfer approx 13L of this water into your mash tun (Esky)
Add in your grain (Approx 5kg)
Stir and make sure the grain isn't clumped up

gallery_10325_462_17785.jpg


Step 3)

Check the tempreture of the mash, do this in several areas of the mash to get an accurate reading.
this should be approx 66 degrees, nice round figure for the beginner. A few degrees either way is fine.

gallery_10325_462_12214.jpg


Step 4) Close the lid and start your timer for 1hr, open the lid every 15mins or so and give it a stir and check the tempreture

gallery_10325_462_28798.jpg


Step 5) Depending on your burner with plenty of time to go before the 1hr is up, fill your vessel back up with water (approx 35L) and get this up to a temp of approx 90 Degrees, ready for when your 1 hr is up.

gallery_10325_462_18263.jpg


Step 6) When your 1 hr is up, open up your mash tun and add approximately 16L of water @ 90 degrees to the mash ( on top of the existing grain and water you added allready)

gallery_10325_462_7517.jpg


Step 6) Give this a good stir and make sure if your using a stainless braid, that it is sitting on the bottom, Close the lid and let this sit for 10mins

Step 7) After the 10 mins, Grab a jug and open the tap and fill the jug up, and pour this gently back into the mash tun, repeat this process a good few times to remove any bits of grain etc, that have made it through the braid.

Step 8) When your satisfied that the runnings are quite clear, open the tap and let the runnings flow into the kettle.

Step 9) When the flow stops, close the tap on the mash tun, and with the remaining water that you heated to 90 degrees, add 16L to the mash tun over the top of the grain bed, give this a good stir and check braid... close the lid and let rest for 10mins.

Step 10) After the 10mins, circulate this using the jug like last time, and drain into kettle.

gallery_10325_462_21689.jpg


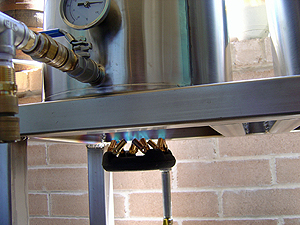
Step 11) With mash tun now only containing the grain, and the kettle now ready to boil... Move your burner over to the kettle and fire it up, full blast :)

gallery_10325_462_16614.jpg


Step 12) Now that your firing up the kettle with some pretty intense heat, you will need to keep on eye on this (depending on your burner) because it tends to get to a boil very quickly and boil overs aren't much fun at all ). Get the wort to a boil and start your timer for 1hr.

gallery_10325_462_12489.jpg


Step 13) Measure your hop additions and add accordingly

gallery_10325_462_11859.jpg
Mr T; The grain, is it cracked it dos'nt look like it is in the pics ???
 
Having a second look and reading the posts I have a question for MrT. Do you have a control of some sort on your burner or regulator so that you can turn that puppy down? Most of the Rambo's, NASA's that I've seen have a valve either at the reg or at the burner to control the flame.

Cheers,

Screwy
 
Do you have a control of some sort on your burner or regulator so that you can turn that puppy down?

gallery_10325_462_2745.jpg


i was supplied with this pipe and ball valve, combined with a low pressure regulator, from my 2 ring.
 
gallery_10325_462_2745.jpg


i was supplied with this pipe and ball valve, combined with a low pressure regulator, from my 2 ring.


Looks like a gas cock, not exactly a variable control. Would have thought it would have come with something like this to control gas flow to the burner.

ramboburner2.jpg

highpressurereg02.jpg

Screwy
 
I got one of the Mongolian burners on town gas; whilst I agree they are hard to tame with just a ball valve (I got your setup) on low, mine is powering away nicely without the sud affect. What distance do you have between the burner and the bottom of your keggle? I had to adust my distance a few times before I got it right.

burner_s.jpg keggle_bottom_s.jpg
See burner in action: http://picasaweb.google.com/pemue.syd/Frid...158434661346898 and http://picasaweb.google.com/pemue.syd/Frid...161540749677474

c1b
I should add bottom of my keggle after 3 brews!
 
Thats approx the same height i have mine set too...

Im thinking now its either a pressure issue or its just a NG burner...


Heres a pic of the connection from the reg to the gas tap...the barb thats installed takes the ID of 5/16" hose down to 1/8" then back up to 5/16"

Could this be restricting the flow? i wouldn't have thought so but i'd like to ear what you guys think.


gallery_10325_462_37619.jpg
 
Big difference there... is that running LPG?

And a pilot light...very nice :)
 
Big difference there... is that running LPG?

And a pilot light...very nice :)
yep, LPG with a 3.5kg/h reg. the only difference i can see with yours is the pilot fitting is open to air but i dont know if that would cause the orange flame. normally the orange flame comes when you are lacking oxygen.
Try blocking it off.
 
I have never seen one of these burners in the flesh, so to speak, But to me it looks like it needs a mix of air coming in with the gas somewhere. As it is, it looks like it is only getting a small amount of air mixed in with the gas. Most gas burners draw air in with just after the small gas jet, check out the gas burners on a gas BBQ or a ring burner to see what I mean.
It kinda looks like an oxy acetylene torch with only the acetylene valve open,therefore getting no oxygen in the mix.

Gavo.
 
2.0 kg/hr reg, its from my 2 ring burner...

i believe the pilot light circuit is seperate to the burner jets.


a mate suggested a air hole somewhere to introduce some oxygen ???


heres a pic of the jet....you can see where it draws in the oxygen....it also gives an idea ast o the size of the jets...wondering if visually they look larger than other peoples that run LPG?


gallery_10325_462_24438.jpg
 
Back
Top