My Single Vessel Biab Electric Build

Australia & New Zealand Homebrewing Forum

Help Support Australia & New Zealand Homebrewing Forum:

This site may earn a commission from merchant affiliate links, including eBay, Amazon, and others.

Impy

Well-Known Member
Joined
30/12/09
Messages
130
Reaction score
12
So... putting together an electric brew kettle is a lesson in patience.

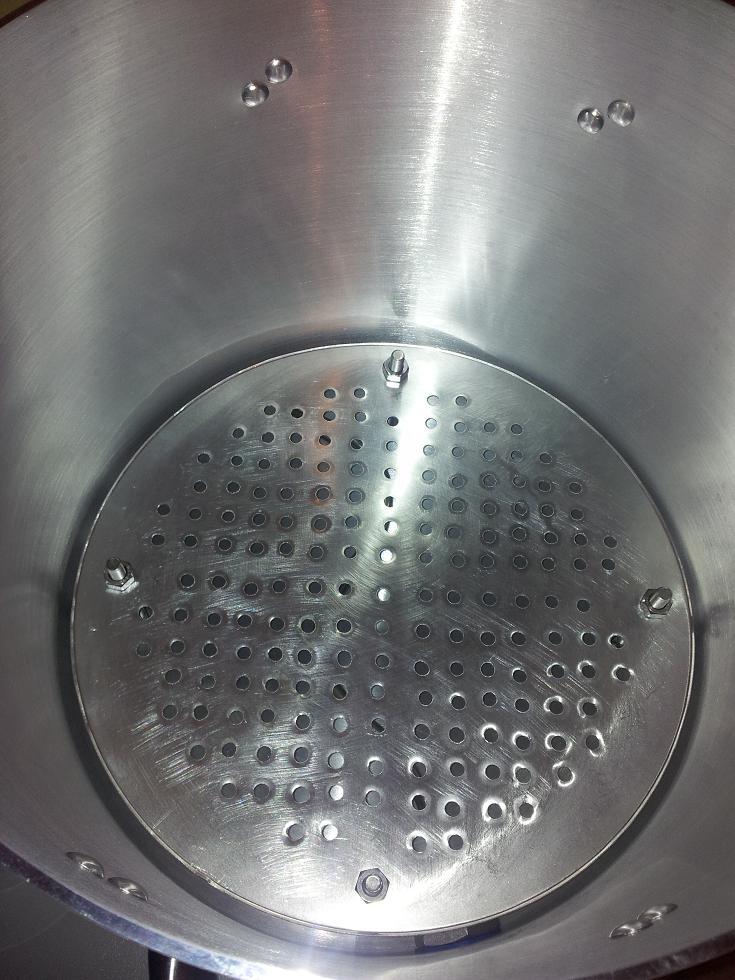
I've got 90% of the parts required to put together the AG set up I've decided to go with. I don't have the space or motivation for a 2 or 3 vessel system so single vessel BIAB seemed like the smart choice.

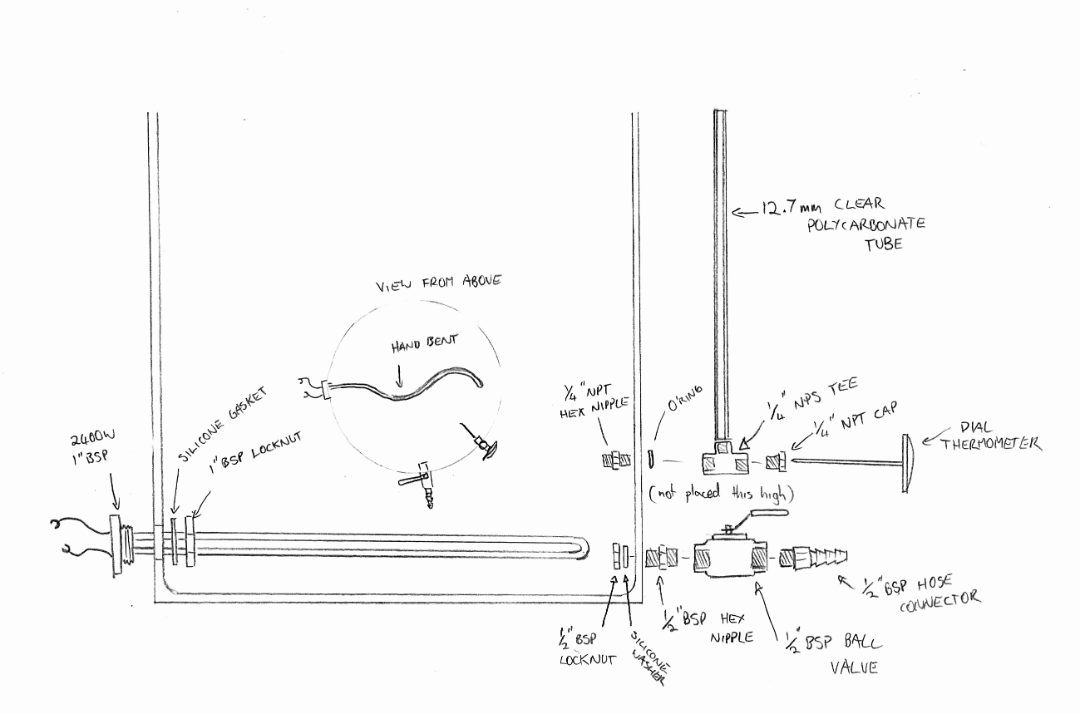
Here is a rough sketch of how the system will go together.

QRsO7.png


I sourced the pot from Kitchenware Direct It's not the ideal shape since it's wider than it is tall, but it's nothing a bit of insulation can't fix.

IMPORTANT: If you buy from here, get a silicone baking mat as well. You'll need it for making gaskets and pushing the total cost over $100 gets you free shipping!

The most time consuming part was looking for stainless steel parts and the required washers. All up I spent the better part of a day driving around buying the parts I needed and still didn't manage to get everything.

I sourced my stainless plumbing parts from T&S Valves in Ingleburn NSW Seriously, if you're in Sydney don't even bother looking anywhere else, I did, and it was just a waste of time. These guys have all the things you need and huge amounts of stock (no frustrating "out of stock" delays)

xCwsu.png


Where I SHOULD have gotten the stainless washers from is a place just down the road from T&S called Fred Tapping but they have a $25 minimum Eftpos and the washers I needed were only $5 (the $5 was spend on a bacon and egg McMuffin on the drive there... damn it). So when you make the trip, HAVE CASH and you can get most of your stuff in one go.

Buying from T&S meant the parts were cheap compared to getting it online at Craft Brewer ($27 for all required stainless plumbing parts compared to ~$50 + postage @ Craft Brewer)

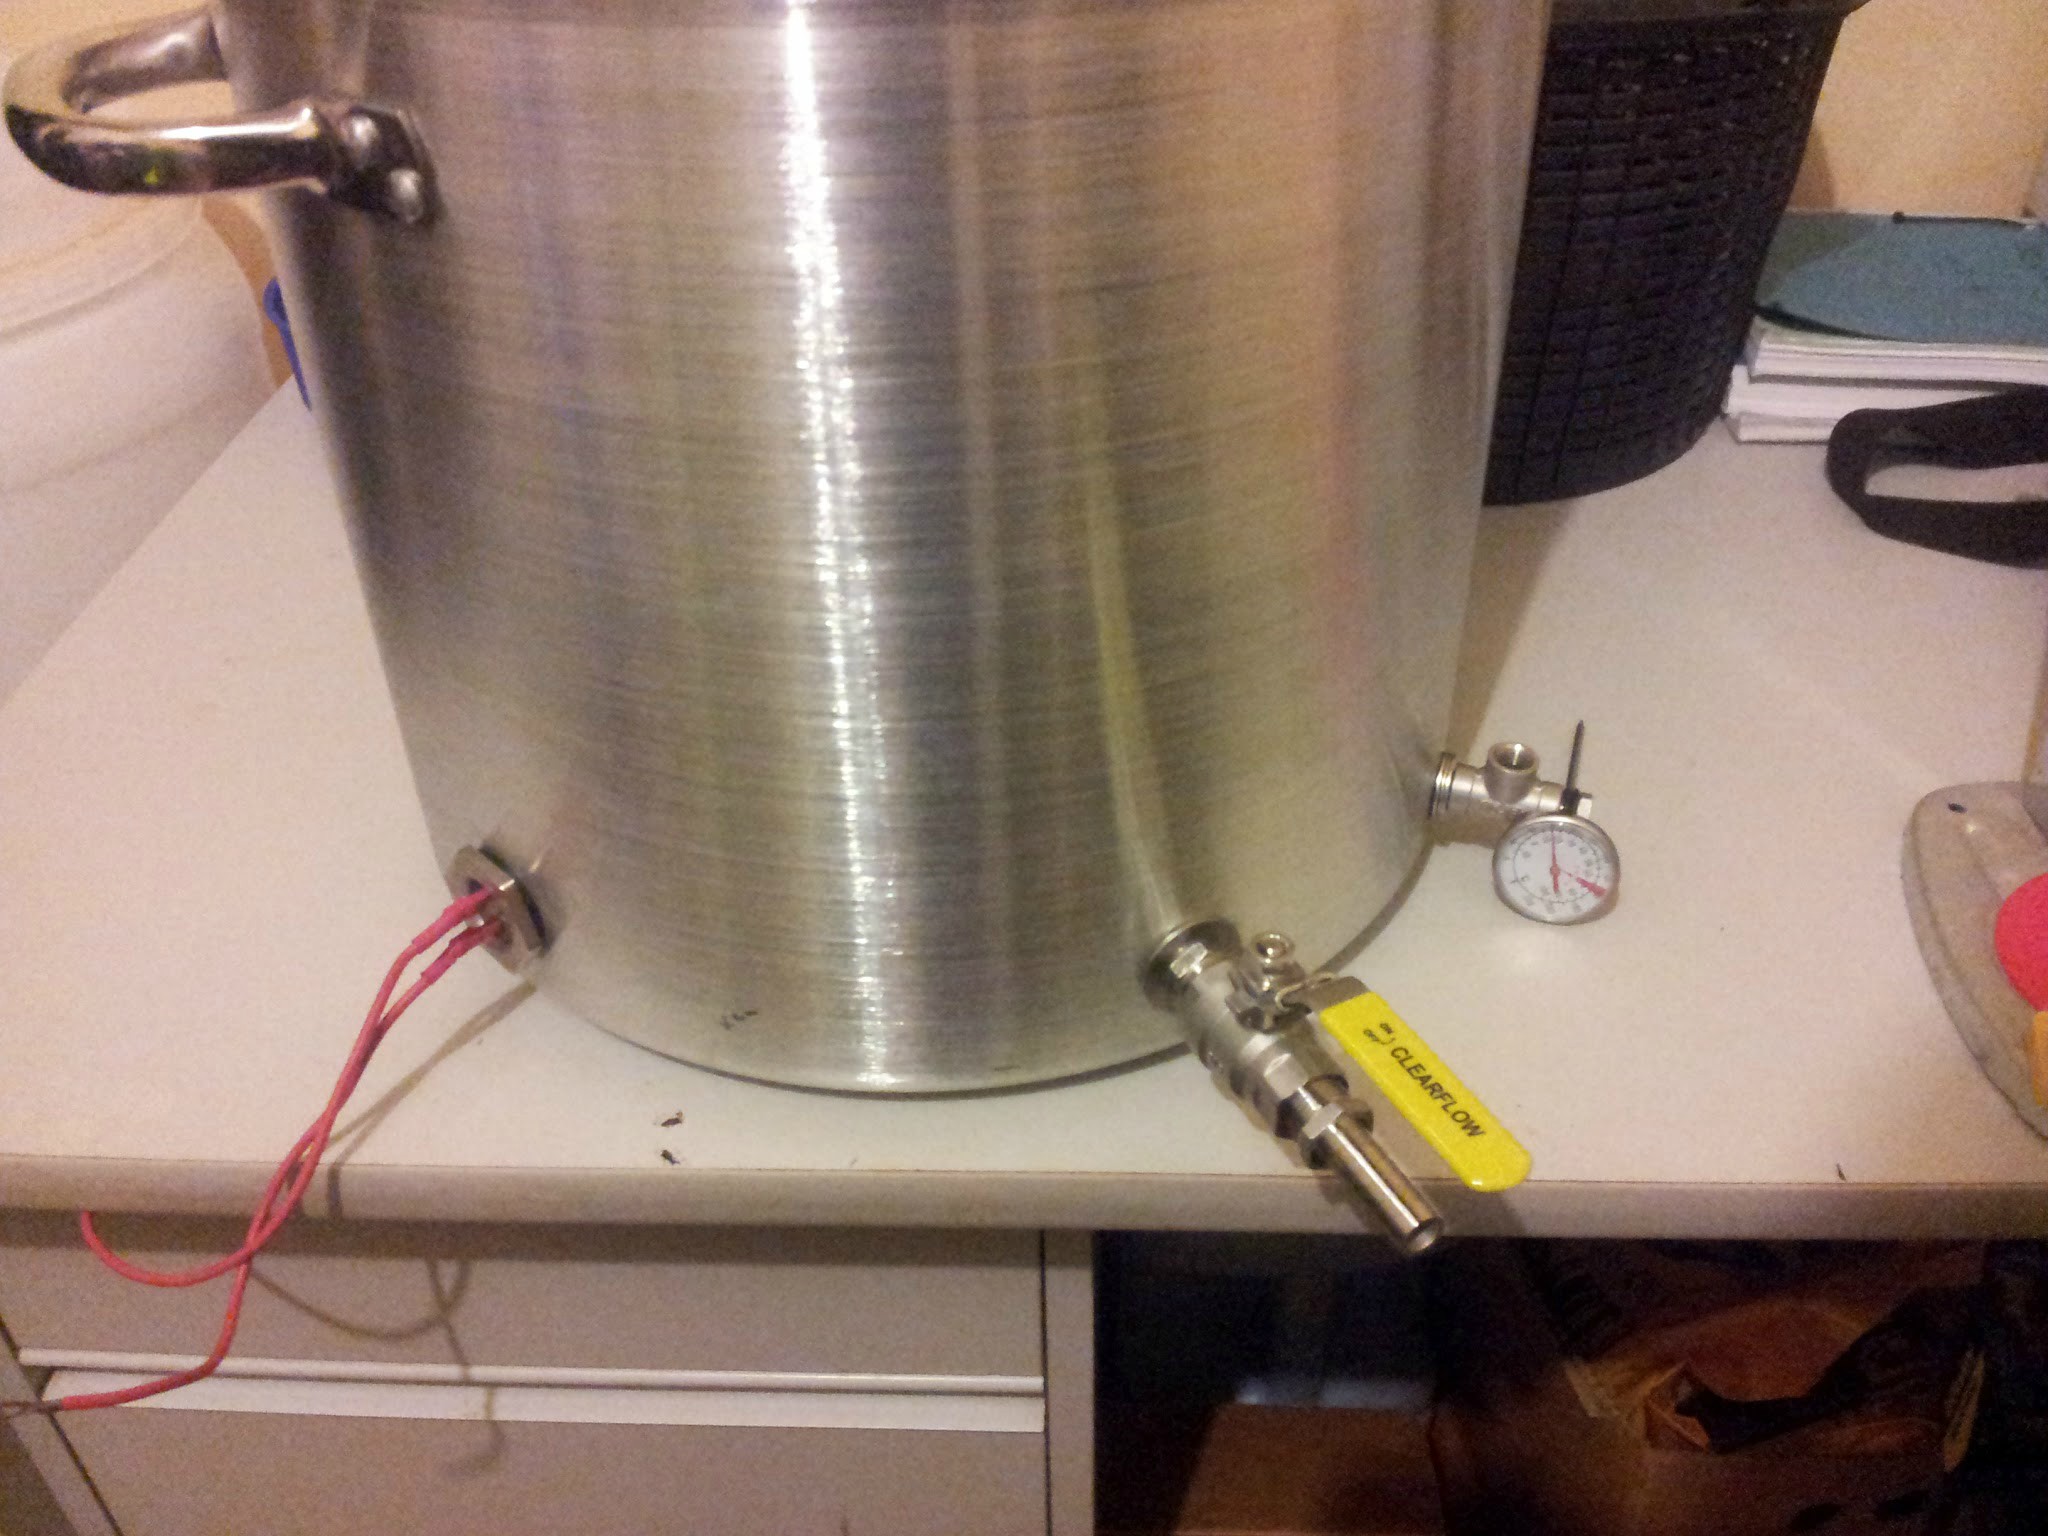
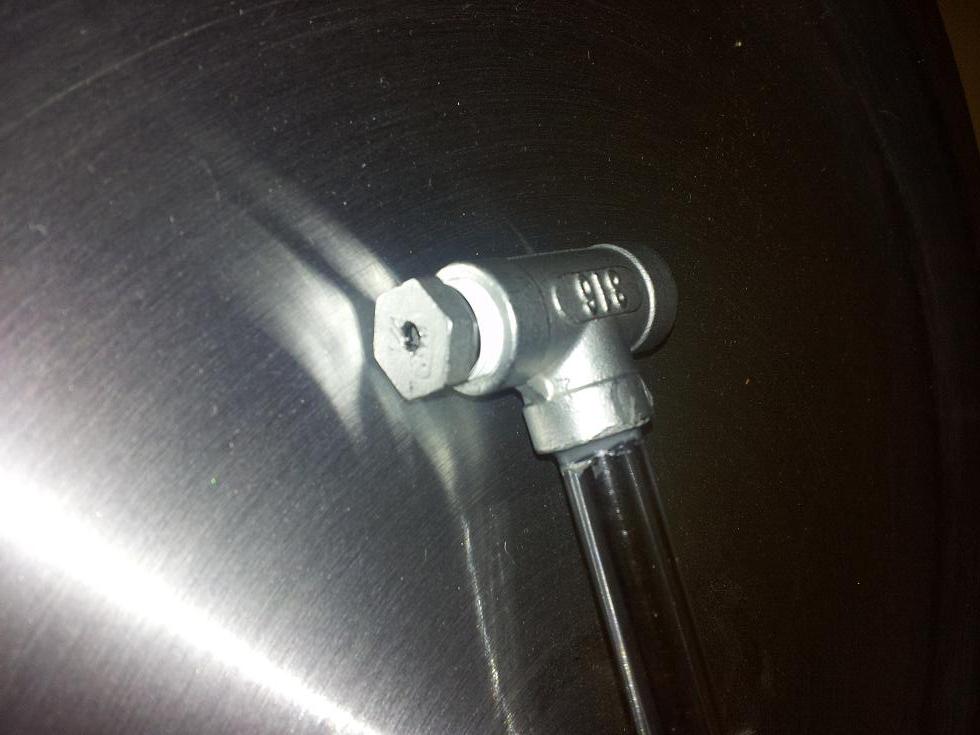
Since the pot is aluminium, drilling the holes wasn't too hard and didn't really require any out of the ordinary bits (neighbour had a tradesmans drill + a large collection of bits). All holes were drilled a little smaller than required, and slowly filed larger so the fits were nice and tight.

aKCwR.png


I took a bit of a gamble with the element. For a low low $36 inc postage I picked up this 2400W 1" BSP element. It didn't look hardened like other ones i've seen so even though it's too long to fit in the pot, I bought it to try and bend it to fit. And I think it's worked..

dRgCp.png


Obviously I won't know until it's wired, but it was very malleable and bent over my knee with ease. I took it slow, and made sure I didn't apply too much pressure to any one place, so fingers crossed I've just discovered a stupendously cheap Aussie supplier for electric brewing elements.

Rubber washers... oh how I hate thee! Finding silicone washers and orings is a F%#@ng nightmare!! I caved and bought some from Craft Brewer which meant they were probably a little expensive, but at least they had them.

Next steps are to recover the table from my wifes competing hobby and get it assembled.

Shopping list so far
Chef Inox 50L Aluminium stock pot ($100)
2400Watt 1" BSP Element ($36.00)
Silicone bakeware for making gaskets ($3.95)
1/2" BSP SS 2 part ball valve ($9.60)
1/2" BSP SS hose tail ($3.44)
1/2" BSP SS hex nipple ($2.32)
1/2" BSP SS locknut ($2.00)
1" BSP SS locknut ($2.48)
1/4" NPT SS TEE ($2.60)
1/4" NPT SS cap ($1.58)
1/4" NPT SS hex nipple ($1.20)
12.7mm outer diameter polycarbonate tube ($20)
3x SS washers to fit 1/4" NPT ($2)
1x SS washer to fit 1/2" BSP ($1)
1x SS eyebolt & nut ($5)
Silicone washers and orings ($9.30)
Teflon tape (40c)

Cost so far: $202.87

I'll update with how the assembly and leaktesting goes as well as the final components I need (insulation, gangbox, wiring etc) but so far I'm enjoying my foot in the door to all grain!
 
Looking good mate.
The only thing I would say is make sure you cover that nice table that your wife uses for her hobby, before you start working on your gear or your going to scratch the shit out of it and she wont be happy...just sayin.. ;)
 
UPDATE TIME!

As I said, it's certainly a lesson in patience putting this thing together, I've been designing, researching, gathering parts and assembling for over a month! Here are the latest developments to the set up.

After some filing to enlarge the element hole I was able to get it installed.

9N6ex.png


I did a quick leak test on the element and valve which saw a few drips come out of the valve seal (sealed with a silicone washer from craftbrewer on the inside of the pot) so I had to install an o-ring on the outside as well which seemed to fix the issue. The tap has a bit of movement in it when I turn it on or off due to the copious amounts of rubber sealing it.. is this normal?

Putting together the sighglass / thermometer setup was problematic. The issue is that 1/2" Polycarbonate tube is far too small to fit snugly in a 1/2" NPT fitting, and sliiightly too big to fit into a 1/4" NPT. So I bought the 1/4" and decided to file out the thread a little to fit the tube in. Sweet jesus that was hard to do by hand. It would probably be a 10 minute job for a dremel with a grinder attachment. As you can see I used JB Weld to glue it in there (gotta love that stuff!) I got my neighbour to drill a hole in the hex cap which ended out being perfectly snug for the dial thermometer I bought. I just used a little teflon tape and more JB Weld to glue it in.

whi6g.png


eduyE.png


Now, to prevent the unlikely event of melting the bag when I needed to turn the element on, I decided to get a pizza tray with holes in it to put in the bottom.. do you think I could find a tray big enough that had holes? Oh no... <_< So I needed up getting an aluminium tray that ended up being considerably larger than it's specifications and nibbling it to the right size. I then spent an afternoon drilling and cleaning it up to the horrifying frankenstin you can see in the bottom of my pot now. Gah, why do I have to do things the hard way...

c6HHg.png


So NOW all I need is some insulation to get the most out of my piddly 2400W element and a gang box to enclose the wiring on the outside of the pot. Fingers crossed payday comes early and I manage to get everything this weekend!
 
Quick question. Why is the tee etc NPT? Why couldn't BSP be used? :huh:
 
Quick question. Why is the tee etc NPT? Why couldn't BSP be used? :huh:

I tried the BSP sizes and they were all either way too big or way too small. The 1/4 NPT seemed to be the closest fit.
 
did a quick leak test on the element and valve which saw a few drips come out of the valve seal (sealed with a silicone washer from craftbrewer on the inside of the pot) so I had to install an o-ring on the outside as well which seemed to fix the issue. The tap has a bit of movement in it when I turn it on or off due to the copious amounts of rubber sealing it.. is this normal?

I first brew pot was aluminum and I had movement with the tap turning on off. just take it easy when you are using it and you'll be ok.

Question, why does the thermometre spike stick out the end of the Tee piece? is this for any reason other then it is too long?
EDIT: scratch that question, I was confused between two of the pics. the thermometer slides into the pot as per the second pic...

Cheers,
Rodders
 
The issue is that 1/2" Polycarbonate tube is far too small to fit snugly in a 1/2" NPT fitting, and sliiightly too big to fit into a 1/4" NPT.
Didn't try putting it into a 1/2" compression fitting and then put that fitting into the T? :D
Worked fine for me with no leaks.

Edit: you could have got a thermometer with an inbuilt NPT fitting on it too. Would have been able to screw it in.
Edit 2: I am not very helpful since the horse has already bolted so, er yeah it's looking good, keep up the good work.

Yeah I thought of the compression fitting, but wanted a neater connection.

And i've seen the thermometers with built in NPT fittings, I just didn't want to spend $50 on the thermometer (mine cost $9)
 
Ok first glitch hit! Advice appreciated!

So I had the false bottom sitting in there for a few days and there were some droplets of water leftover from when I did the leak test. The bolts holding it up are stainless steel and were obviously in contact with the aluminium pot.

Is the below going to be a problem while I'm brewing? There was a pretty obvious tangy rust smell, a characteristic I certainly don't want in my beer. Or will this issue go away once I do a wet run with water and build up an oxide layer on the pot?

wIzP5.jpg
 
I need my bent also and have sent them (well not them found another place) an email about it but noticed yours didn't look like the website one.. Any reason for the wiggle? more area coverd in the wort?

I bent it like that. This is the element http://www.stoveconnection.com.au/shop/ind...s/kz24hq00.html It was really easy to bend. I want thinking i'd need to make a jig, but I just carefully bent it by hand.

If it works and works well.. I'll have found the holy grail of cheap elements for homebrewing!! :beerbang:
 
I need my bent also and have sent them (well not them found another place) an email about it but noticed yours didn't look like the website one.. Any reason for the wiggle? more area coverd in the wort?

The only reason is to reduce it's length so it fits in the pot. Straight it's 44cm long with the bend I was able to pull it inside 37cm (about a 39cm diameter in the pot)

Also, regarding surface area, bending something of a certain length doesn't add any more surface area.
 
hmm surface area bad choice of words I mean the radial heat "bubble" ? no science behind it just my though..

The only reason is to reduce it's length so it fits in the pot. Straight it's 44cm long with the bend I was able to pull it inside 37cm (about a 39cm diameter in the pot)

Also, regarding surface area, bending something of a certain length doesn't add any more surface area.
 
Ok first glitch hit! Advice appreciated!

So I had the false bottom sitting in there for a few days and there were some droplets of water leftover from when I did the leak test. The bolts holding it up are stainless steel and were obviously in contact with the aluminium pot.

Is the below going to be a problem while I'm brewing? There was a pretty obvious tangy rust smell, a characteristic I certainly don't want in my beer. Or will this issue go away once I do a wet run with water and build up an oxide layer on the pot?
You may be getting galvanic corrosion due to different metals being
in contact in an electrically conductive environment (e.g. wort) - see:
... Galvanic corrosion ... WIKI

Since the pot and tray you used are both aluminium can you get
some aluminium nuts and bolts to act as the spacers? Or maybe
aluminium rivets and some alu- tubing. Be interesting to see if the
contact areas between the steel bolts and tray also have signs of
corrosion.

I bent it like that. This is the element http://www.stoveconnection.com.au/shop/ind...s/kz24hq00.html It was really easy to bend. I want thinking i'd need to make a jig, but I just carefully bent it by hand.
...
Did you check with the supplier that it was ok to bend the element?
 
You may be getting galvanic corrosion due to different metals being
in contact in an electrically conductive environment (e.g. wort) - see:
... Galvanic corrosion ... WIKI

Since the pot and tray you used are both aluminium can you get
some aluminium nuts and bolts to act as the spacers? Or maybe
aluminium rivets and some alu- tubing. Be interesting to see if the
contact areas between the steel bolts and tray also have signs of
corrosion.


Did you check with the supplier that it was ok to bend the element?

If your element or tap or thermometer (or anything) is stainless you risk galvanic corrosion. One solution (other than buying a stainless pot and starting again) is making sure you have no metal-on-metal contact between the steel and the aluminium. It is not going ot be easy, but if you can manage to insulate the contact points it should solve your problem.

Edit: Spelling

But won't the galvanic reaction still happen when there is liquid in the pot making the connection?
 
little rubber/silicon feet on the bolts will stop the galvanic corrosion - but easier is to either just take the thing out of the pot when you aren't using it, or make sure its completely dry.

galvanic corrosion needs moisture and metal on metal contact to happen. I have an aluminium kettle with brass, copper, chrome plated and stainless bits in it, a little care and the corrosion has been minimal to zero over several years.

Sure, it'll happen while you are actually brewing... but its not that fast, the pots only in use for a few hours. Dont sweat it.

Thanks for the info! Yeah the bolts were sitting in contact with the pot for a few days and moisture must have pooled around them via capillary action.

If I have some cash lying around I might get some food grade silicone and make some feet for the bolts (I've had experience with silicone mold making)
 
Back
Top