1st All-Grain brew day - complete!

Australia & New Zealand Homebrewing Forum

Help Support Australia & New Zealand Homebrewing Forum:

This site may earn a commission from merchant affiliate links, including eBay, Amazon, and others.
Mr B said:
Nice vid, very interesting and entertaining :)

Couple of q's - What size were your pots? Is that an available controller design setup?

Cheers
The HLT and BK are 71 litres, the MT is 83L. I had the HLT setup before I bought that mash tun otherwise I would have used them the other way around. Would have been better to have the larger volume for the HLT ... oh well, knowing me it wont be long before I start tinkering with the setup again.

The control panel was built by me following the design available from theelectricbrewery.com. They have a kit you can buy so you dont need to worry about finding all the parts yourself, but when I enquired they were not supplying them to Australia due to high demand. From memory the kit cost around US$1400, according to my parts/prices list mine cost ~$500 ... but I did go cheaper on some of the components like the Sestos PIDs instead of Auberin etc.
 
Thanks for prompt reply

Interesting stuff, and from the perspective of a person new to all grain, great rundown on everything

Hope (and expect) the beer tastes great, and good luck with the pesky leaks

Cheers
 
Mr B said:
Thanks for prompt reply

Interesting stuff, and from the perspective of a person new to all grain, great rundown on everything

Hope (and expect) the beer tastes great, and good luck with the pesky leaks

Cheers
Hahaha, I'm hoping to brew again this weekend so we'll see how we go. I got the tools out and was tightening up things during the brew, I probably should strip everything out and clean all the threads (given there is now sticky wort everywhere) properly and put everything back in though ... but that will be fun with a beer in hand!
 
Great video Crouch, very entertaining. I love watching other people make the same mistakes I do. You handle your mistakes a whole lot better than me though.
 
Crouch said:
So with my electric brewery finished and ready to go I set about today on my very first all-grain brew. The day did not go without problems but in the end I have 42L of APA in the fermentation fridge that looks, smells and tastes amazing!

I tested the system several times, re-did valves and bulkheads and water tested it twice ... but somehow on brew day I had leaks, very small ones but leaks! After so much testing and prep work I was a little annoyed.

I made some mistakes with temperatures and valves, forgetting to close them before removing hoses etc .. but luckily my brew-room has an in-ground drain so spills and cleaning weren't really a big issue.

Most of my target vs actual numbers were pretty close:

Boil Volume target was 57.8L, I got 54 into the kettle before the MT & HLT were empty - I swear I had enough water for my sparge but will double check my calcuations for next time. I added a little extra water to the kettle to make up the volume.

Estimated pre-boil gravity target was 1.044. I got 1.047 so pretty close and was happy with that.

I didn't measure the post boil volume but the target was 46.8L. I know I was over that as I had setup in Beersmith my boil-off rate at 11L but with the PID's I was able to 'tone down' how vigorously the boil happened so didnt lose that much to evaporation. I'll need to do another water test to calculate the boil-off rate with the adjusted PID settings.

Est Post Boil gravity target was 1.056 and I hit 1.058 so once again was well happy!

My target was 42L into the fermenter and I made that, with some extra in the kettle (again due to reduced boil off) but left that as I forgot to add my hop filter so didn't want to suck up to much trub/hop etc.

All in all a great day! I've kept some of the spent grain to make some bread and some treats for my dog. I'm looking forward to brewing again on the weekend!

Here's my fermenter in its little fridge hooked up to a cheap one-relay STC knock-off (I'll grab an enclosure and some cable glands from Jaycar tomorrow and do it up properly!). At the moment its hooked up to a hair dryer as the heating source, but I'll also grab a heating mat tomorrow to replace that. I don't expect to need to cool the fridge as its quite cold down the back of the warehouse so is only set to heat ... 19C.

Cheers :chug:


attachicon.gif
clearwort.jpg
attachicon.gif
1stAGfermenation.jpg
WOW! Since this is Your first all-grain i must say that you're not low on equipment ;-)

Best regards Folke

(Denmark)
 
Great video! Also curious about your pots - where did you get them and how much were they?
 
Wow - I thought I was clinical with my organisation...

Great video mate and glad you had success getting it into the fermenter. My brewery is much more clandestine than that - As others have said, you soon get to know your system and tweaks will be made.

Seems like your biggest hurdle was getting that sparge water to the temp you want it at. I would suggest ramping your sparge water temp at least 2 degrees.. its pretty safe below 80 to sparge, others say even higher, but I'm usually sparging at around 75-78ish.

It will be a heck of a system when you are familiar with it - Looks like you had a stack of fun - the most fun one can have alone lol!

Don't beat yourself up about a few leaks here and there - as much as you can try there will always be areas that will not be an exact science. I use an urn for boiling water and it has a slight leak on the tap.. usually I can make up the difference by adding another litre of water to the recipe.. once again, something you get used to the more you brew!

One other tip, I didn't see exactly where you pitched the brew bright - I generally find its good to dilute it with a bit of water **right** before throwing it in as it gunks up quickly if left - I usually do that at 10mins before flame out and mash up any clumps in the wort - it is still effective thrown in dry, just find it tends to clump a bit more...

Are you going to bottle at that 50L or keg? That will be a biiig bottling party lol.
 
So much enthusiasm. Now I'll be reading all your posts in your voice. Think I've said it before, but good gear and you're a very lucky bloke with that dedicated area. Uneventful first brew all things considered, it'll be seamless before you know it.
Suggestion - why don't you heat up your strike water in the boiler? Get the HLT 2°C or so above mash temp for your HERMS, and then underlet your liquor to the mash from the boiler. That way you're ready to go off the bat.
I'm betting you'll get a drier beer than expected, but I think it'll be so many light years ahead of your previous brews it wouldn't even be notable.
 
Interesting content. Thanks for posting. Very enthusiastic!
 
storeboughtcheeseburgers said:
One other tip, I didn't see exactly where you pitched the brew bright - I generally find its good to dilute it with a bit of water **right** before throwing it in as it gunks up quickly if left - I usually do that at 10mins before flame out and mash up any clumps in the wort - it is still effective thrown in dry, just find it tends to clump a bit more...

Are you going to bottle at that 50L or keg? That will be a biiig bottling party lol.
I pitched the brewbrite with the 10min hop addition ... I didn't mix it with water though, other threads I was reading about did suggest doing that too so will give that a shot on the next brewday.

It will go into 2 kegs, plus a few bottles just for the sake of it :)


TheWiggman said:
So much enthusiasm. Now I'll be reading all your posts in your voice. Think I've said it before, but good gear and you're a very lucky bloke with that dedicated area. Uneventful first brew all things considered, it'll be seamless before you know it.
Suggestion - why don't you heat up your strike water in the boiler? Get the HLT 2°C or so above mash temp for your HERMS, and then underlet your liquor to the mash from the boiler. That way you're ready to go off the bat.
I'm betting you'll get a drier beer than expected, but I think it'll be so many light years ahead of your previous brews it wouldn't even be notable.
I can only use one element at a time, they draw ~24amps and are on a 32amp circuit ... so its either heating the HLT or the BK. I guess I could heat up the HLT first, then heat the BK and undelet that into the MT once at temp and switch back to the HLT which would have only dropped a few degrees whilst the striker water was heating in the BK ...
 
Awesome video and setup. Great job getting your first brew in and hope Sat went well.

You should be able to get some 3/4“ inside x 1/2" thick insulation (black foam 'spaghetti sticks 1m long) at Bunnings. You picked that up though.

Since you are all electric, you should insulate your vessels, particularly the mash tun.

You could also install a switch on the HLT element to go from "HLT control" to "mash tun control". This should give you better ramp times and set point maintenance, but you will get more overshoot. You can help this by slowing the pump speed as you approach the set temperature, or with a solid auto - tune. This is where the 'D' in PID comes into it, but it's hard to fiddle with it unless you know what you're doing.

Happy brewing...
 
Adr_0 said:
Awesome video and setup. Great job getting your first brew in and hope Sat went well.

You should be able to get some 3/4“ inside x 1/2" thick insulation (black foam 'spaghetti sticks 1m long) at Bunnings. You picked that up though.

Since you are all electric, you should insulate your vessels, particularly the mash tun.

You could also install a switch on the HLT element to go from "HLT control" to "mash tun control". This should give you better ramp times and set point maintenance, but you will get more overshoot. You can help this by slowing the pump speed as you approach the set temperature, or with a solid auto - tune. This is where the 'D' in PID comes into it, but it's hard to fiddle with it unless you know what you're doing.

Happy brewing...
I'm really torn between insulating the MT with some insulating foil and then wood - they look beautiful from the ones I have seen, and very old world'ish, but then I'm hiding all the SS ... which at this point still has a lot of bling factor for me! Though from a practical perspective it would be more efficient as you mentioned, and with a nice timber (need to do some research on the best wood for the job) it will still look awesome!

I have loads to learn about PID's!!

Cheers
 
Crouch said:
I'm really torn between insulating the MT with some insulating foil and then wood - they look beautiful from the ones I have seen, and very old world'ish, but then I'm hiding all the SS ... which at this point still has a lot of bling factor for me! Though from a practical perspective it would be more efficient as you mentioned, and with a nice timber (need to do some research on the best wood for the job) it will still look awesome!

I have loads to learn about PID's!!

Cheers
Wood would be sexy, wouldn't it?

If you are going to, foam with wood on top would be about a million times more effective than foil underneath the wood. Foil is good for reducing heat loss from radiation, but doesn't do anything for contact or air circulation heat losses . And it with be doing zero with a dark layer of wood over the top (though the wood will do a bit) .
 
panzerd18 said:
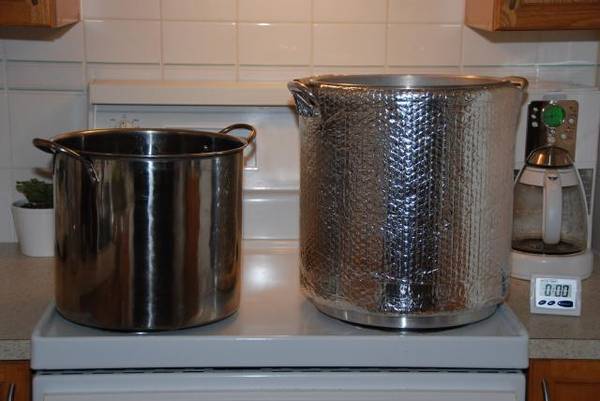
Insulation like this?

kettles.jpg
As long as there is something under the foil, eg foam. As you have it there the foil is on the outside (not hidden under dark wood) so being shiny it won't radiate a lot (good).
 
There are a few links floating around here for insulation people have used for kettles/mash tuns.

Being electric and a mash tun (<90°C) you have lots of options: I would say anything from a K-Mart yoga mat up to your top $$ stuff would work a treat. I would be leaning towards the yoga mat, and they come in some great colours...

When you have a fired kettle or you're up at 100°C the options are probably more limited. Something 'fire proof' generally means that it will not CATCH fire when heated; it doesn't mean it won't melt into delicious vinyl molasses when you put fire onto it. But if you can shield it from the flames of hell, it should be ok... i.e. a ring shield directly around your burner with a fairly tight/no gap - maybe a few slots to stop gas accumulating.

Or you can build a shield into your brew sculpture another way (again just talking burners here): e.g. cutting a burner-sized hole in your sculpture with the pot sitting flush on it. Then insulate around the sides with your weapon of choice applied with one of the good Silastic (Dow Corning) engineering silicones and strap it up for a few days while it cures.
 
How long are you fermenting for? Keen to see the results :)
 
Adr_0 said:
You could also install a switch on the HLT element to go from "HLT control" to "mash tun control". This should give you better ramp times and set point maintenance, but you will get more overshoot. You can help this by slowing the pump speed as you approach the set temperature, or with a solid auto - tune. This is where the 'D' in PID comes into it, but it's hard to fiddle with it unless you know what you're doing.

Happy brewing...
I was considering that on the same type of panel. A switch to change the PID controlling the SSR.
 
sjp770 said:
I was considering that on the same type of panel. A switch to change the PID controlling the SSR.
Yes, and that way you have two separate PID controllers controlling two separate systems which have different characteristics. But this is also why RIMS with an immersion heater is so good - direct control of the wort without the lag of a bit pot of water.

Anyway, as above it has its pluses and minuses which you just need to be aware of.

The BK should be controlled in manual IMO: just 70-100% output until it hits boiling temp, then whatever output (10-50%) to keep the boil you want. Should give awesome boil off consistency that way.
 

Latest posts

Back
Top