Show Us Ya Fridge - Mate

Australia & New Zealand Homebrewing Forum

Help Support Australia & New Zealand Homebrewing Forum:

This site may earn a commission from merchant affiliate links, including eBay, Amazon, and others.

Yob

Hop to it
Joined
14/11/09
Messages
15,035
Reaction score
6,410
Location
Ringwood, Melbourne
There are many and varied techniques we employ as HB's and I thought it would be good to get a visual if a search for temp controll.. and my own curiosity as well :D

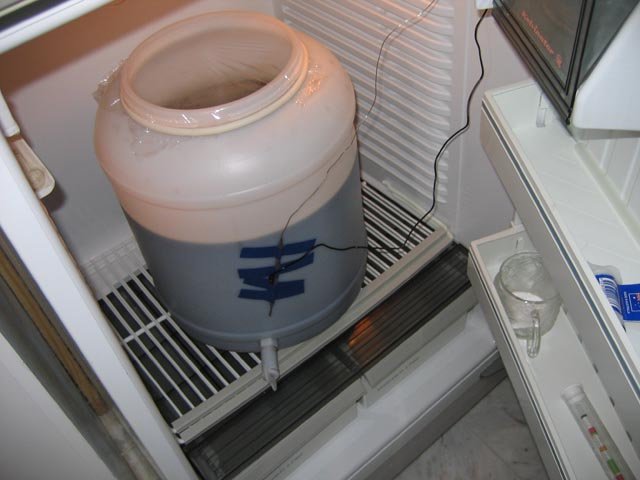
Note the structural reinforcement employed via whatever crap I had laying around to strengthen the shelf with a strut and footplate. Fermenter sits on a heat pad so +/- no drama, the only cost was a heat pad (and ive seen nifty cheap solutions to this, which Im sure will get picked up)

For my 3 pence Photos shown below. :p

1.JPG
 
I have nothing constructive to add.. but.... gotta say.. LOVE the homer sticker in ur fridge.
 
Mine is a 'fridge only' fridge; so I can get 2 fermentors in it.

Standard temp controller for cooling; no heating as it never really gets too cold.


My latest addition is a fan to ensure the air gets circulated from top to bottom as I recently found the bottom fermentor to be 1 degree warmer than the top. Geeze thats a good looking fan.

fridge_fan.jpg


QldKev
 
For my 3 pence Photos shown below. :p
I used to have the exact same fridge, but removed the door-crap and just squeezed 2 fermenters in it.
Added 2x 12V fans to circulate the air and it did well ... until I trashed it.

Now I've just got it all in a larger but older fridge that unfortunately only fits 1 fermenter at a time.
 
Beam me up :p does it destroy unsanitised girlfriends on radar aquisition?

I was hoping it would, but I got it from ebay for $4.59 (inc postage). At least it does move a lot of air.

QldKev
 
I used to have the exact same fridge, but removed the door-crap and just squeezed 2 fermenters in it.
Added 2x 12V fans to circulate the air and it did well ... until I trashed it.

Now I've just got it all in a larger but older fridge that unfortunately only fits 1 fermenter at a time.

A bit off topic here, but did you notice a loss in the fridge's insulation ability when you removed the inside door crap, Wolfy? Been planning on taking a jigsaw to the inside door panel on my brew fridge (gonna see if I can end up getting four fermenters into the beastie) but was wondering if I would need to patch up where I've cut with filler foam, or the like.
 
My latest addition is a fan to ensure the air gets circulated from top to bottom as I recently found the bottom fermentor to be 1 degree warmer than the top. Geeze thats a good looking fan.

Odd, I would have thought your bottom fermenter would be cooler than the top based on hot air rises.
 
There are many and varied techniques we employ as HB's and I thought it would be good to get a visual if a search for temp controll.. and my own curiosity as well :D

Note the structural reinforcement employed via whatever crap I had laying around to strengthen the shelf with a strut and footplate. Fermenter sits on a heat pad so +/- no drama, the only cost was a heat pad (and ive seen nifty cheap solutions to this, which Im sure will get picked up)

For my 3 pence Photos shown below. :p

Do you just run the power cable for the heating pad out the door of the fridge? I'm just about to set mine up and can't figure out how to get the power in to the fridge...
 
Odd, I would have thought your bottom fermenter would be cooler than the top based on hot air rises.


I can only assume the coolness is being transferred to the top fermentor better;
or that since it's an old fridge i'm loosing too much cold air out the bottom, but the seals do seem good.

QldKev
 
Do you just run the power cable for the heating pad out the door of the fridge? I'm just about to set mine up and can't figure out how to get the power in to the fridge...

Yeah mate just runs over the top seal with no drama, you can always spade bit a hole in the side and plug it up with expandable foam or summit like that too if you are feeling adventurous... my power cord hangs from a yard umbrella above so is easier for me to just cum out over the seal... :beerbang:
 
A bit off topic here, but did you notice a loss in the fridge's insulation ability when you removed the inside door crap, Wolfy? Been planning on taking a jigsaw to the inside door panel on my brew fridge (gonna see if I can end up getting four fermenters into the beastie) but was wondering if I would need to patch up where I've cut with filler foam, or the like.

If the 'inside door crap' - i.e. shelves, etc are being removed - this should not affect the foam in the door itself - I took off the whole inner door skin on my fridge and replaced it with a piece of laminated board.
 
If the 'inside door crap' - i.e. shelves, etc are being removed - this should not affect the foam in the door itself - I took off the whole inner door skin on my fridge and replaced it with a piece of laminated board.
What he said. :)

In particular if you look at the picture on the right in the first post, you'll notice that the 'holder' for the bottom shelf is still in place and the middle (and top shelf) 'bump' is still in place. The inner door shell and 'bump' is made from very thin plastic - so rather than remove the inner door skin - I just cut the 'bump' out with a Stanley Knife and then gaffer-taped over it.
 
If the 'inside door crap' - i.e. shelves, etc are being removed - this should not affect the foam in the door itself - I took off the whole inner door skin on my fridge and replaced it with a piece of laminated board.
Awesome, that's what I was looking for. I was just using the technical name for the shelves :rolleyes:

Just to keep things nice and off-topic here, but what's the best way to go about removing the inner-door shelving/cladding and still leave the foam in tact?

EDIT: Question already answered by Wolfy. Cheers guys!
 
What he said. :)

The inner door shell and 'bump' is made from very thin plastic - so rather than remove the inner door skin - I just cut the 'bump' out with a Stanley Knife and then gaffer-taped over it.

Wolfy,the 'bump' you speak of..
is that the freakin annoying 'bump' in the bottom? Whats behind it? I thought it might be the condensor for the fridge??
did you have a homer sticker on yours?
:party:
 
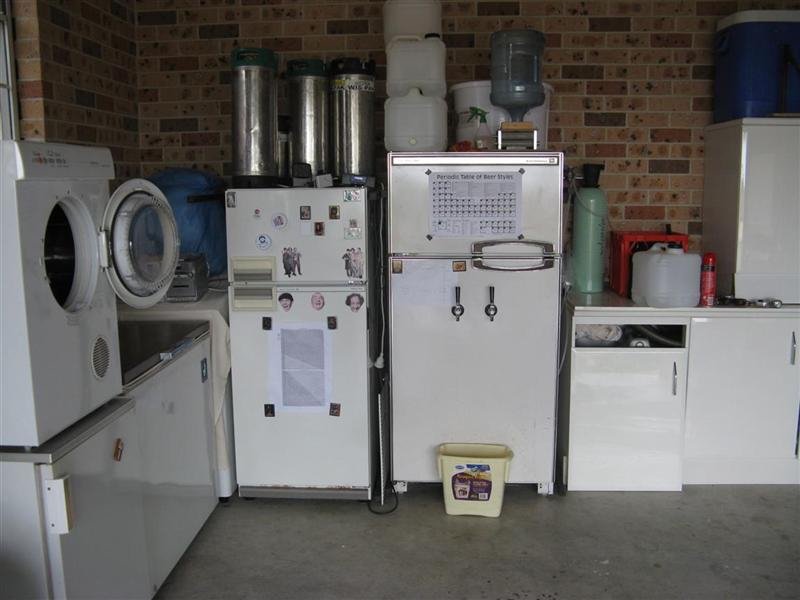
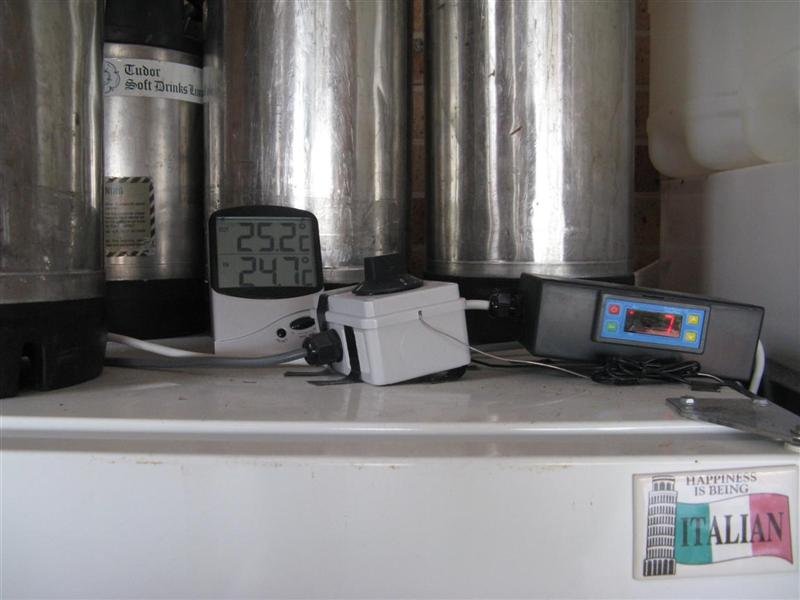
Adlo heat controller on fermenting fridge

Fridgemate on keg fridge

Cheers

Edit: Cortez The Killer

Sweet rigs... especially :wub: the twin tap fridge... I think Im in love... we were trying to count your containers/kegs and stuff today... care to clarify? Once again... Sweet Rig :icon_cheers:
 
is that the freakin annoying 'bump' in the bottom? Whats behind it? I thought it might be the condensor for the fridge??
By removing everything in the door and cutting out the door's middle-shelf-bump I found I could just squeeze two glad-wrap-topped-fermenters in.
 

Latest posts

Back
Top