DIY Braumonster

Australia & New Zealand Homebrewing Forum

Help Support Australia & New Zealand Homebrewing Forum:

This site may earn a commission from merchant affiliate links, including eBay, Amazon, and others.

NealK

Well-Known Member
Joined
28/2/12
Messages
400
Reaction score
150
This is my upgraded system for use with the brauduino controller. My last build is documented on here somewhere and was based on a 40L Birko urn. This new system is based around a 100L pot and an original Braumeister 50L malt pipe. I am hoping to be able to do 60+ litres when I have had a bit of practice with the system.
Here is how I did it.

Buy a big pot!
IMG-20170918-WA0004.jpg

Drill lots of holes in it.
IMAG0284.jpg

Insert all thread rod, skin fittings and heating elements
IMAG0287.jpg

Mount the whole lot on to an auto crate and plumb in the pump and wire in the elements and pump.
IMAG0291.jpg

I have chosen to have sockets on mine as it will be easier for swapping between systems and using the same control unit
IMAG0297.jpg

I also installed an extra tap for draining and cleaning.
IMAG0300.jpg

And now with the malt pipe and bottom filter in place
IMAG0302.jpg

The top filter is a large false bottom as used in Grain and Grape
IMAG0304.jpg

The elements I used are the bend it yourself type. The outer is 2.4kw and the inner is 1.8kw. I have done this so that I can run it off different circuits and do not need to upgrade my electrics.
I will post the cost of the build very soon if anyone is interested.
Cheers
Neal
 
looks pretty good, well done.

as a tip, put a second temp probe about 10cm above the wort outlet. This will help when chilling the beer with a IC, the temp probe gets covered with trub and cold break and doesn't give a accurate temp.
 
are you having male plugs for power in on 240V on those scockets?

If yes that seems like a death trap and i think you should swap to female sockets !!

that said nice looking build

edit
(iec would work better, as said below)
 
Last edited:
are you having male plugs for power in on 240V on those scockets?

If yes that seems like a death trap and i think you should swap to female sockets !!

that said nice looking build
Iec sockets are a good option as well.
 
I originally planned to have weatherproof sockets but I had these left over from upgrading some lighting in the house. They will be connected to the Brauduino like this
IMAG0305.jpg

The sockets will be upgraded at some stage but this will have to do for the moment
 
Where did you get your elements from?
Cheers
Bevan
The elements are from Thermal Products in Thomastown. They were easy to deal with and insisted on bending the right angles for me as they have a jig for it. Both elements cost $225 total.
 
looks pretty good, well done.

as a tip, put a second temp probe about 10cm above the wort outlet. This will help when chilling the beer with a IC, the temp probe gets covered with trub and cold break and doesn't give a accurate temp.
I generally no chill. I have recently got a plate chiller and it has a thermometer attached to it. I haven't used it yet as I am happy filling a couple of cubes from a single brew and making each one slightly differently. The test batch was an apa and one cube had calypso hops and the other had mosaic and melba. I am hoping to never run out of beer by always having a spare cube ready to ferment lying around the house.
 
I should point out that this has only happened because Black n Tan donated the malt pipe because he knew it would challenge me to do something with it. I also have to give him credit for any beers that are made on this system as this is an award winning malt pipe. Grant mate. your a legend, I wouldn't have made this if you hadn't put the idea in my head and given me the malt pipe and screens etc.
 
I originally planned to have weatherproof sockets but I had these left over from upgrading some lighting in the house. They will be connected to the Brauduino like this
View attachment 109254
The sockets will be upgraded at some stage but this will have to do for the moment

Nice death lead......
nothing like the possibility of bumping out a cable out from its socket and electrocuting yourself at the same time...
 
How do you know?
I know you think that little grey pump is no where near powerful enough to cause damage, but in reality it will bend that perf like fly screen. If you check through the original Matho's Controller thread, you'll see pics from Lael and Edak, of bent top plates. Be sure to use some rice hulls your first few brews till your dialed in.
 
I know you think that little grey pump is no where near powerful enough to cause damage, but in reality it will bend that perf like fly screen. If you check through the original Matho's Controller thread, you'll see pics from Lael and Edak, of bent top plates. Be sure to use some rice hulls your first few brews till your dialed in.
I did have that issue with my first build but the domed shape of the false bottom seems to work well. Grain and grape have been using this method for a while now with no ill effects. On the trial run that I did some grain did get through but this was because my crush was too fine. I also got some wort fountains which are a another fault created by too fine a crush. I will adjust my mill settings for the next brew but I think it will take a few brews to get it spot on.
 
Nice death lead......
nothing like the possibility of bumping out a cable out from its socket and electrocuting yourself at the same time...
mmmmmmmmm, point taken I am going to change those to iec connectors asap.
 
Nice build.
I just can't get my head around how the auto crate might last the distance though.
 
mmmmmmmmm, point taken I am going to change those to iec connectors asap.
I never picked up on the fact you may have had a supply wired to a plug.... sbob was right to comment. That $hits not good at all. Especially if a kid unplugs it and has exposed mains in his hand.

Just saying.
 
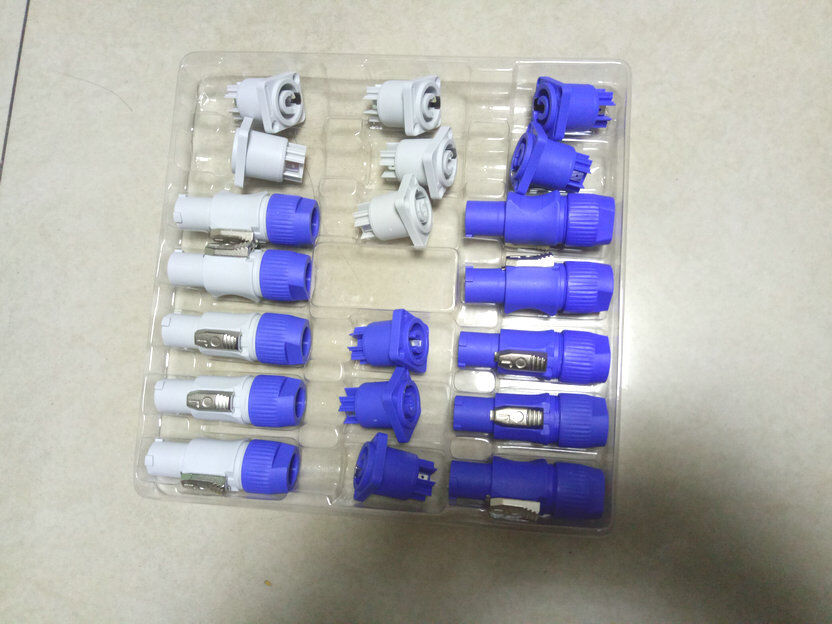
I obviously wasn't thinking straight when I decided to put the sockets on the side. I have now ordered these:
s-l1600.jpg

They will be nice and safe and I will have enough to change the connections on the new and old systems and have a few spares for future projects.
 
I obviously wasn't thinking straight when I decided to put the sockets on the side. I have now ordered these:
s-l1600.jpg

They will be nice and safe and I will have enough to change the connections on the new and old systems and have a few spares for future projects.

Hi NealK, where did you purchase these from and what was the cost?
 
Back
Top