


djar007
Well-Known Member
This is looking like it is going to be a good thing. I just bought a brewpi and it is awesome. This new brewpi has heaps of potential as a full brewery controller. I am definitely going to be grabbing one of these.
No affiliation etc.
Introducing the BrewPi Spark
It has been a long time since we last posted an update on our blog, so this is going to be a big one. We are proud to announce a new version of our hardware, the BrewPi Spark!
The BrewPi Spark will replace the BrewPi Arduino Shield. We shipped about a 1000 BrewPi Arduino shields since we first released them. The Arduino was an excellent platform for us to grow but we are running into its limits. With the BrewPi Spark, we are leaving the Arduino platform and are switching to the much more powerful Spark Core. With on board WiFi, it really is the ideal platform for an Internet connected brewing controller. Please see the images below for a quick overview.
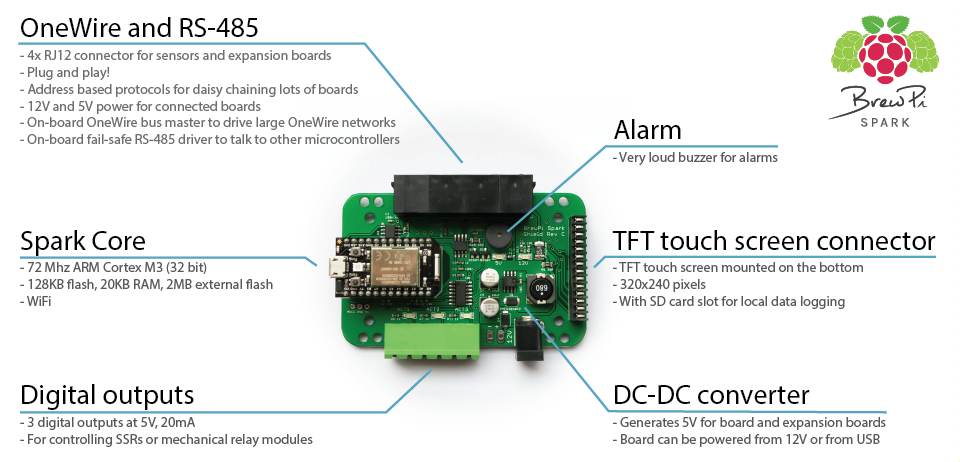
The BrewPi Spark
With this switch to a new platform, we decided to do a complete redesign of our hardware. We learned a lot from making the Arduino version of BrewPi and decided to do a major overhaul to address a few key issues:
Plug an play
The Arduino Shield came with a bag of parts, a separate display, Arduino and lots of panels to build the case. Assembling your brewing controller took a lot of steps, which where not all easy. With the new BrewPi Spark, we decided to not leave assembly to the end user. It will come inside an very pretty enclosure, ready to use. Just plug in your sensors and play!
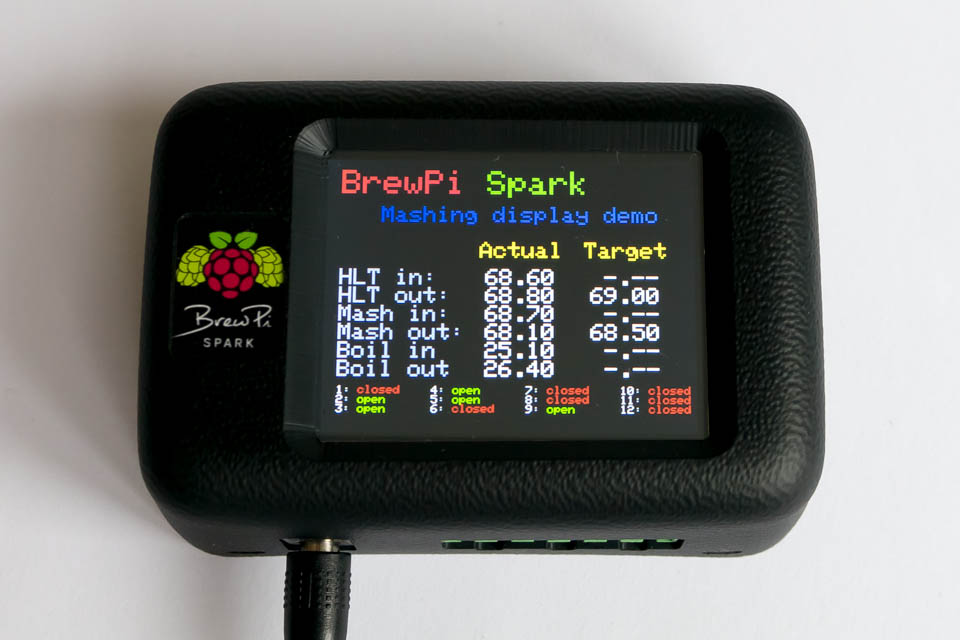
A better display and menu
The character LCD on the Arduino version could only fit 80 characters. To display beer, fridge and room temperature, we had to alternate what was displayed on the screen. With our new 320×240 color TFT touch screen, we can fit 1500 characters in the smallest font. So there is plenty of space to display all your settings and temperatures.
The touch interface will also be a lot more intuitive to use.
Reliability
We took 3 steps to increase reliability of the system:
The BrewPi Spark has an SD card slot for local data logging, in case WiFi is not available.
Modular and expandable
The BrewPi Spark is designed to be a central control unit for your entire brewery. So why does it only have 3 outputs and 4 inputs? (Hint: it doesn’t).
Almost all brewing panels I have seen so far have a central control panel with a wire going to every sensor. When I started designing my mashing system, I quickly realized that this would become one big mess of wires: my HERMS has 6 temperature sensors, 12 motorized ball valves, 2 pumps and 2 heating elements. So I needed a different solution, and that was address based communication.
Each RJ12 socket on the BrewPi Spark has the same 6 signals:
So how does that work in a brewing setup? Here is a sneak preview of my HERMS. In a future blog post I’ll tell you everything about it. It really deserves its own post.
As I said before, my HERMS has 6 temperature sensors and 12 ball valves, controlled by 6 dual ball valve controllers. These are all on the same OneWire bus. In the photo below, you can see 6 of my ball valves, which determine to which kettle the water or wort is pumped.
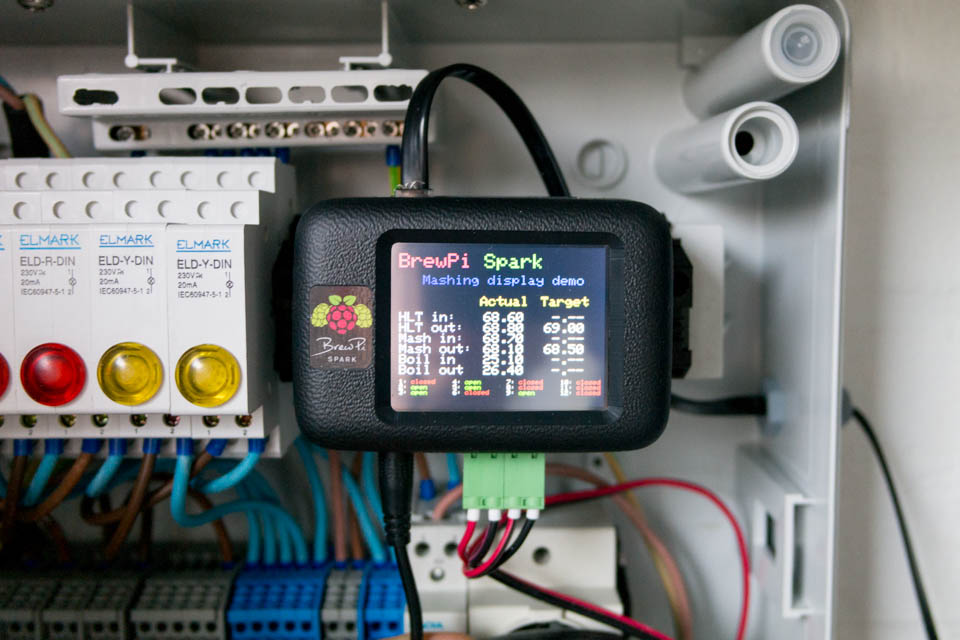 Here is the controller in my HERMS control panel. As you can see, only a single cable comes out at the top. This cable connects to all sensors and ball valves in my setup.
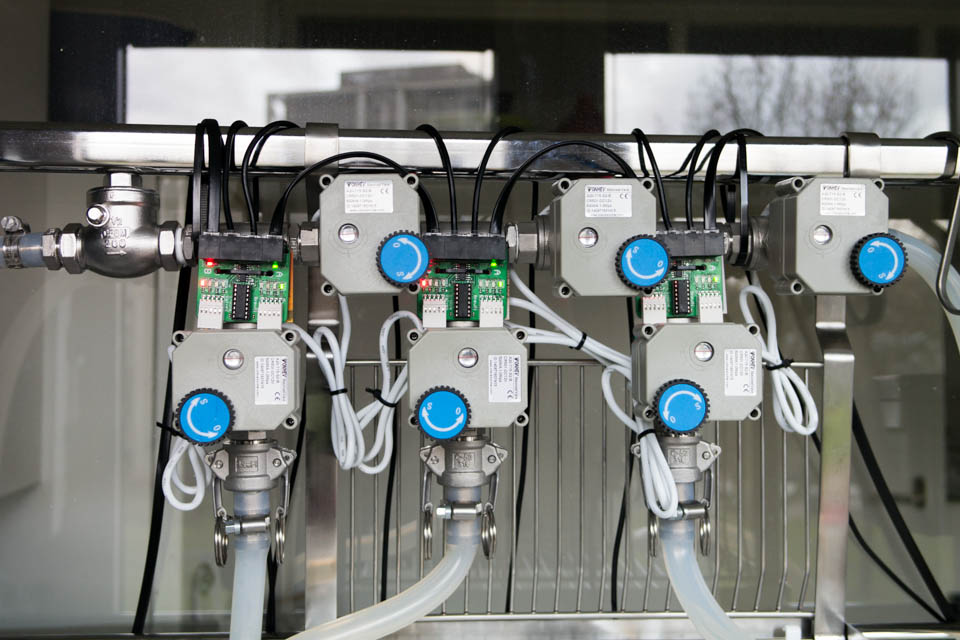 My ball valve controllers, daisy chained with temperature sensors in between.
In the photo you can see 12 RJ12 sockets and plugs (3 x 4). The leftmost cable comes from the control panel. The fourth cable in each block daisy chains to the next block. In the middle of each block, 2 temperature sensors are connected. Here you can really see the benefit of a bus protocol: wiring is a piece of cake!
Multiple fridges? Mash and fermentation control together?
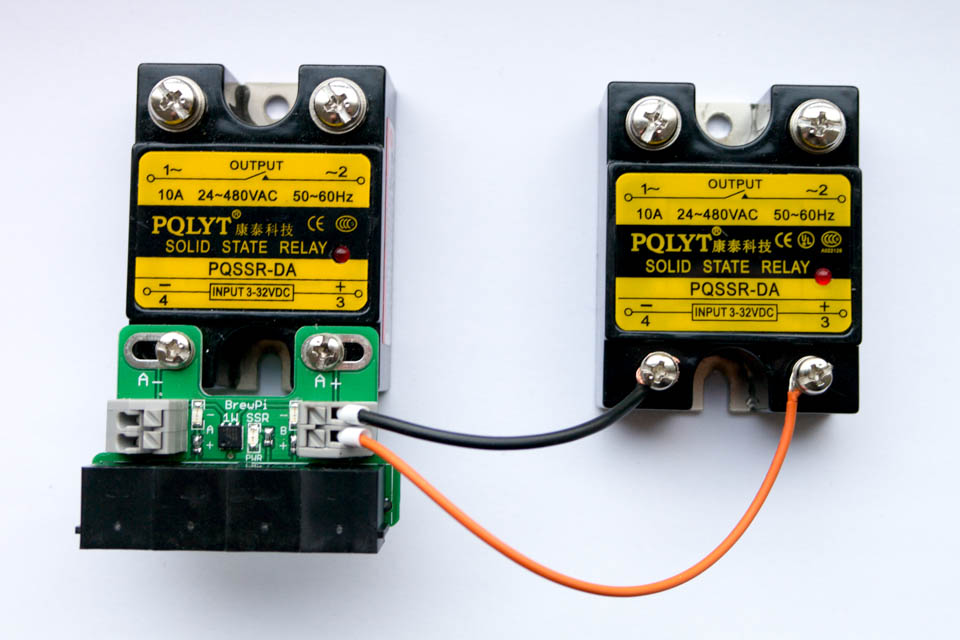
The Spark Core is powerful enough to run multiple control loops at once. So you should be able to just run an RJ12 cable to your fridge on the other side of your brewery and set up another controller in the software. To make it easy to do this, we are going to sell an SSR expansion board. It is controlled by OneWire and drives 2 SSRs. It has 4 RJ12 sockets, so minus the cable coming in, you have room left to plug in 3 temperature sensors.
New temperature sensors
From now on, we are going to sell our OneWire temperature sensors with an RJ11 plug (RJ11 connects to middle four pins in RJ12 sockets). They will still have silicone cables and will be guaranteed water and high temperature proof. We increased the cable length to 1.5m.
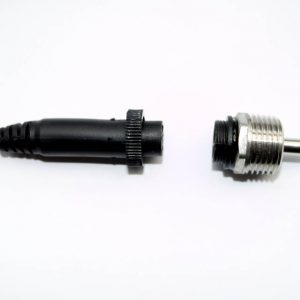
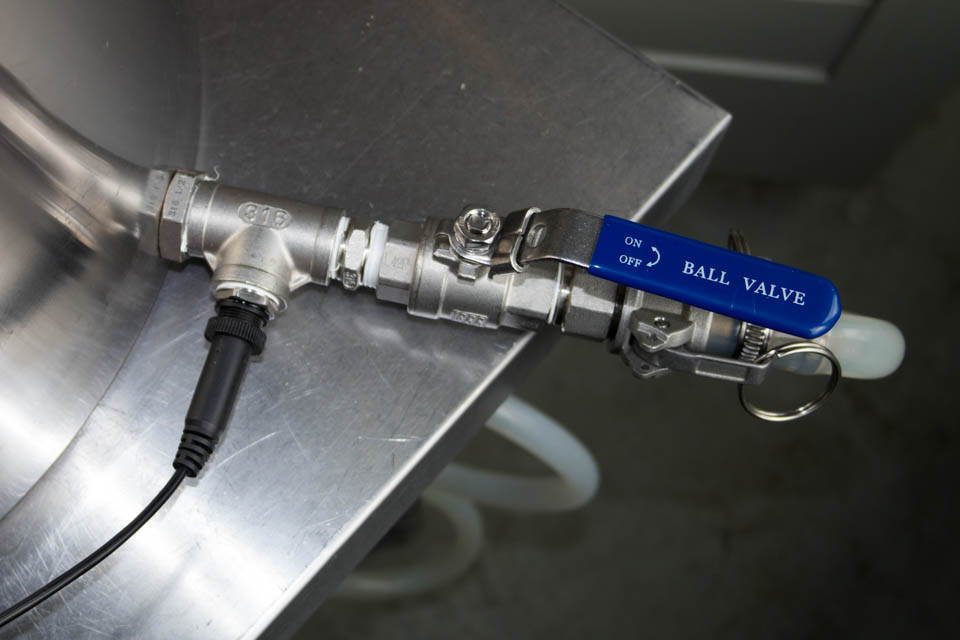
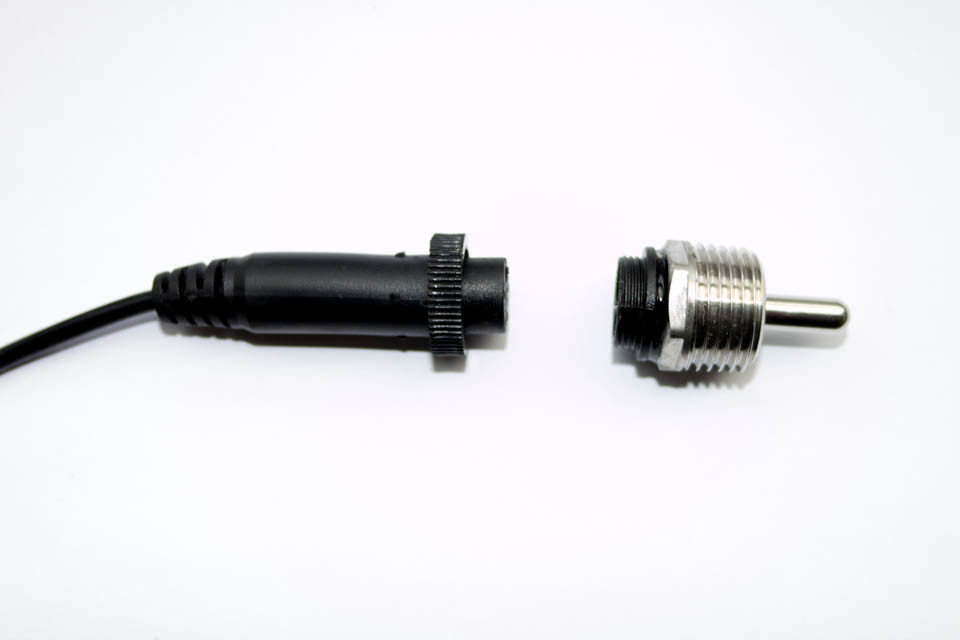
Next to the standard temperature sensors, we will also offer threaded OneWire sensors that can fit into a BSP or NPT tee. The cables can be disconnected for when you need to clean your kettle.

What about the Raspberry Pi?
BrewPi will still use the Raspberry Pi for the web interface and for data logging: the Spark Core is not powerful enough to host a website. But without the need for a USB connection between the controller and the pi, it will be easier to swap out the Pi for a different web server.
With this combination of an embedded device for control and a (mini) computer to host a web interface you get the best of both worlds: The reliability of an embedded platform and a beautiful web interface.
In the future, we will also support connecting multiple Spark cores to a single web interface.
What about the Spark Photon?
The Photon is the successor of the Spark Core and will come out in March 2015. They managed to cut the price in half, while increasing the processor speed and memory space. It is pin compatible with the current Spark Core, so we decided not to wait for its release and work with the currently available hardware.
When can I order?
The controllers are almost ready, the enclosures are still being manufactured. Due to the Christmas holiday, I probably cannot ship the first units until January.
I have not found the the time yet to get our new web shop ready for pre-orders: making the controller, building my HERMS, testing, it was all a lot of work.
Because many people have inquired about giving BrewPi as a Christmas gift, I still wanted to announce our new controller today. Now you know why the old controller is out of stock!
What will they cost?
The BrewPi Spark, fully assembled with a Spark Core, inside will cost 125 euro. If you already have a Spark Core, you can buy the board, display and enclosure for 95 euro.
No affiliation etc.
Introducing the BrewPi Spark
It has been a long time since we last posted an update on our blog, so this is going to be a big one. We are proud to announce a new version of our hardware, the BrewPi Spark!
The BrewPi Spark will replace the BrewPi Arduino Shield. We shipped about a 1000 BrewPi Arduino shields since we first released them. The Arduino was an excellent platform for us to grow but we are running into its limits. With the BrewPi Spark, we are leaving the Arduino platform and are switching to the much more powerful Spark Core. With on board WiFi, it really is the ideal platform for an Internet connected brewing controller. Please see the images below for a quick overview.
The BrewPi Spark
With this switch to a new platform, we decided to do a complete redesign of our hardware. We learned a lot from making the Arduino version of BrewPi and decided to do a major overhaul to address a few key issues:
Plug an play
The Arduino Shield came with a bag of parts, a separate display, Arduino and lots of panels to build the case. Assembling your brewing controller took a lot of steps, which where not all easy. With the new BrewPi Spark, we decided to not leave assembly to the end user. It will come inside an very pretty enclosure, ready to use. Just plug in your sensors and play!
A better display and menu
The character LCD on the Arduino version could only fit 80 characters. To display beer, fridge and room temperature, we had to alternate what was displayed on the screen. With our new 320×240 color TFT touch screen, we can fit 1500 characters in the smallest font. So there is plenty of space to display all your settings and temperatures.
The touch interface will also be a lot more intuitive to use.
Reliability
We took 3 steps to increase reliability of the system:
- Sensors now come with RJ11 connectors
- High quality push-fit terminal blocks for the SSRs: easier to use and more reliable than the previous screw terminal blocks.
- An on board OneWire bus master with strong pull-up. This will increase reliability in large OneWire networks.
The BrewPi Spark has an SD card slot for local data logging, in case WiFi is not available.
Modular and expandable
The BrewPi Spark is designed to be a central control unit for your entire brewery. So why does it only have 3 outputs and 4 inputs? (Hint: it doesn’t).
Almost all brewing panels I have seen so far have a central control panel with a wire going to every sensor. When I started designing my mashing system, I quickly realized that this would become one big mess of wires: my HERMS has 6 temperature sensors, 12 motorized ball valves, 2 pumps and 2 heating elements. So I needed a different solution, and that was address based communication.
Each RJ12 socket on the BrewPi Spark has the same 6 signals:
- OneWire
- RS-485 (2 pins)
- 12V
- 5V
- GND
So how does that work in a brewing setup? Here is a sneak preview of my HERMS. In a future blog post I’ll tell you everything about it. It really deserves its own post.
As I said before, my HERMS has 6 temperature sensors and 12 ball valves, controlled by 6 dual ball valve controllers. These are all on the same OneWire bus. In the photo below, you can see 6 of my ball valves, which determine to which kettle the water or wort is pumped.
In the photo you can see 12 RJ12 sockets and plugs (3 x 4). The leftmost cable comes from the control panel. The fourth cable in each block daisy chains to the next block. In the middle of each block, 2 temperature sensors are connected. Here you can really see the benefit of a bus protocol: wiring is a piece of cake!
Multiple fridges? Mash and fermentation control together?
The Spark Core is powerful enough to run multiple control loops at once. So you should be able to just run an RJ12 cable to your fridge on the other side of your brewery and set up another controller in the software. To make it easy to do this, we are going to sell an SSR expansion board. It is controlled by OneWire and drives 2 SSRs. It has 4 RJ12 sockets, so minus the cable coming in, you have room left to plug in 3 temperature sensors.
New temperature sensors
From now on, we are going to sell our OneWire temperature sensors with an RJ11 plug (RJ11 connects to middle four pins in RJ12 sockets). They will still have silicone cables and will be guaranteed water and high temperature proof. We increased the cable length to 1.5m.
Next to the standard temperature sensors, we will also offer threaded OneWire sensors that can fit into a BSP or NPT tee. The cables can be disconnected for when you need to clean your kettle.
What about the Raspberry Pi?
BrewPi will still use the Raspberry Pi for the web interface and for data logging: the Spark Core is not powerful enough to host a website. But without the need for a USB connection between the controller and the pi, it will be easier to swap out the Pi for a different web server.
With this combination of an embedded device for control and a (mini) computer to host a web interface you get the best of both worlds: The reliability of an embedded platform and a beautiful web interface.
In the future, we will also support connecting multiple Spark cores to a single web interface.
What about the Spark Photon?
The Photon is the successor of the Spark Core and will come out in March 2015. They managed to cut the price in half, while increasing the processor speed and memory space. It is pin compatible with the current Spark Core, so we decided not to wait for its release and work with the currently available hardware.
When can I order?
The controllers are almost ready, the enclosures are still being manufactured. Due to the Christmas holiday, I probably cannot ship the first units until January.
I have not found the the time yet to get our new web shop ready for pre-orders: making the controller, building my HERMS, testing, it was all a lot of work.
Because many people have inquired about giving BrewPi as a Christmas gift, I still wanted to announce our new controller today. Now you know why the old controller is out of stock!
What will they cost?
The BrewPi Spark, fully assembled with a Spark Core, inside will cost 125 euro. If you already have a Spark Core, you can buy the board, display and enclosure for 95 euro.